


Happy Halloween! I hope you all had a blast this past weekend getting into this spooky holiday, I know I did. This year's costume required by far the least amount of effort in comparison to years past. I just don't have as much free time as I used to, but they seemed to carry instant recognition and the possibilities are endless. Just pick an animal, Google their tag information and you've got yourself a costume. We decided on "Squealer" he pig, "Manchu" the panda bear, and "Chocolate" the moose.
Since today is the real Halloween and I am far to old to be trick-or-treating I will be spending my night attempting some creamy pumpkin soup and searching for one of my favorite Halloween movies, "The Nightmare Before Christmas". I wish I lived closer to my family to see all my little cousins adorable costumes. How do you guys spend Halloween?


I got a haircut from Edward Scissor-hands, jealous?
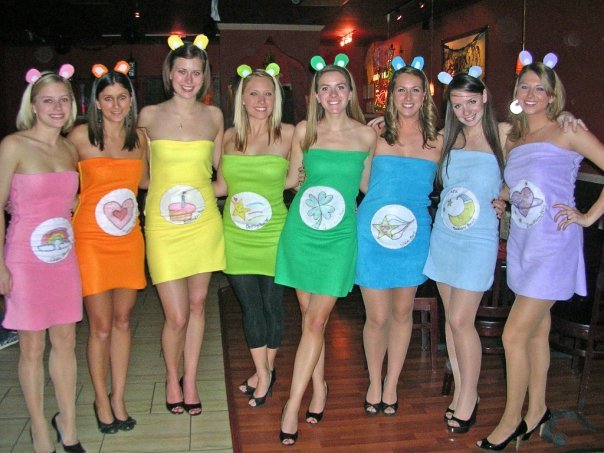

Look familiar? That’s because they are! All you need to do is follow the exact directions to make the dress from here but use fleece fabric instead (SO cozy!). Pair that with the headband instructions from here (obviously switch out a flame for two bear ears) and you’ve got yourself a whole new costume. We traced a plate to make perfect circles on pieces of felt and then had the craftiest ones of the bunch draw the pictures for our tummies. I can also attest they transition into PJ’s quite nicely as I actually ended up sleeping in mine that night (oh Halloween shenanigans…oops).


Ingredients (served four)
Four green
peppers
1 can black
beans
1 onion
(chopped)
1 clove
garlic (minced)
1lb Ground
beef
1 Bag of
minute rice
1 Can tomato
soup
1/4th
red pepper (chopped)
1 bag
shredded cheddar cheese
2
tablespoons olive oil
Directions
1. Wash and slice the rounded bottoms off of your peppers so they stand up straight. Slice an inch off the tops and then chop them (minus the stem) and set aside. Place them in a baking dish lined with aluminum foil.

2. Add a little olive oil to a pan. Sautee the meat, chopped onion, green &
red peppers, and garlic. You can also
season to taste here with salt and pepper.
3. When the meat is partially browned, add the tomato soup (do not add 1 can water).


4. After the meat has fully browned up, cook your minute rice in the microwave and add this to the mixture along with the black beans. When the peppers have become tender and the meat is cooked you can remove from heat and stuff into peppers.
5. Sprinkle cheese on the top of each one and bake at 400 for about 15 minutes or until cheese is melted over top & enjoy! They were so delicious we ate them up before I got to take a picture of the finished product but you get the idea :)


I just recently tried out a newer restaurant in my neighborhood called "Rustico" and was really pleased with the overall experience, especially for a Tuesday night. Aside from having to wait to be seated until our entire party arrived it was really great all around. Thier beer menu is 15 pages long! (you can view it here it's pretty amazing) and it's only a few steps away from my apartment (which may have something to do with my new adoration for the place). I only had my phone camera but here are some shots of the delicious food. They seem to be known for their artisan pizza. They had a bunch of really creative ones available including pumpkin, grilled mushroom, and spicy shrimp but I opted for the most basic one. I am pretty picky about my pizza (more so the sauce) and I have to say this one gets my stamp of approval! It was so good I ate the entire thing (when I probably should have taken home a few slices as leftovers..oops).
 |
| Laur & Megs |
 |
| Meatball Lettuce Wraps (on a cute piggy cutting board) |
 |
| Basil & Fresh Mozzarella Pizza |
 |
| "Ichabod" Pumpkin Ale |


I'm starting to feel Halloween in the air and abcfamily has finally started their 13 days of Halloween movie marathon (schedule here). Hocus Pocus is on tonight and is also my favorite!
I have to say of all the costumes I have stuffed myself into over the years, this one was by far the easiest to assemble. It was also probably one of the most fun to wear because it was so comfortable, and instantly recognizable. I did spend a chunk of the night re-adjusting my moustache and picking hairs from my drink (it was well worth it but also had me wondering how guys with real ones do it every day without getting things stuck up in there?) and I can’t even count how many times I shouted the phrase “IT’S A ME, MARIO!” (aka my favorite part of this entire operation).
Supplies
Short-alls (we nabbed ours from Forever 21last year the exact ones aren’t available anymore but these are even cuter and would totally work)
Red & green t-shirts
Yellow & white felt pieces (one of each is all you need)
Black puffy paint
White gloves
Red & green newsboy hats (we got ours on Amazon)
Hot glue
Assembly
To make the hats just cut two circles from the white felt and use the black puffy paint to make either an “M” or an “L” and then glue it to the front of your hat (let black paint dry before wearing).
Cut two smaller circles from the yellow felt. Paint on four little dots to make them look like buttons and let dry. Now glue to the front of your over all hooks (after you put them on.. otherwise you can’t undo them). Everything else is pretty self explanatory.
 |
| It's a me! |


Our friend Lauren was the question box! How awesome is that?


I saw these on pinterest.com and IMMEDIATELY needed to try making
them. It just so happened that my
parents were also visiting from out of town to be touristy and see all the DC monuments.
Sorry Mr. Lincoln, but they were my Dad’s
favorite part of the whole weekend. They're super easy, especially bc I skipped the graham
cracker crumbs (just didn’t want them on there but would be a quick addition).
Ingredients
1 Lb. large
strawberries, scooped out (with paring knife)
1 Package
cream cheese
3
Tablespoons of powdered sugar
1Tablespoon
vanilla extract
Crushed Graham
Crackers (optional)
1. Rinse and then scoop out centers of
berries with your paring knife and set aside.


2. Mix all other ingredients together and stuff into berries (I used a piping bag but you can just as easily spoon it in)
3. If you decide you want gram cracker crumbs on top then just grind a few crackers up and either dip them into it or sprinkle over top.
 |
| Yum! |

I have been promising my friend I would do something with this gorgeous sea glass we found in Bermuda a couple of years ago and I finally got around to it one lazy Sunday. Since my friend is getting married by the beach, I figured this would be a cute way to use it.
1. I wanted to incorporate it into a frame somehow, but I knew there wasn’t enough to go all the way around. My solution was to only do a couple sides in a mosaic fashion.
2. I really wanted the driftwood effect but driftwood = expensive so I got a plain wood frame from Michaels, used a dark wood touch up marker to stain it brown, and then used white paint over it. The brown shows through just the right amount.
3. I used nail polish to personalize the frame with their last name.
4. I still might give it a quick varnish (still undecided) but here’s the finished product J


I volunteered to make cupcakes for a coworker's wedding shower at work. At first I wasn't sure what flavor I should do because I wanted to keep it simple and classy, but I’m totally over vanilla and chocolate cake right now. Then I remembered that it’s one of my favorite months of the year, one that warrants pumpkin flavored anything, any time of day. These cupcakes are SO amazing. Seriously! I can’t take credit for the original recipe, it’s one by Martha Stewart and she really knows her stuff. All I did differently was add 1/8th teaspoon of ground ginger, skipped the sage, and used salted butter (instead of unsalted). Just the smell of the cake batter had me cupcake-drunk. I decided a spiced cream cheese icing would be a great match for this particular cupcake (I have seen this combo everywhere recently). They also needed some little love or wedding indicator so I made chocolate hearts to top them off. Aren't they cute?
Brown Butter Pumpkin Cupcakes (Martha Stewart Cupcakes)
3/4 cup butter
1 2/3 cup all-purpose flour
2 teaspoons baking powder
1 teaspoon salt
1/2 teaspoon cinnamon
1/4 teaspoon freshly grated nutmeg
1/8 teaspoon ground cloves
1/8 teaspoon ground ginger
1 cup pumpkin puree (not pie filling)
1 cup packed light-brown sugar
1/2 cup granulated sugar
2 large eggs
1. Preheat oven to 325 F. In a pan, melt the butter over medium heat until butter turns brown. Skim foam from top, and remove from heat. Pour into a bowl and leave any burned sediment behind. Let cool.
2. Whisk together flour, baking powder, salt, cinnamon, nutmeg, (ginger), and cloves. In another bowl, whisk together the pumpkin puree, both sugars, eggs, and brown-butter mixture. Gradually add the dry ingredients to the wet until until completely blended.
3. Bake for about 20 minutes.
Spiced Cream Cheese Icing
Just follow this exact recipe and add a teaspoon of cinnamon, 1/8th teaspoon of nutmeg, an 1/8th a teaspoon of ginger, and the tiniest bit of ground cloves (less than 1/8th teaspoon). Frost with a 1M tip.
Chocolate Hearts
Melt ¾ cup semi-sweet chocolate chips using the defrost setting on your microwave in 45 second intervals. Stir between the intervals. Use a piping bag to make heart shapes on wax paper and top your cupcakes when they are dry.


These costumes are even easier than the crayons and who doesn’t love cupcakes? They cost very little to make and are super comfy.
What you need:
Matching white (or whatever color) tank tops for the “candle stick”
Brown opaque tights (or white if you want to be vanilla?)
A headband covered in cloth (so you can glue or sew the flame onto it)
One piece of felt in every color: red, orange, yellow, green, blue, pink, purple, & white (to make the flame and sprinkles).
Four yards of tulle in your choice color (I am chocolate here)
One yard of elastic
Small piece of cardboard
Hot glue gun/glue sticks
Flame headband:
1. Draw the shape of the flame for your head on the piece of cardboard and cut it out.
2. Trace it on your yellow felt and cut one piece for both sides and glue around the cardboard. Cut smaller orange flames and glue them onto each side as well.
3. Hot glue (or sew) the bottom of the flame to your headband and wear!
Tutu (frosting):
1. Cut your tulle into as many 6 inch wide by 3 feet long strips as it will make.
2. Lay out your elastic into a straight line. Take a strip of tulle and fold in half (lengthwise) over the elastic making an “A” shape (the elastic is the middle line)
3. Now pull the two legs of your “A” and put them under the elastic, through the top of the “A” and pull tight.
4. Do this with every strip of tulle you made, sliding the ties close together as you do it. This makes the full tutu.
5. Cut your felt into little oblong ovals for sprinkles (I did 20 of each color) and hot glue them to the tulle, make them more concentrated at the waistline and getting sparser at the bottom.
6. Now walk your “sweet” ass to that Halloween party!


These are great because they are so versatile. If you're just going for coffee, out on the town, or even to a special event, you can get away with this do. The best part is as far as styling goes, its low on the skill-scale.
 |
| My guinea pig, Lauren. |
2. Now separate the top half into four layers of hair. Leave the first layer of hair closest to your forehead alone. It needs to stay smooth to go over the teased layers. Tease the middle two with hair spray and a comb or brush at the very bottom. Start with the second layer, then the third.
3. For those with thicker hair use that fourth layer to make a little bun with some bobbi pins for extra "oomph." Those with thinner hair can just tease this one as well.


 |
| Make a baby bun with that twist of hair. |
4. Now Pull all the layers back over the bun and pin it there, then take all of the hair (including the hair pined over the bun) and put it in a hair elastic.
5. Take a small piece of hair from the bottom of the elastic and wrap it around the band to make it invisible. Secure with bobbi pins.

6. Take out the pins holding the hair over the bun and you are finished!

 |
| Isn't this awesome? |
 |
| This is one I did SANS-bun in extra thin hair (same result). |
Subscribe to:
Posts (Atom)

Social Icons