
Showing posts with label recipe post. Show all posts
Showing posts with label recipe post. Show all posts
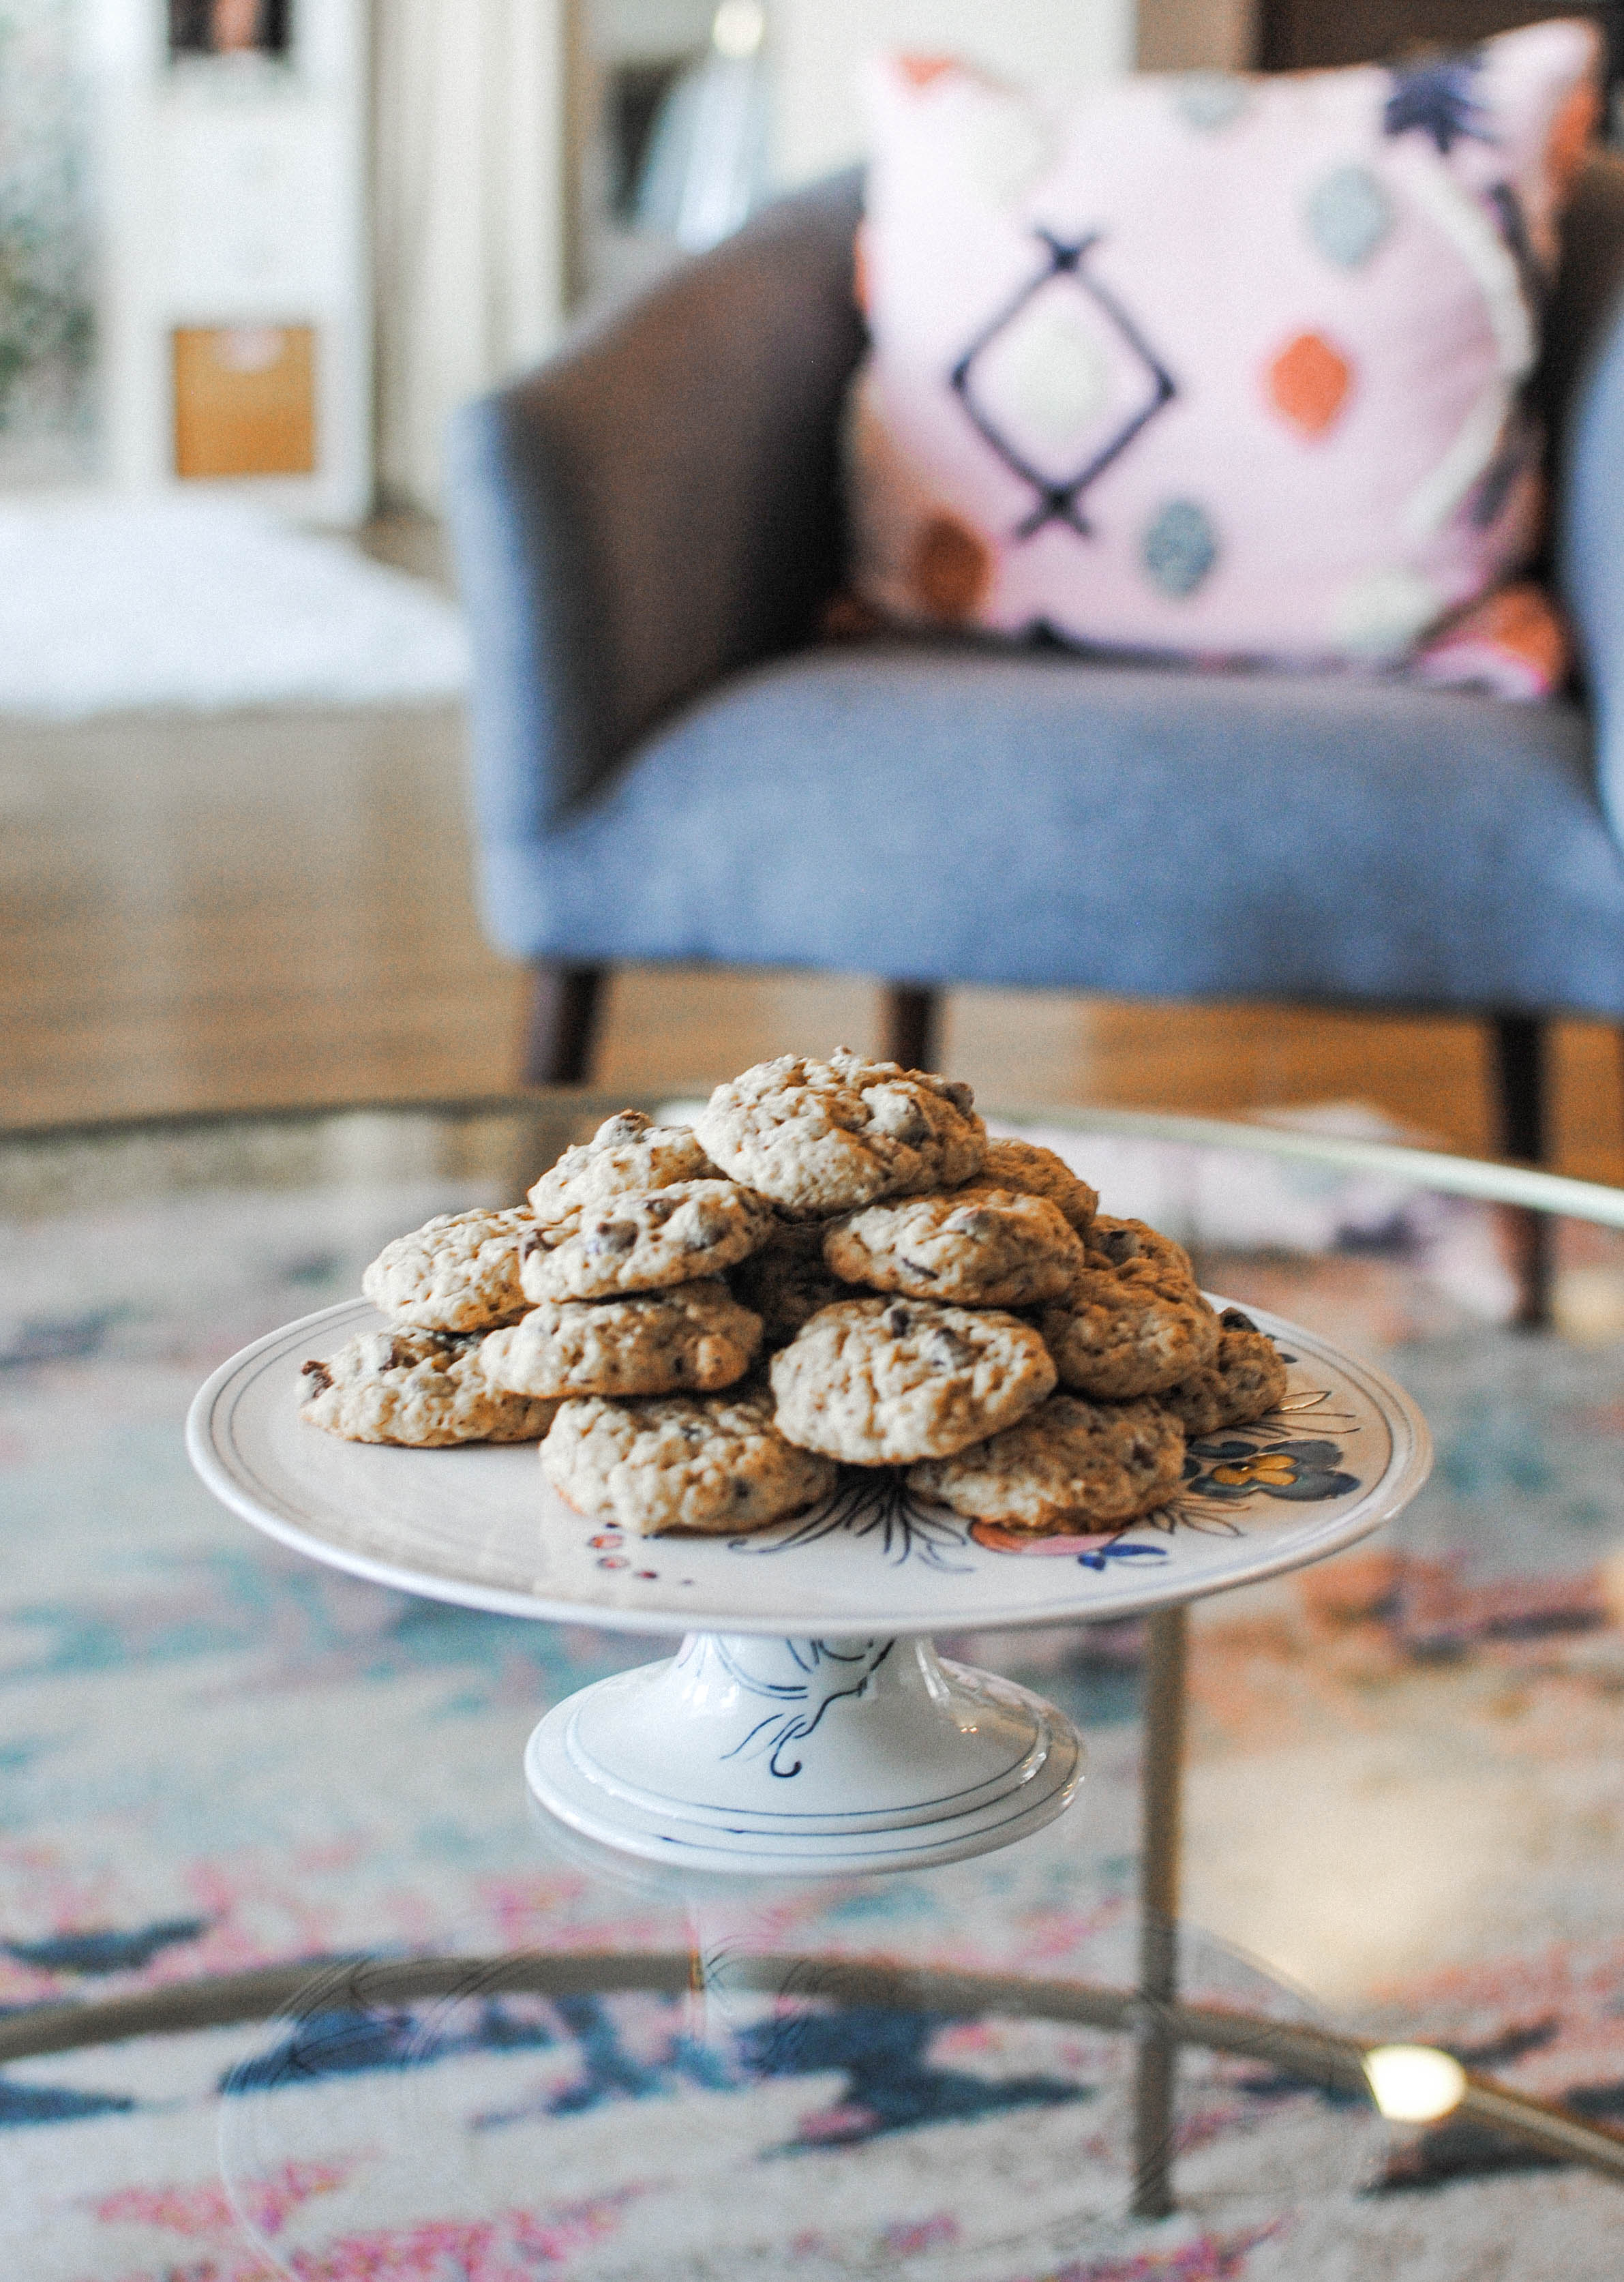
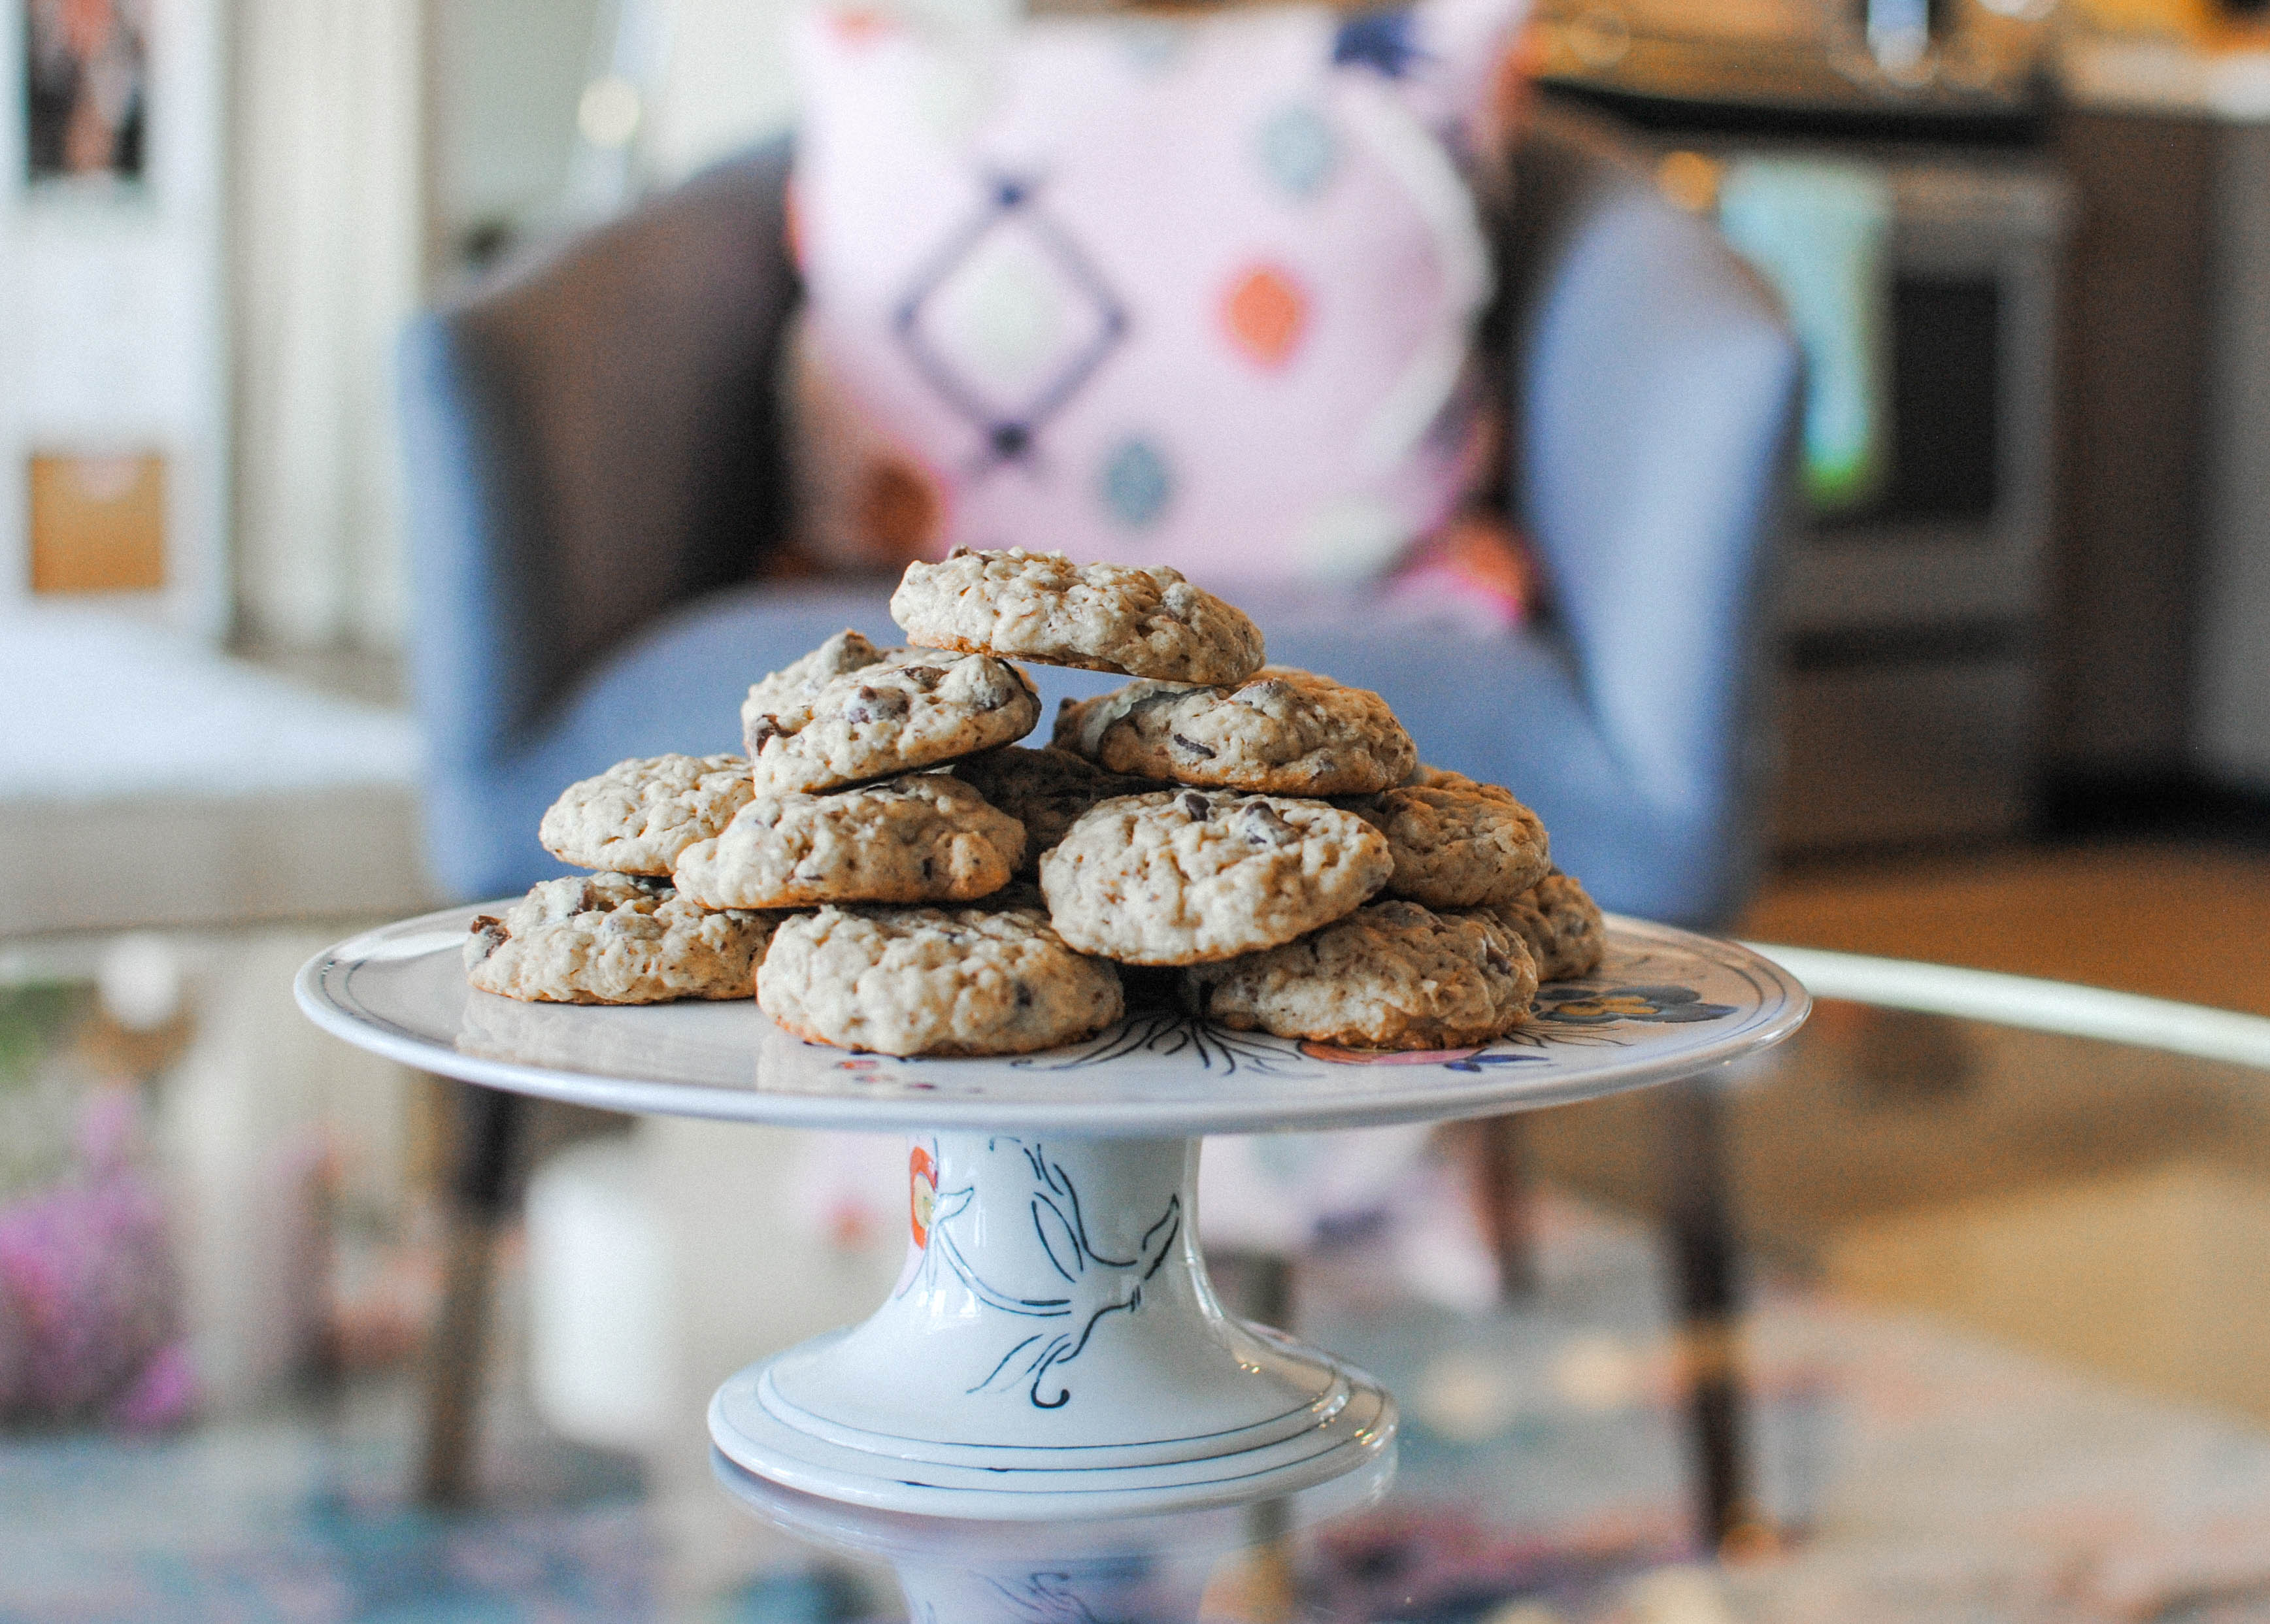
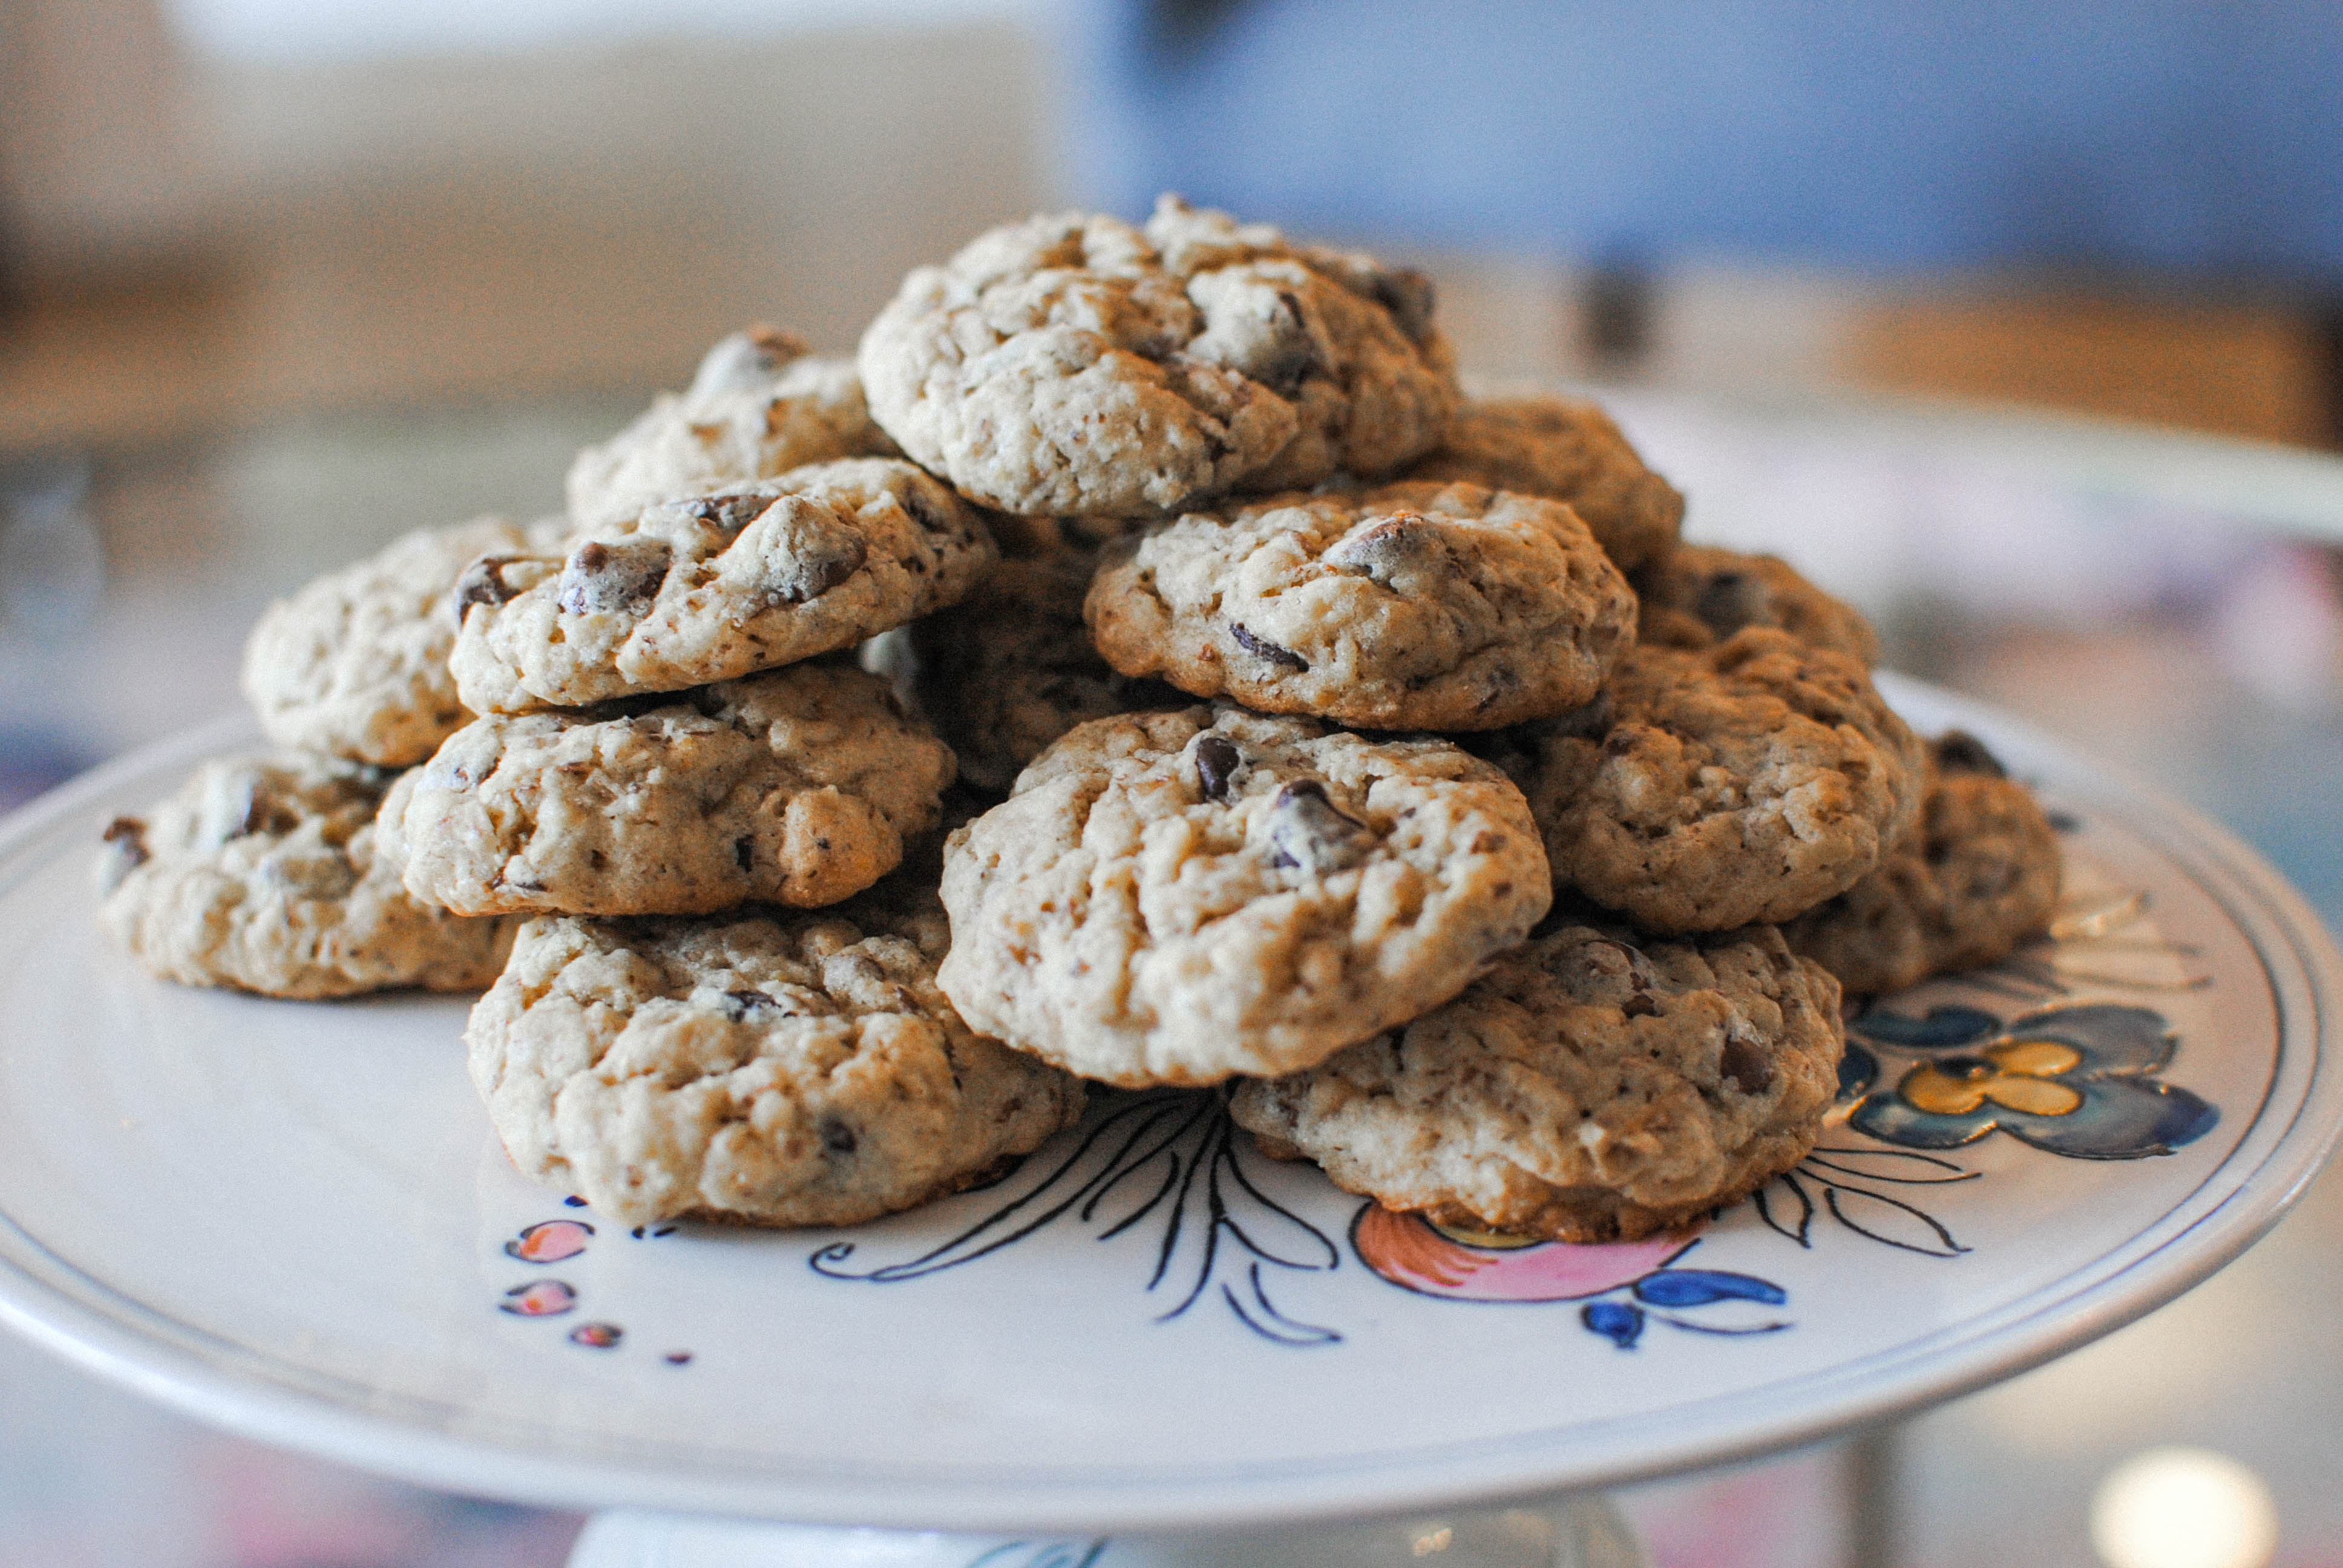
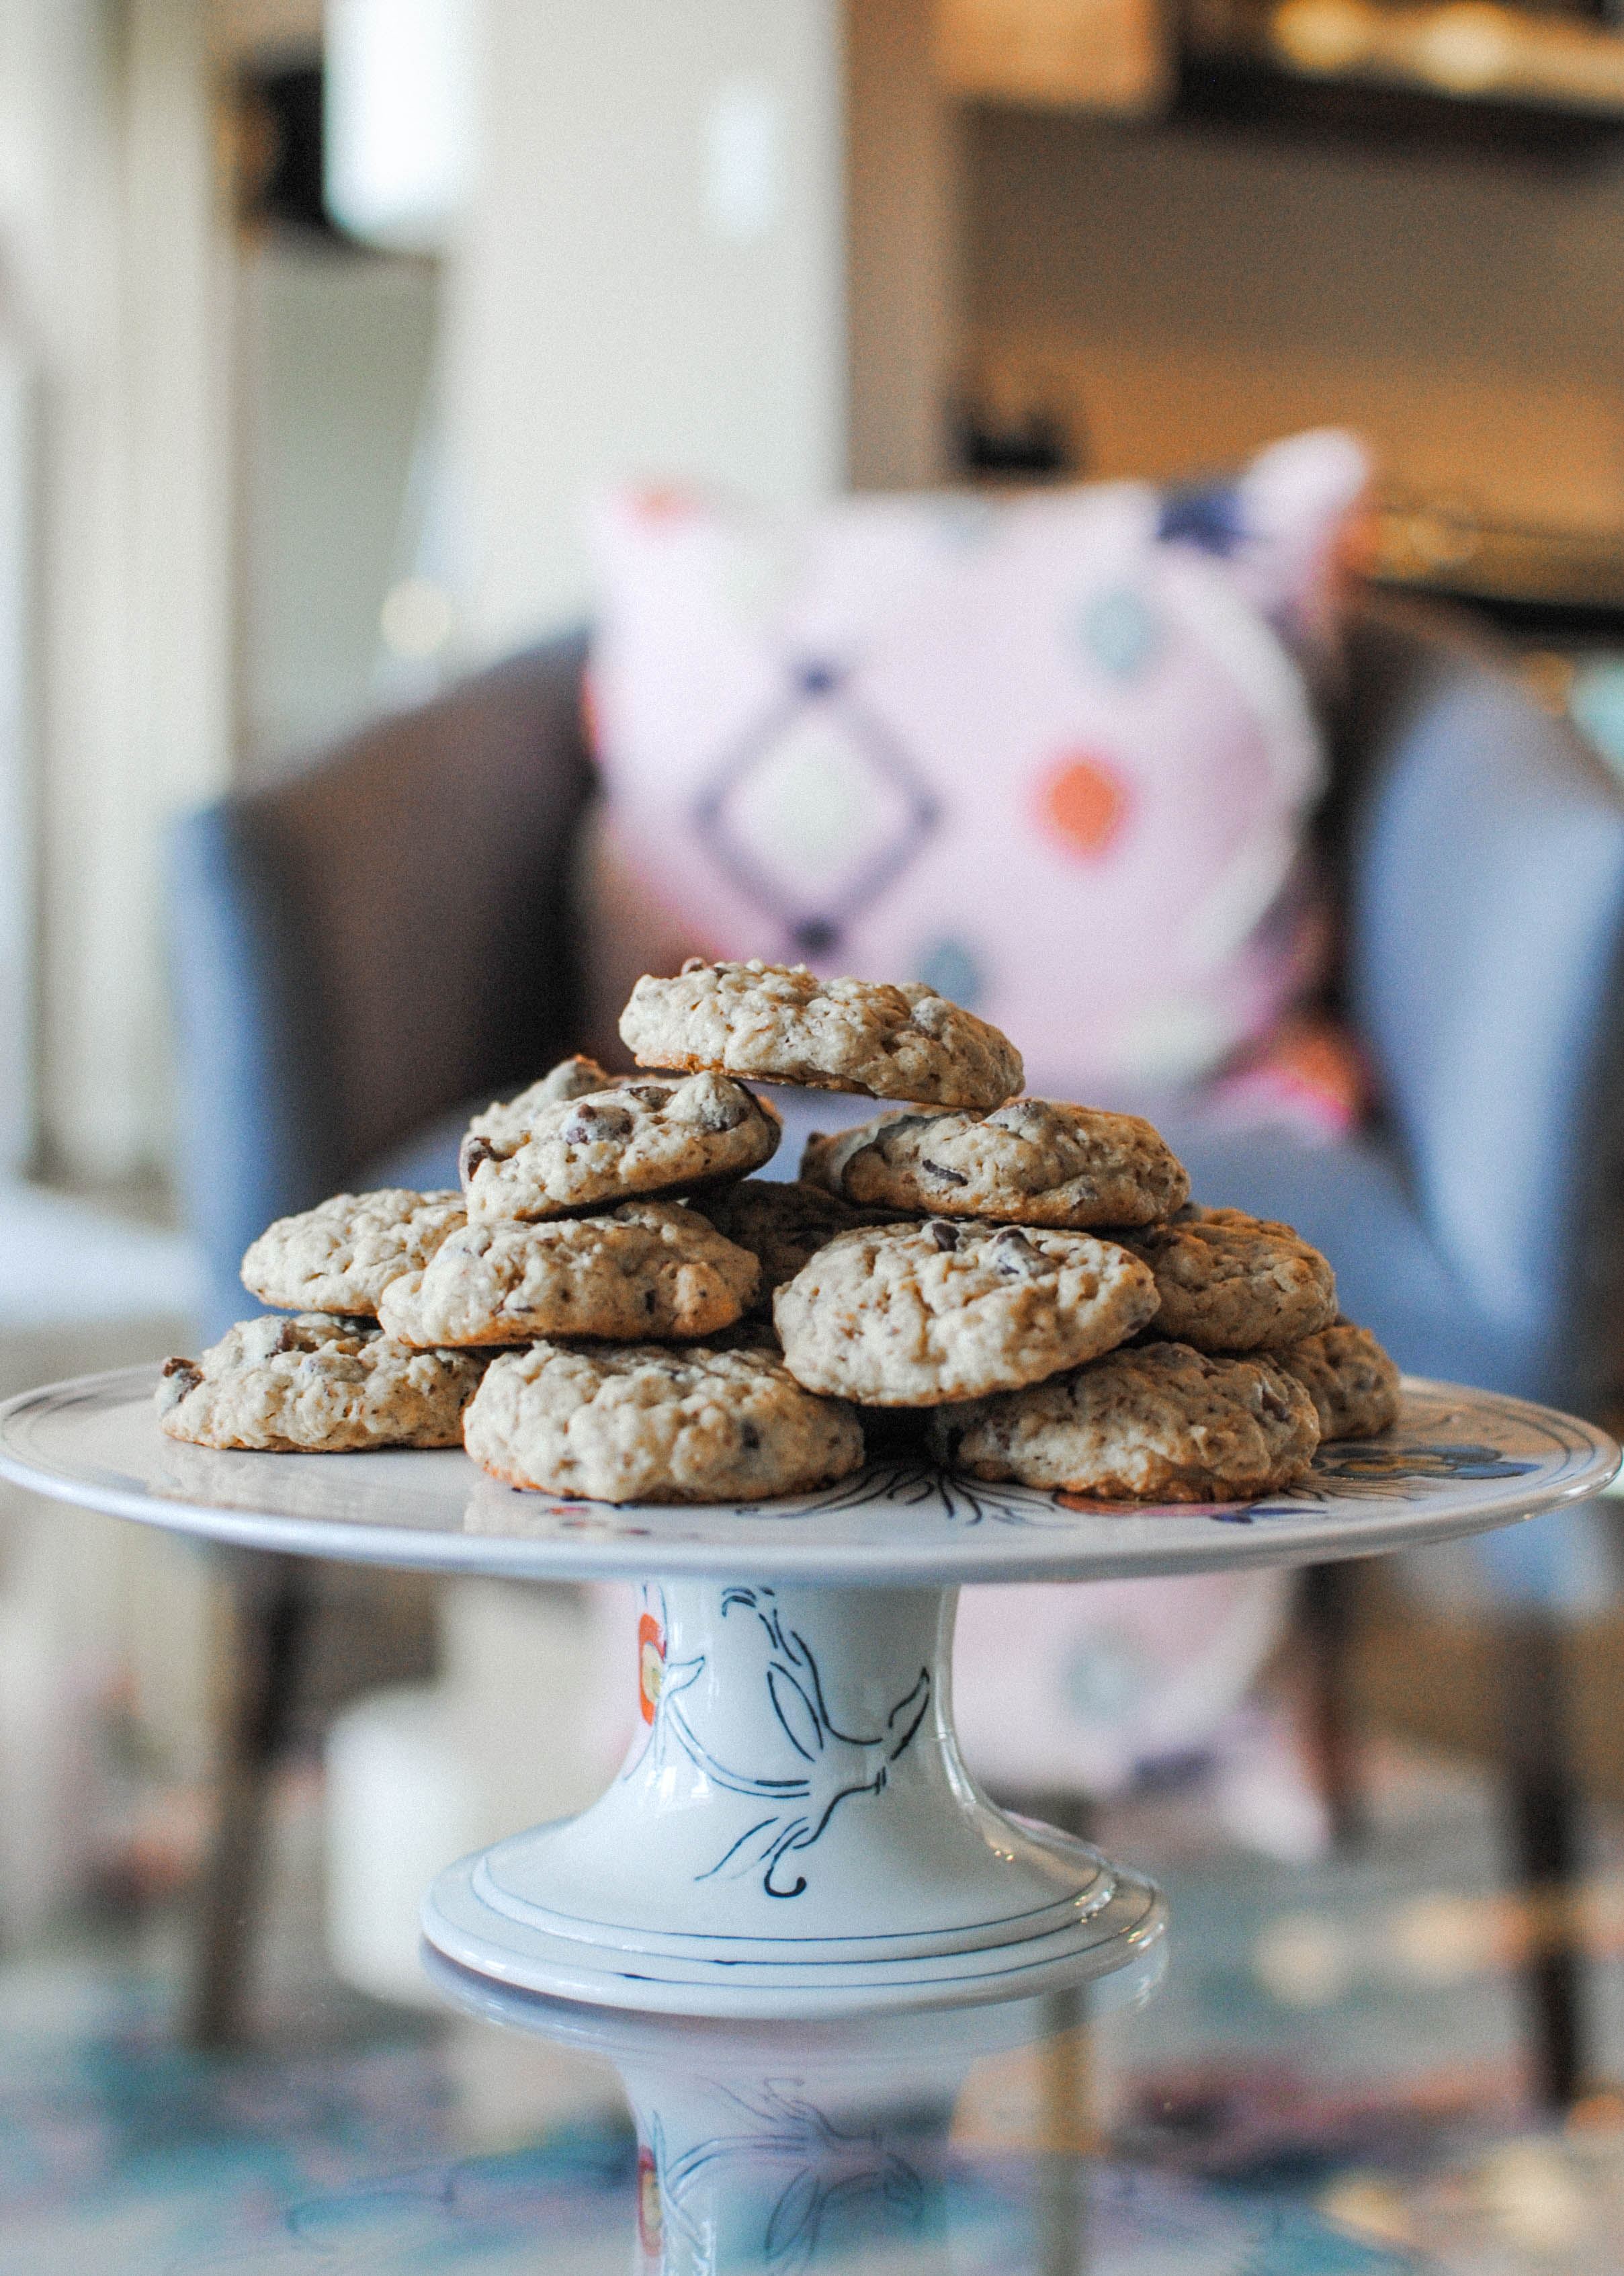
..The Best Lactation Cookie Recipe & My Top 6 Supply Tips for Pumping
October 10, 2018 • recipe post
Okay so I know this post isn't for everyone but in case you are also a new mama who is breastfeeding or exclusively pumping (like I am) I want to share this recipe (it's not mine) because I feel like it works really well and they actually taste pretty good. I have been eating a couple a day since my milk came in and feel like they do make a difference. I also wanted to share some other tips I have gleaned so far from my pumping experience. I know the internet is flooded with tips and tricks but these are what truly helped me. I won't suggest an optimal schedule because that really varies from woman to woman (I pump every 4-5 hours during the day but I know a lot of ladies swear by every 3 hours). I produce between 30-33oz each day. The baby eats 24-30 and I freeze anything extra that day. Sometimes I can freeze 6oz sometimes I don't have enough to freeze anything but I always at least make plenty for the baby to eat!
1. If your at home pump doesn't seem to be producing enough milk to keep up with your baby - invest in renting the hospital grade pump. I was having a really hard time getting my milk to fully come in after taking her home from the hospital so we had to supplement with formula for a few days. As soon as I brought home the better pump I immediately saw a difference in volume that very day.
2. Check to make sure the shield size is correct for you (I used this to find out)! I was using the standard size that comes with your pump at first but ended up needing the 27mm size. When I made the switch I immediately saw a second increase in volume that day.
3. Do NOT be afraid to supplement if you need to. Stress is a supply killer and if you are constantly worried about keeping your child fed you will definitely be stressed! We had a pretty scary experience her first couple days home when I wasn't making enough colostrum before my milk came in and she became extremely dehydrated. We didn't know I wasn't making enough since they say all you need are a few drops but thankfully I read this book (can't recommend it enough for new mamas to be) and knew to check the inside of her cheek and lip to see if it was tacky since she was showing all the other normal signs (diapers were still flowing which is normally how you can tell). It was VERY tacky so I made the quick decision to mix up some formula we happened to have in the house that was sent to us as a sample. Her newborn wellness check was the next day and my doctor said we definitely made the right call. She had dropped a little too much weight (all babies lose some at first) and we then needed to give her an ounce of food every hour for 24 hours following the appointment. While we were waiting for my milk to fully come in we mixed 50/50 breastmilk to formula, then as the volume increased 25/75, then 20/80 and so on until I was comfortable giving 100% breastmilk. I noticed that when I wasn't worried about making enough milk for the next feed it flowed MUCH easier.
4. Eat lots of healthy fats! This one is less about supply and more about volume quality. My Dr. let me know that my milk was a bit too lean (kinda like skim milk) unless there is a thick layer of fat on the to when it begins to separate. I incorporated full fat yogurt in the morning and nuts & cheeses for snacks throughout the day. Also put avocado toast on the morning menu when possible (my husband makes a great one with feta).
5. Stay hydrated AF. This one is pretty much a "duh" tip but I wanted to include it because it's so important. I try to drink 8oz of water after every pump session and 8 more in-between. I also load up on coconut water whenever I can to get those natural electrolytes.
6. These lactation cookies! They taste pretty much like oatmeal chocolate chip. I did need to hit whole foods for some of the more obscure ingredients but feel that it was well worth it. I have been able to make like 200 of these guys and still have plenty ingredients to make more. I have a couple for dessert at night and wake up and pump 10-13oz which is a LOT of milk!
Always know when there is a new post up by following CC!

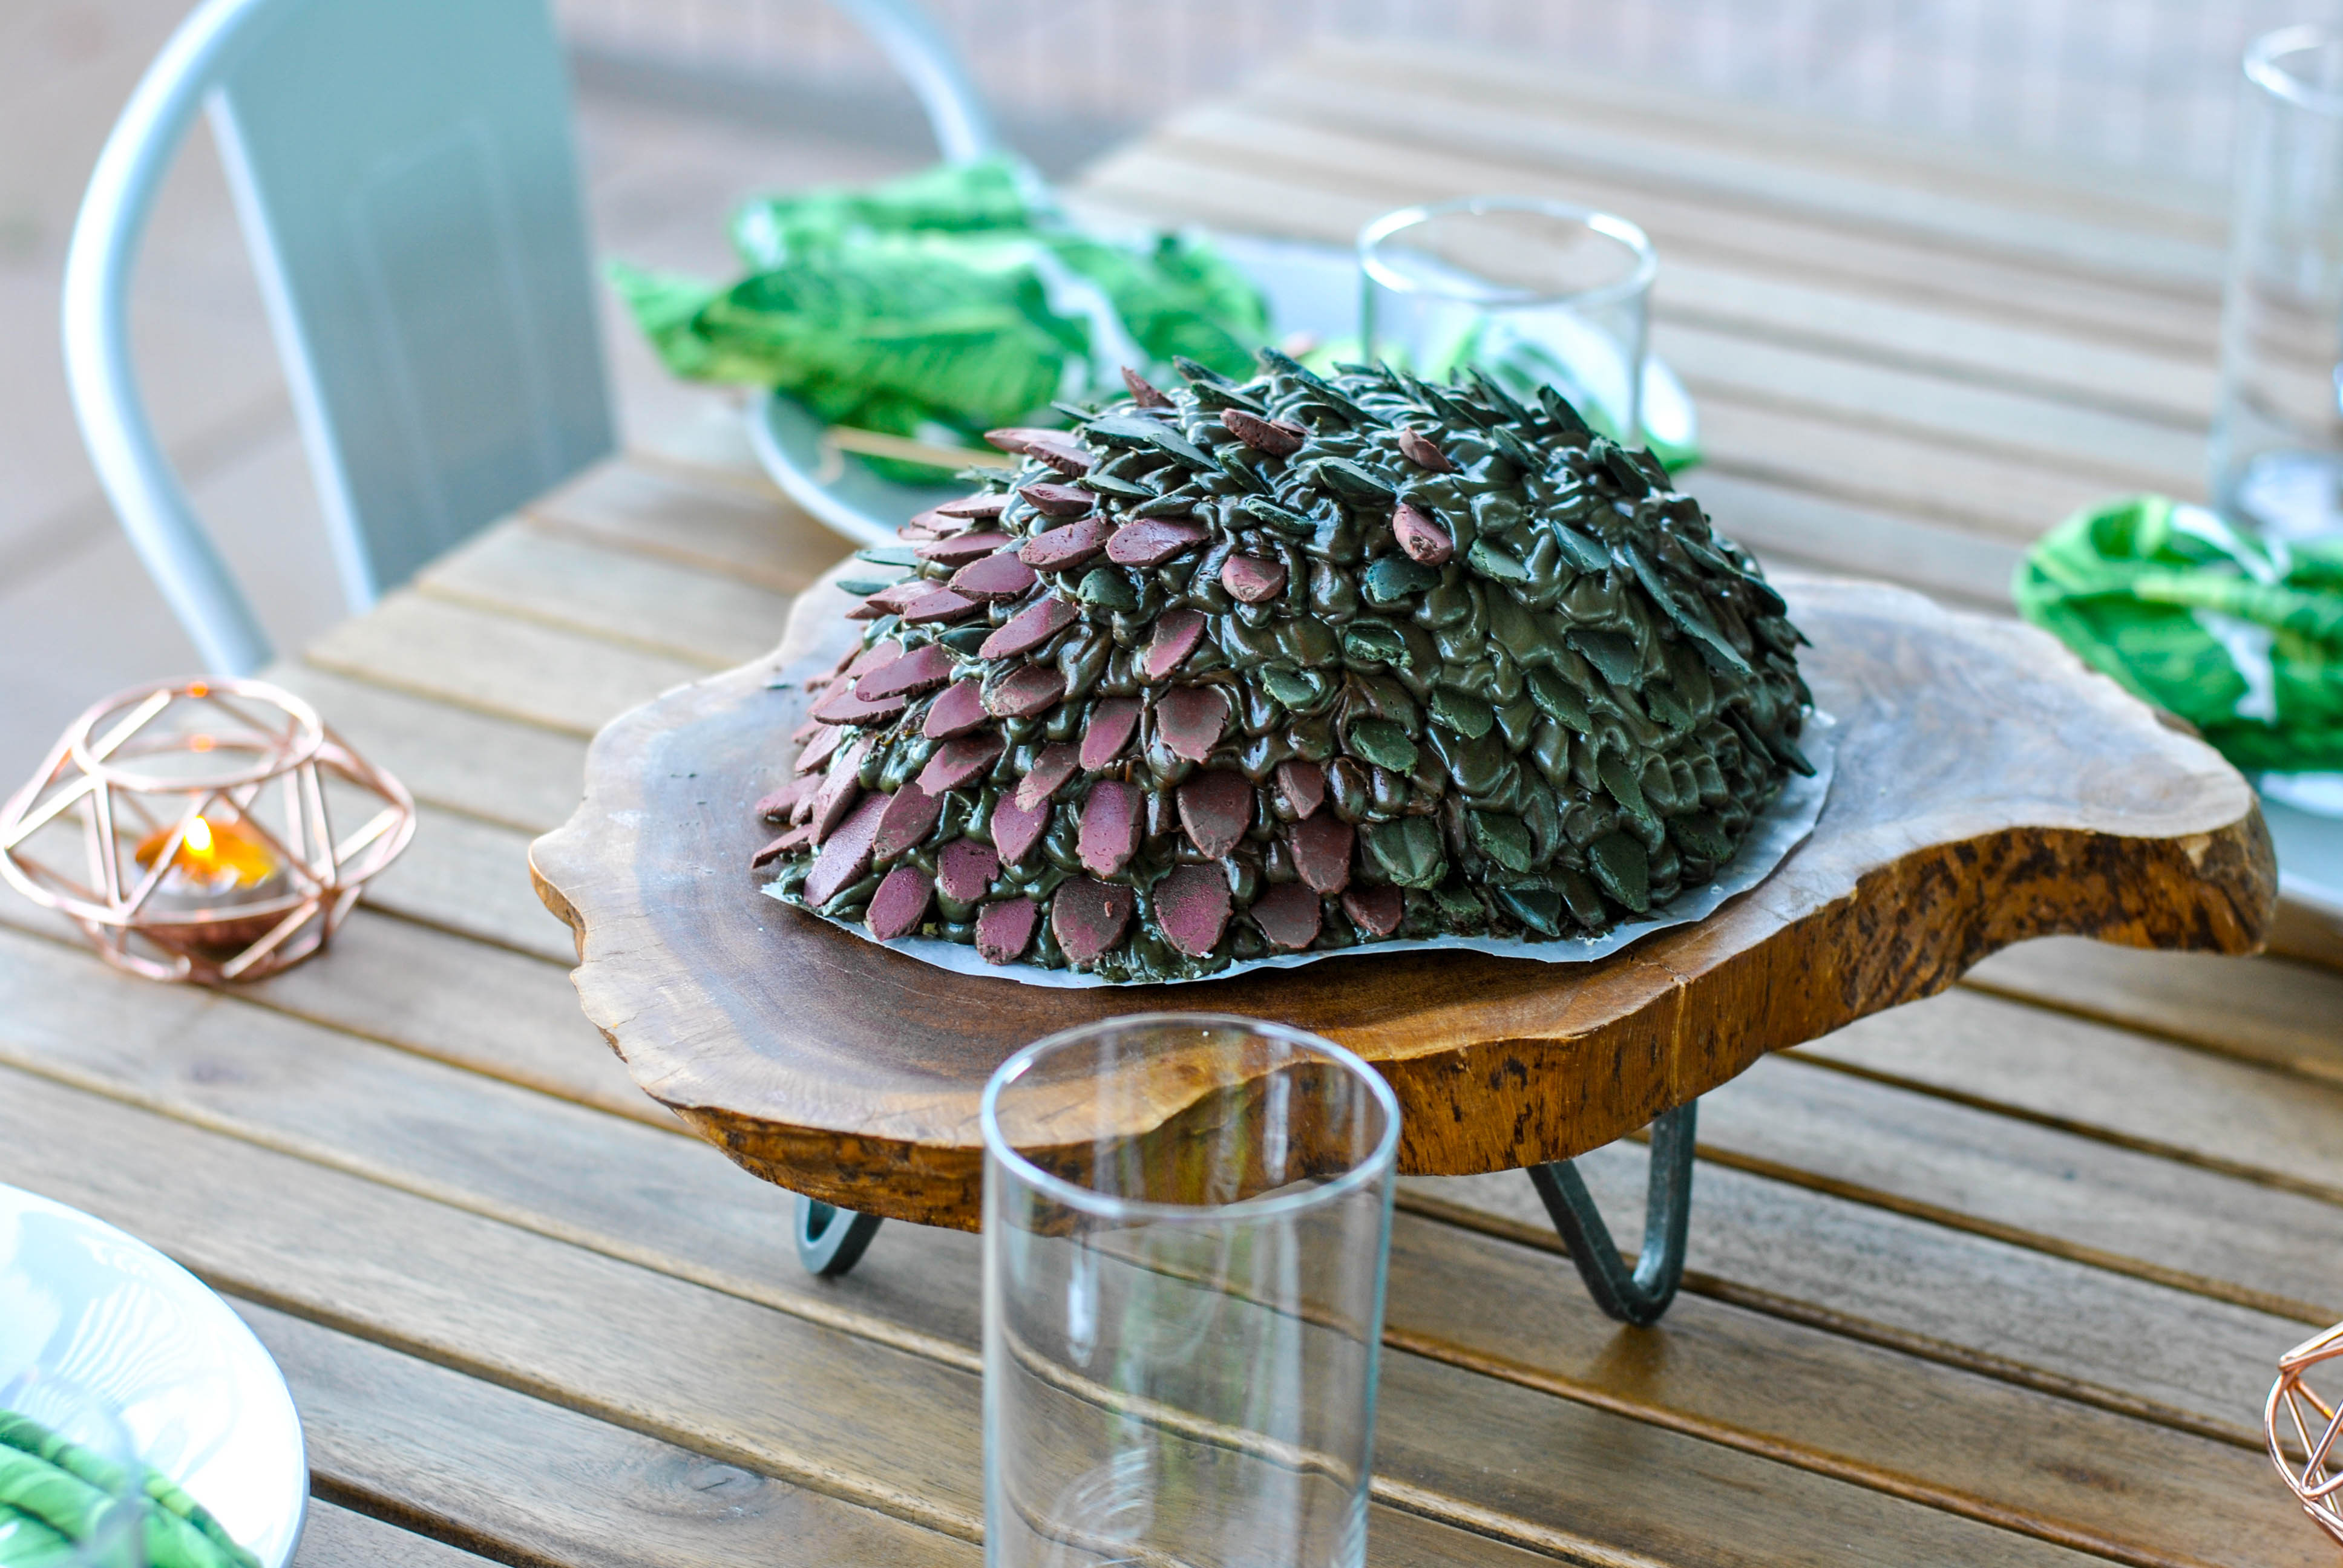
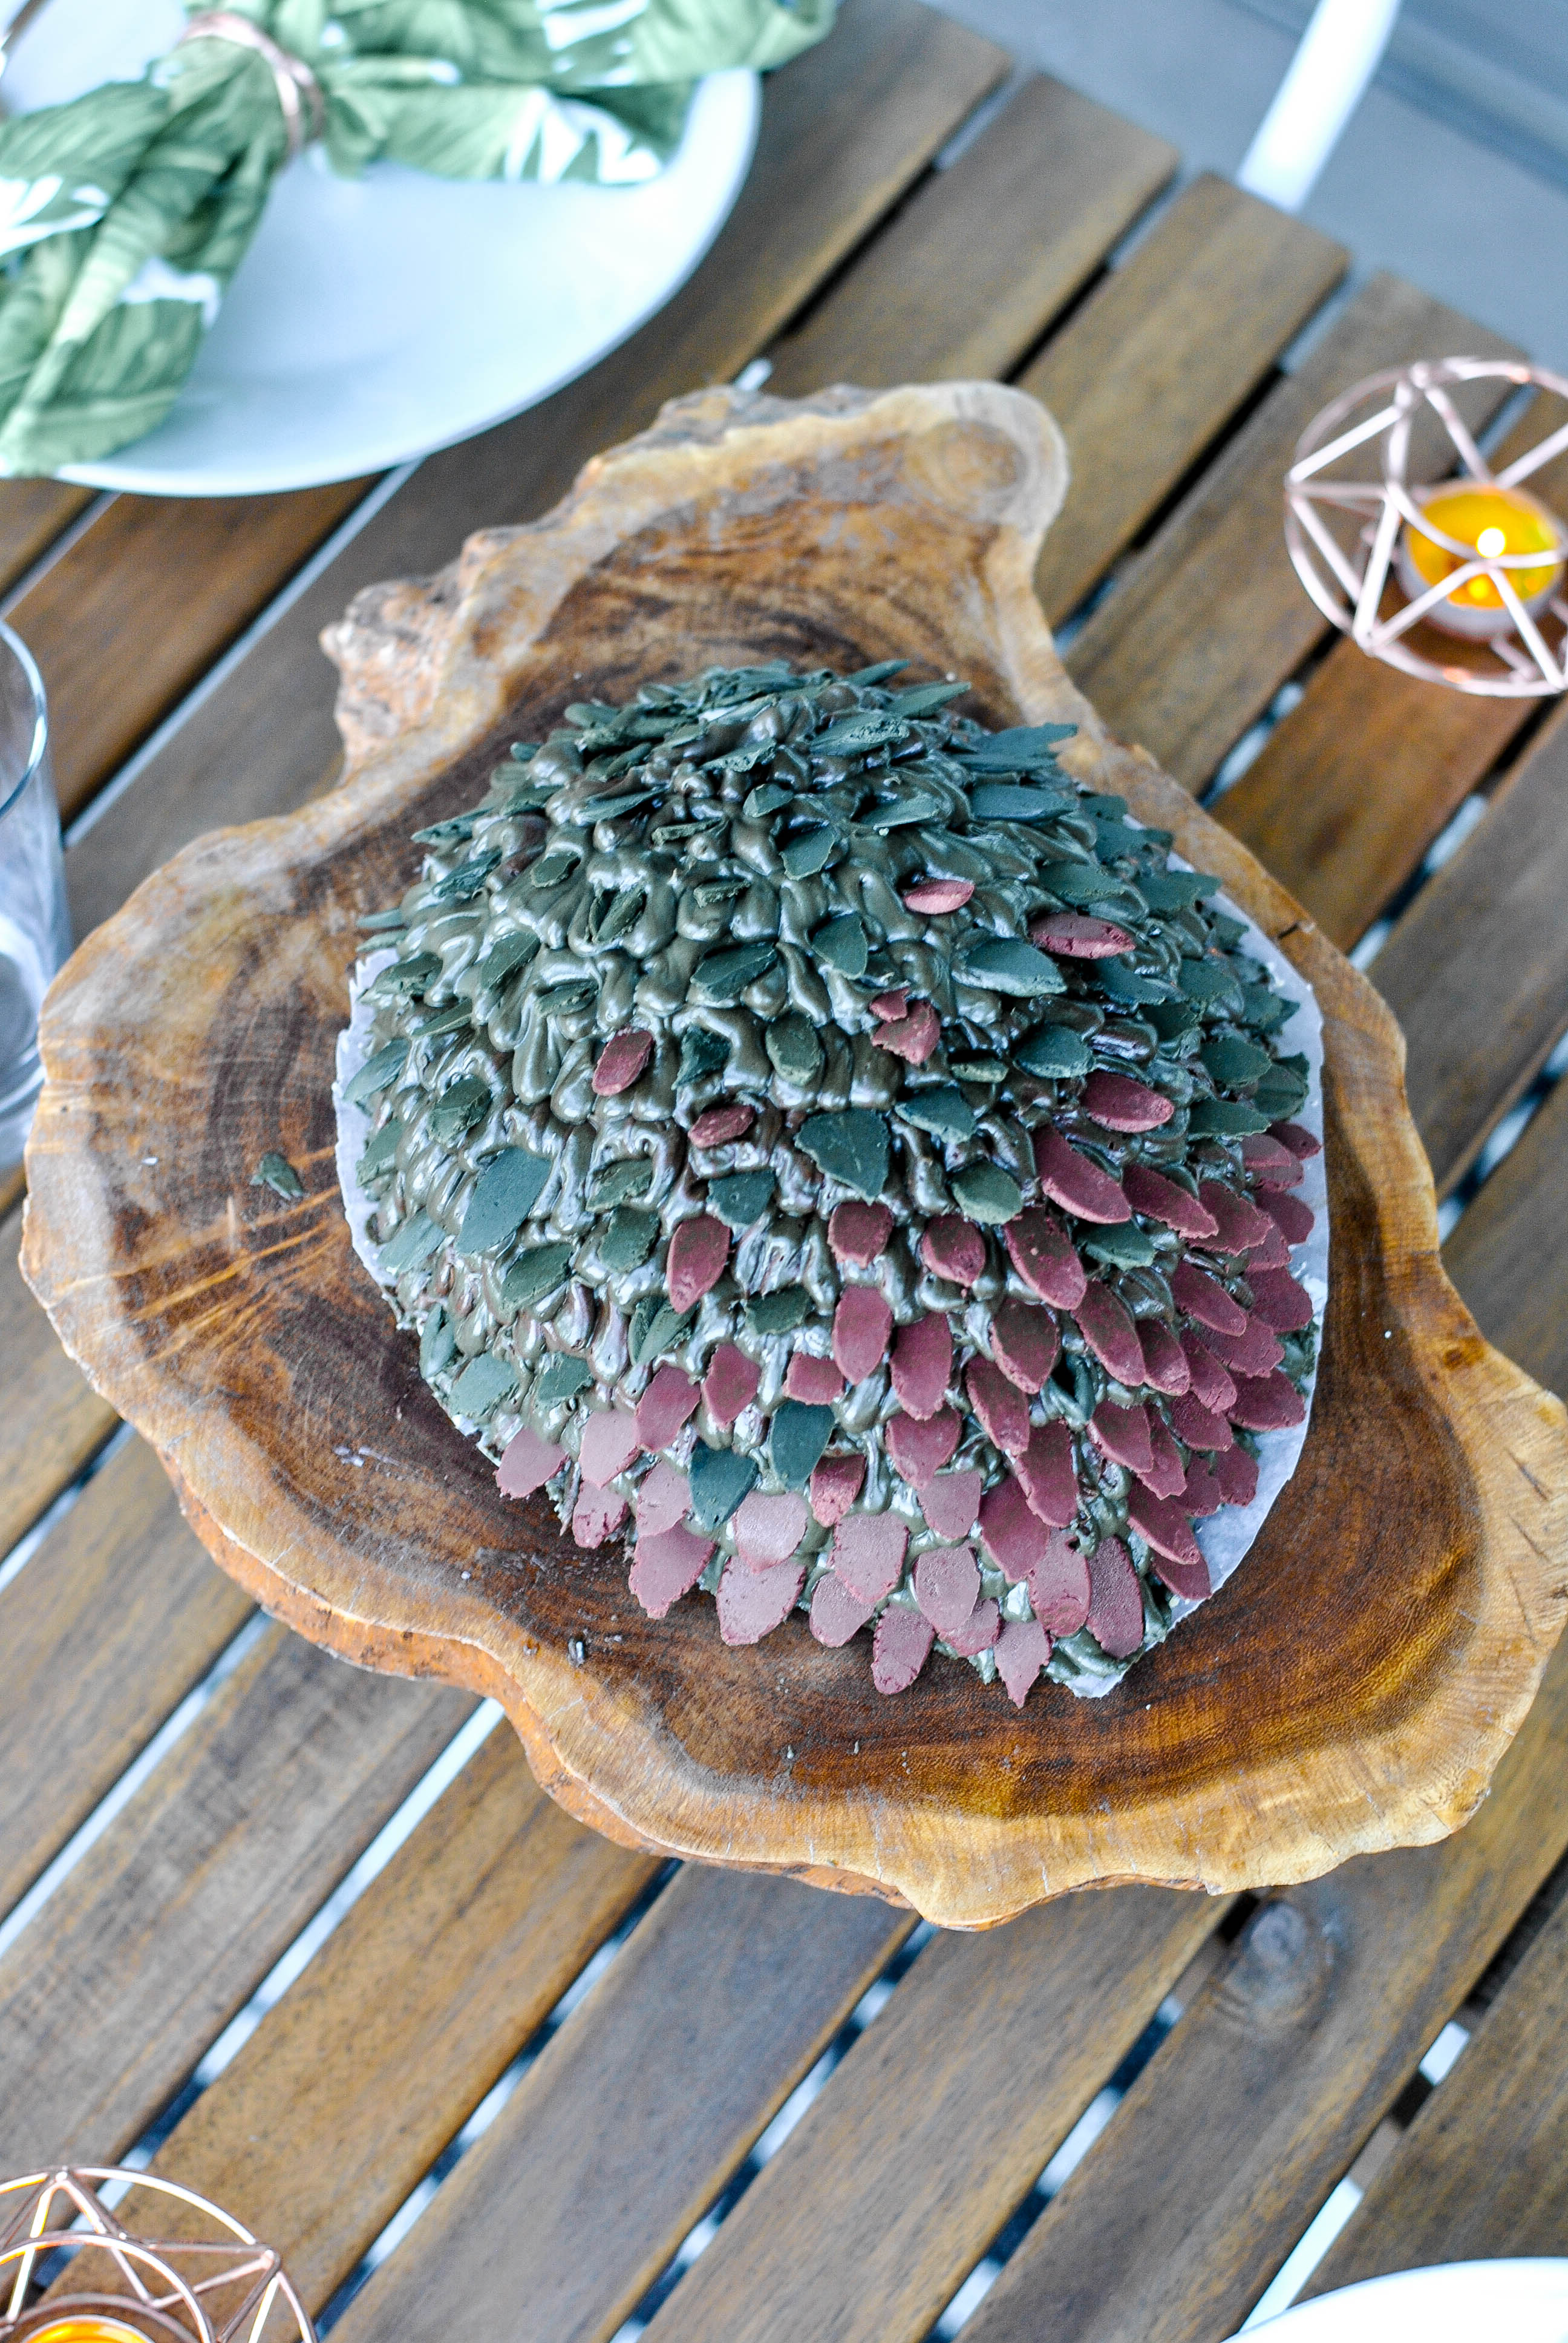
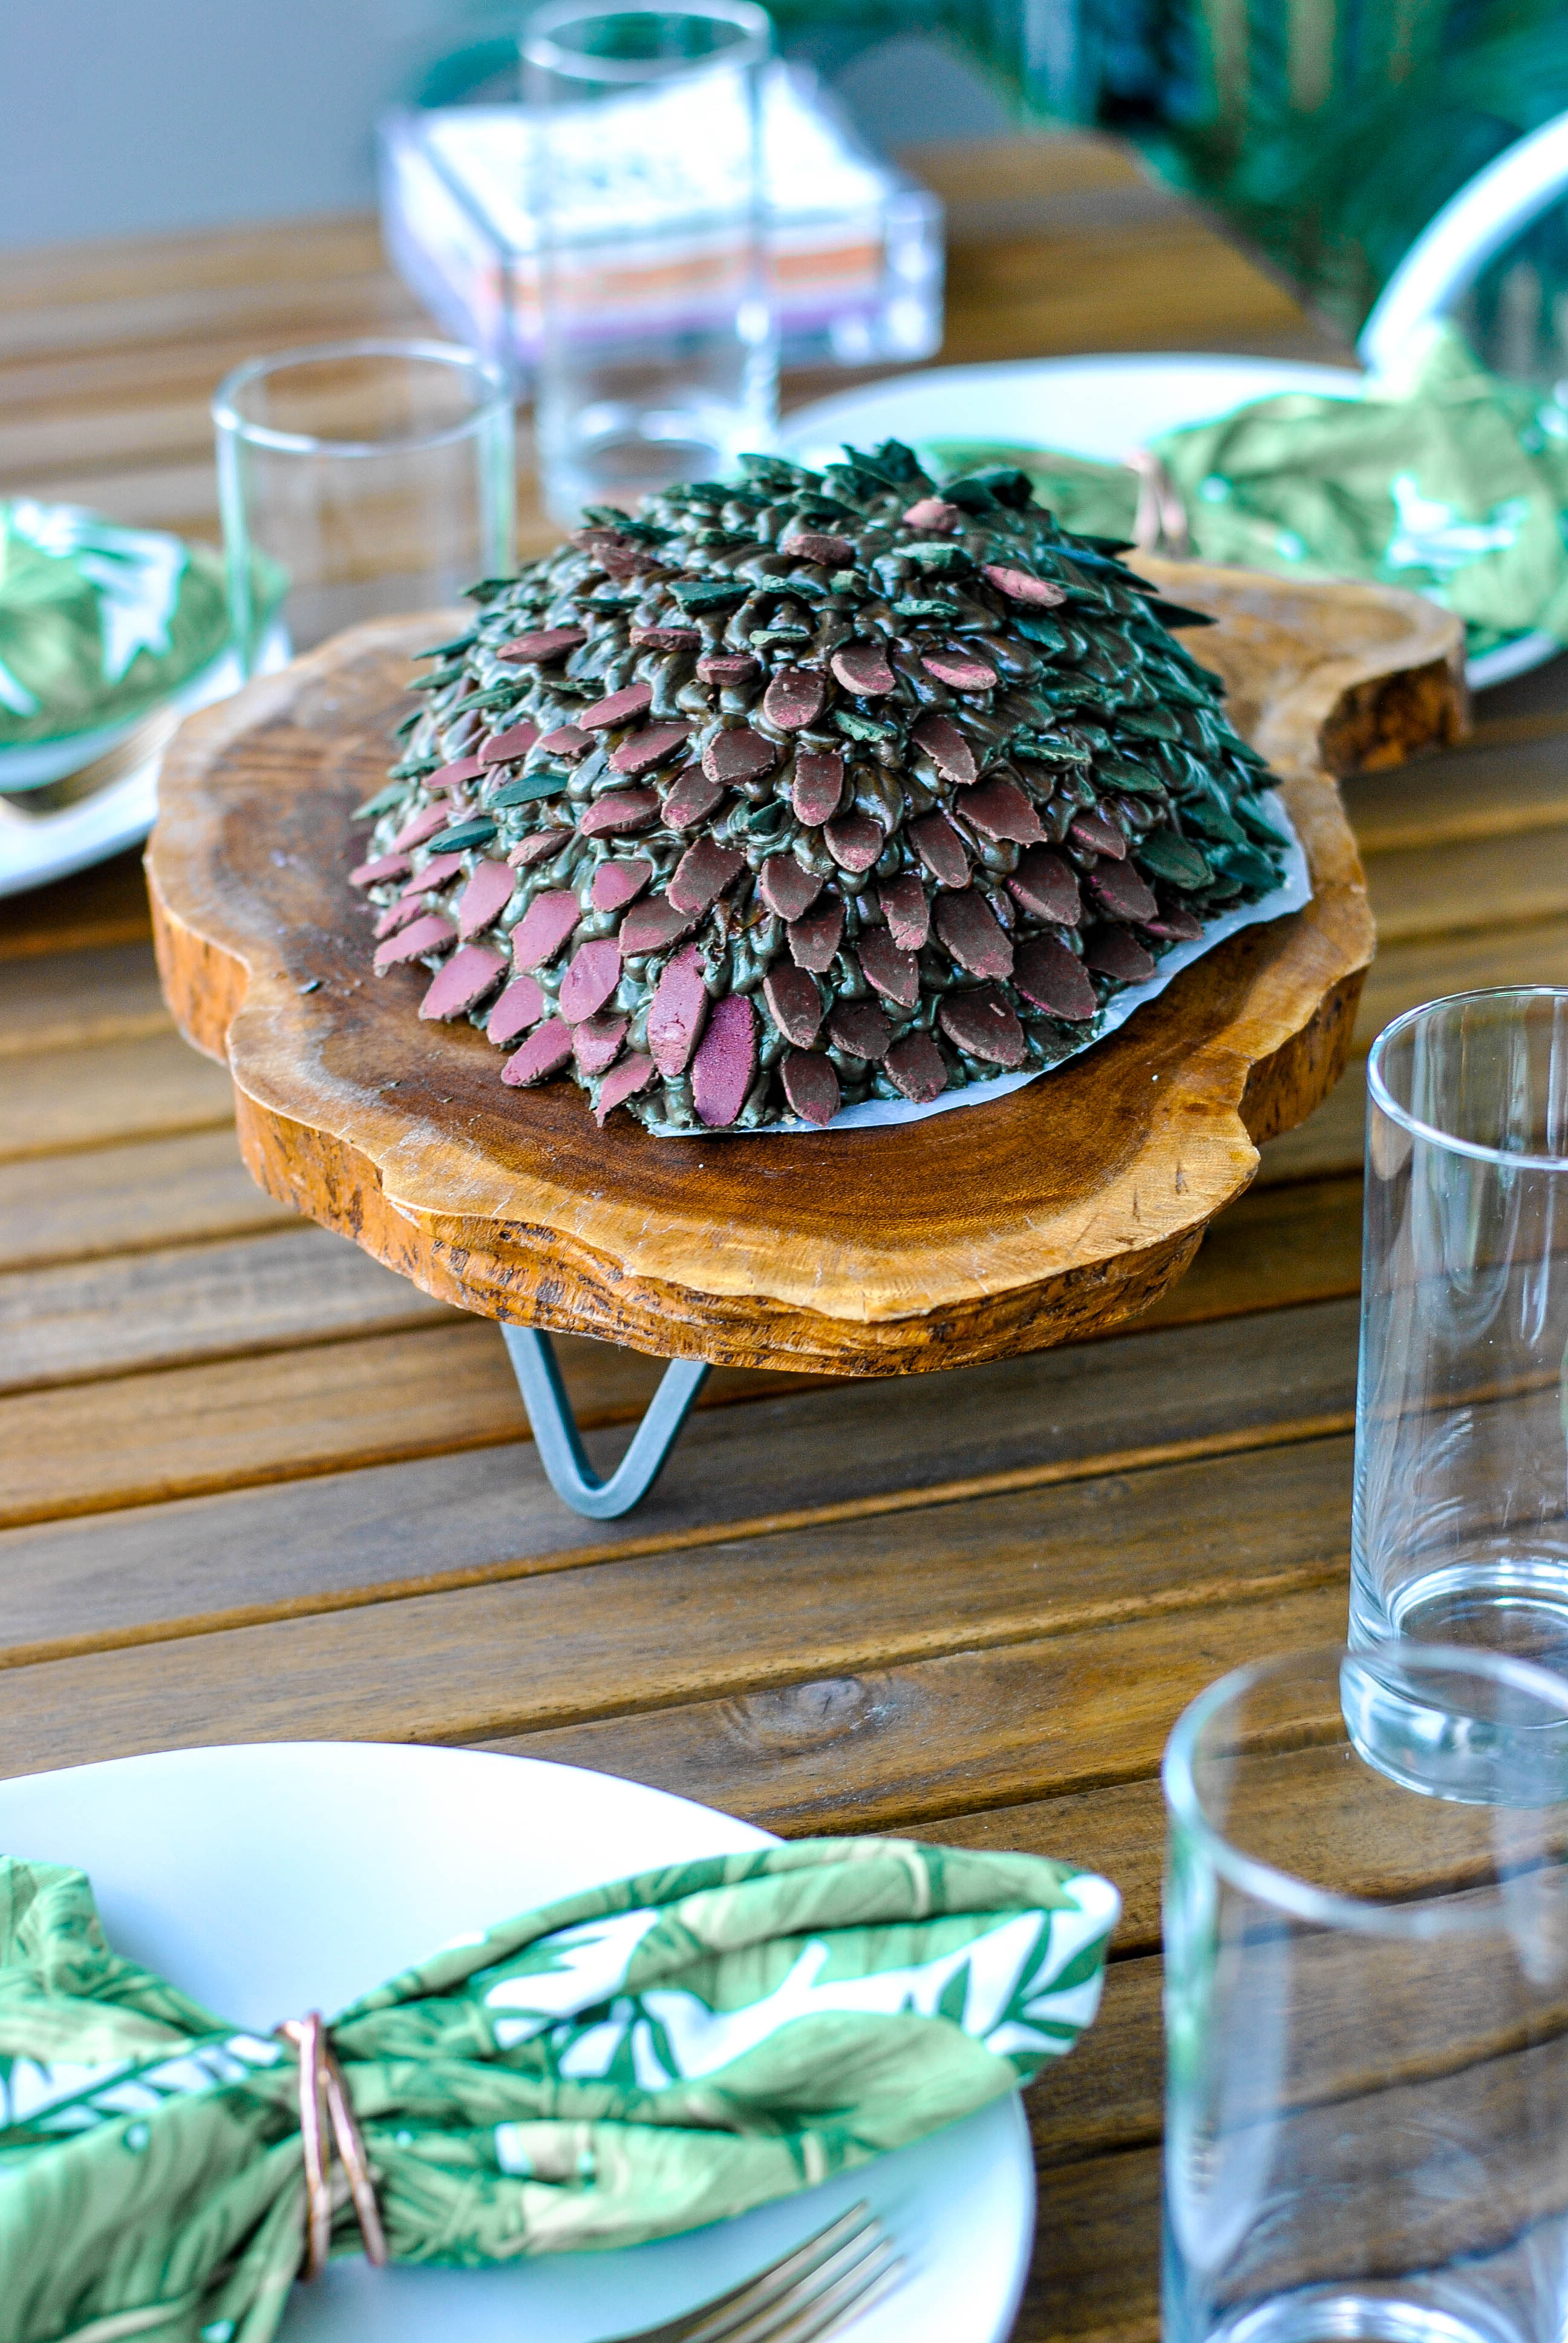
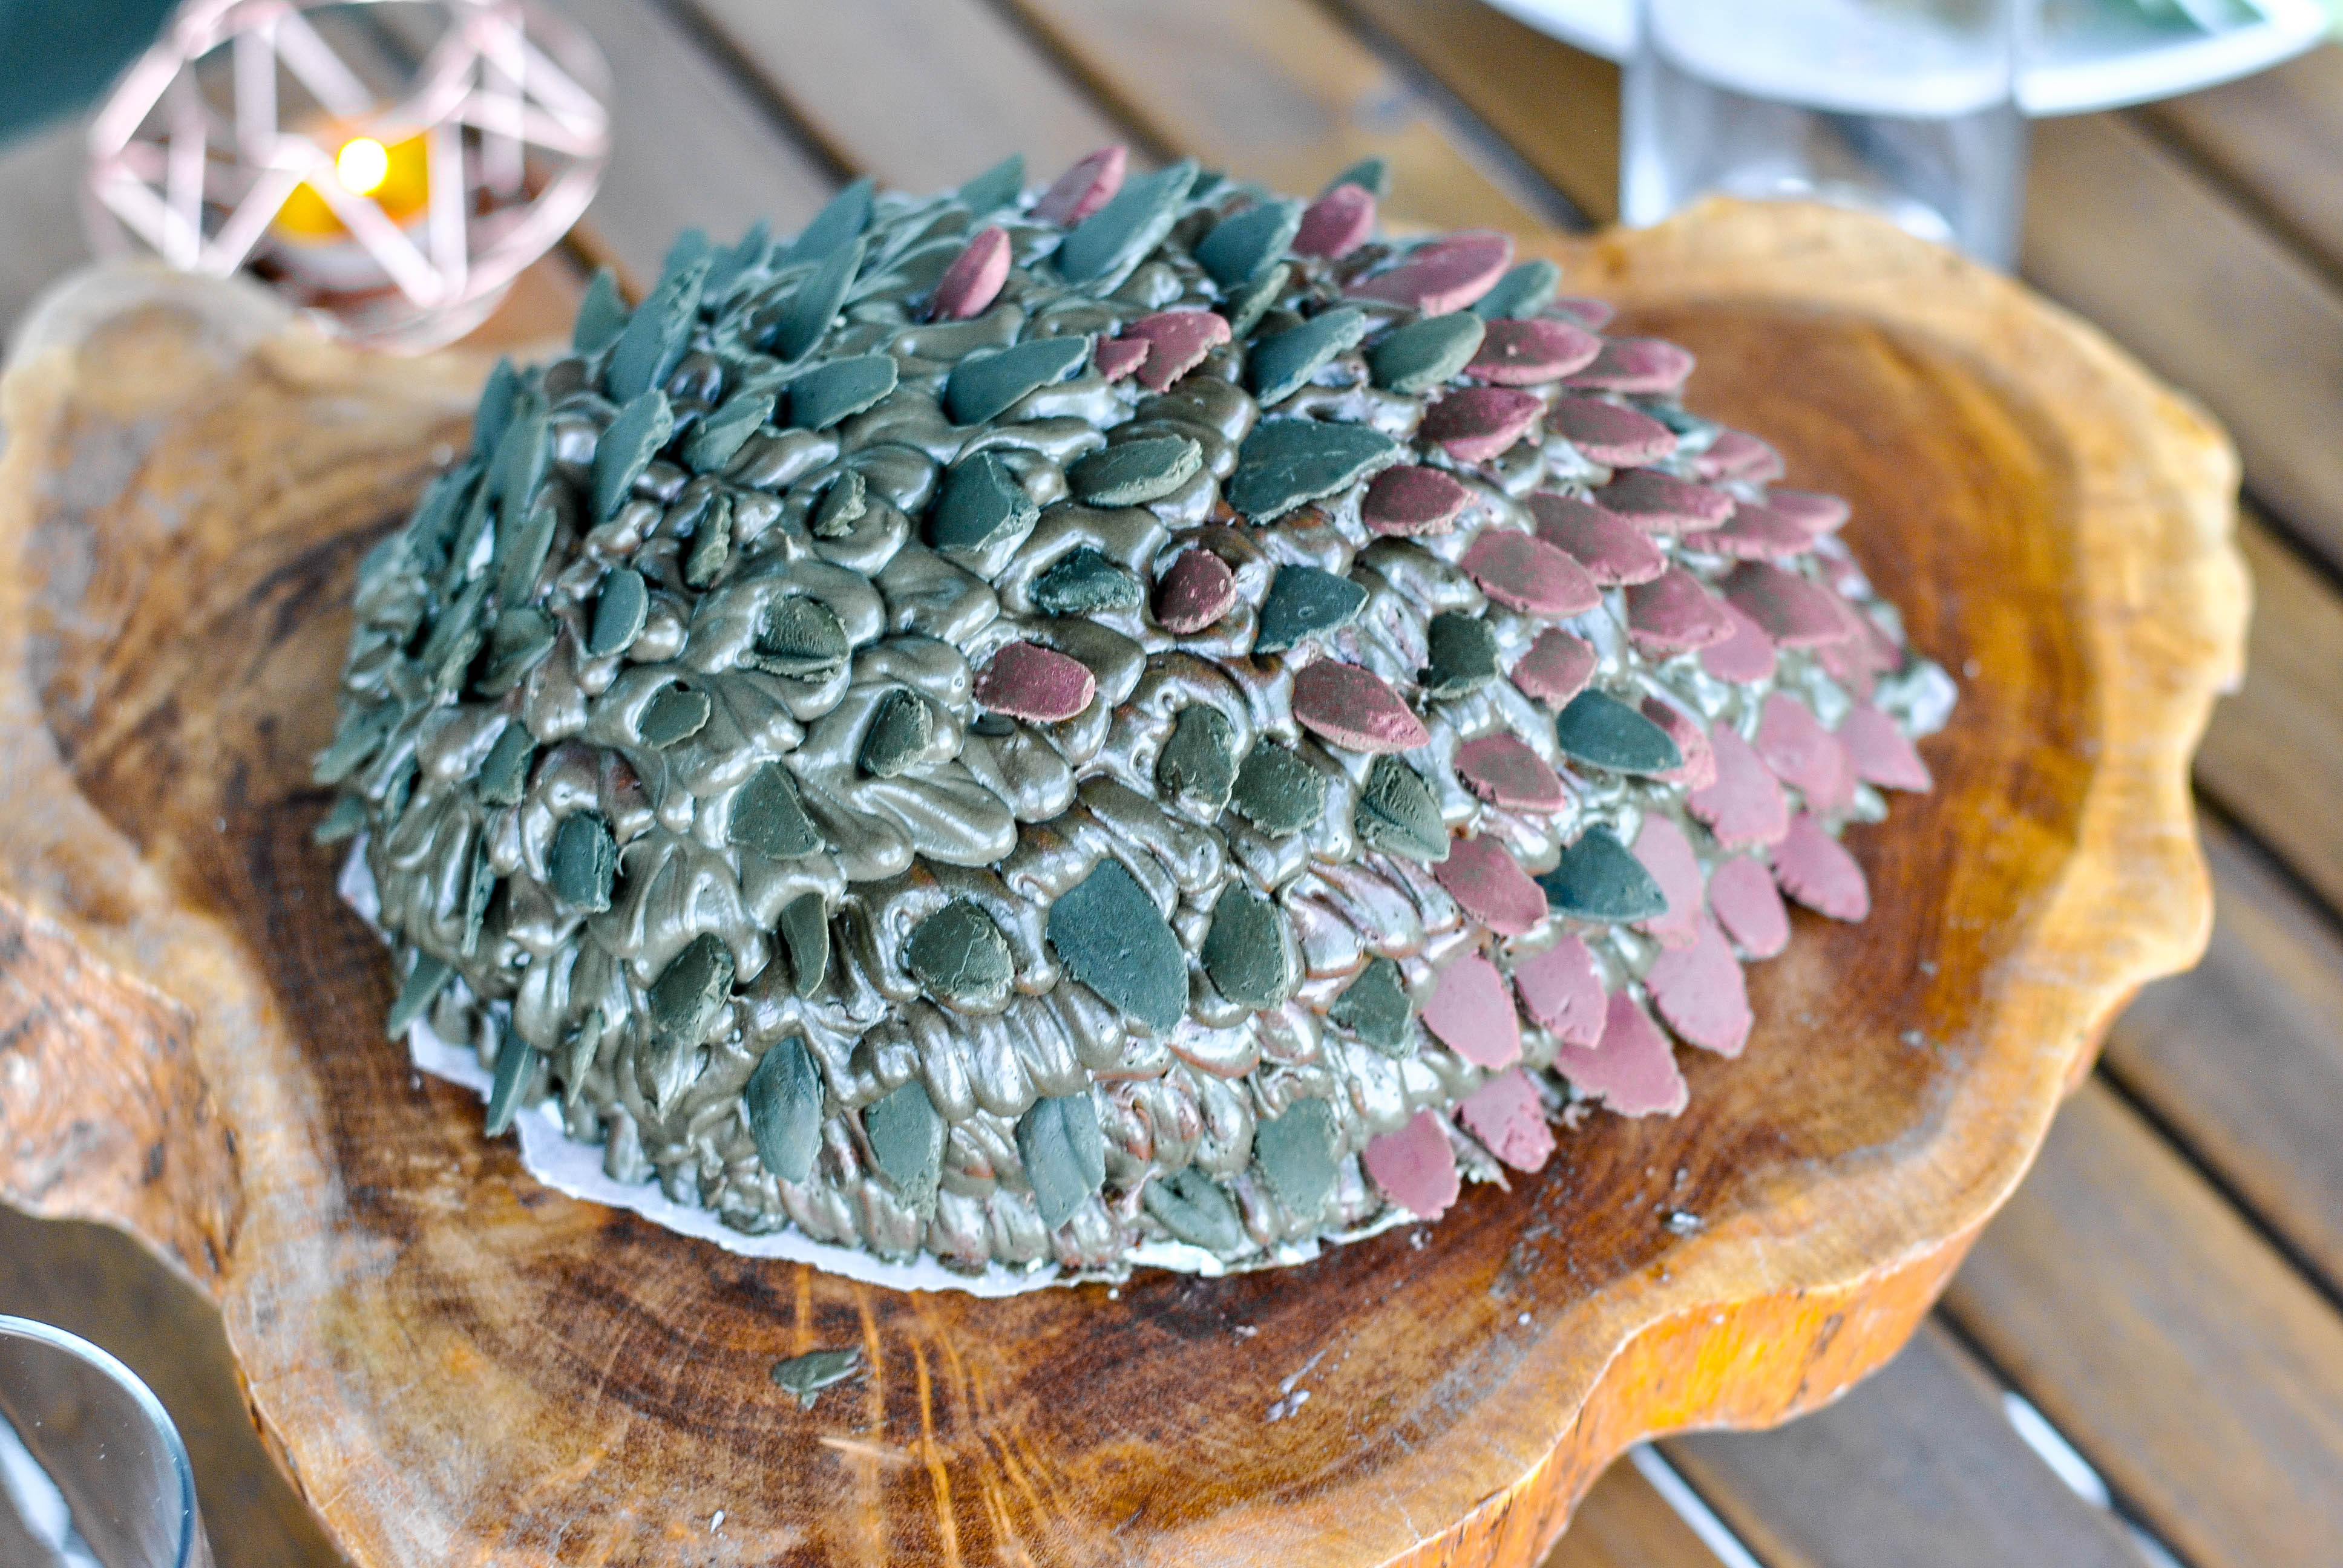
I know it says "finale" in my post title but I actually made this for last weekend's episode and I got so many DMs about how I made it I decided on the spot to take some photos of it and attempt to get the directions on here for you guys before the finale this weekend. Unfortunately, I didn't think that it would be so popular so I didn't take any "in process" photos to help guide you so bare with me.
What you need:
1 box any old cake mix
2 cans chocolate icing
Red & green food coloring
Wax paper
Directions:
1. Bake your cake according to box instructions in two nine inch round pans, let cool.
2. While your cake is baking, melt your chocolate candy melts in two bowls. Dye one with red food coloring and one with green. Insert the dyed chocolate into two piping bags and squirt the chocolate out into little tear drop spikey shapes on wax paper (make as many as you think will cover the cake). Let them cool and harden.
3. Ice one of your cakes and then stack the other on top of it (looks like a normal cake at this point) then with a knife, carve around the circular stack until you get an egg shape. I even plopped some of the carved pieces onto the top to make it higher in the middle. ice it a little to help it keep its shape.
4. Dye the rest canned chocolate icing with green food coloring (makes that awful green color). Place it into another piping bag and ice your cake in pointed dollop motions all around (doesn't have to be perfect since the spikey chocolate will cover some).
5. Push your hardened chocolate spikes into the icing all over as you like.
THEN YOU SERVE YOUR DRAGON'S EGG LIKE THE BAD ASS KITCHEN KHALEESI THAT YOU ARE!
Always know when there is a new post up by following CC!
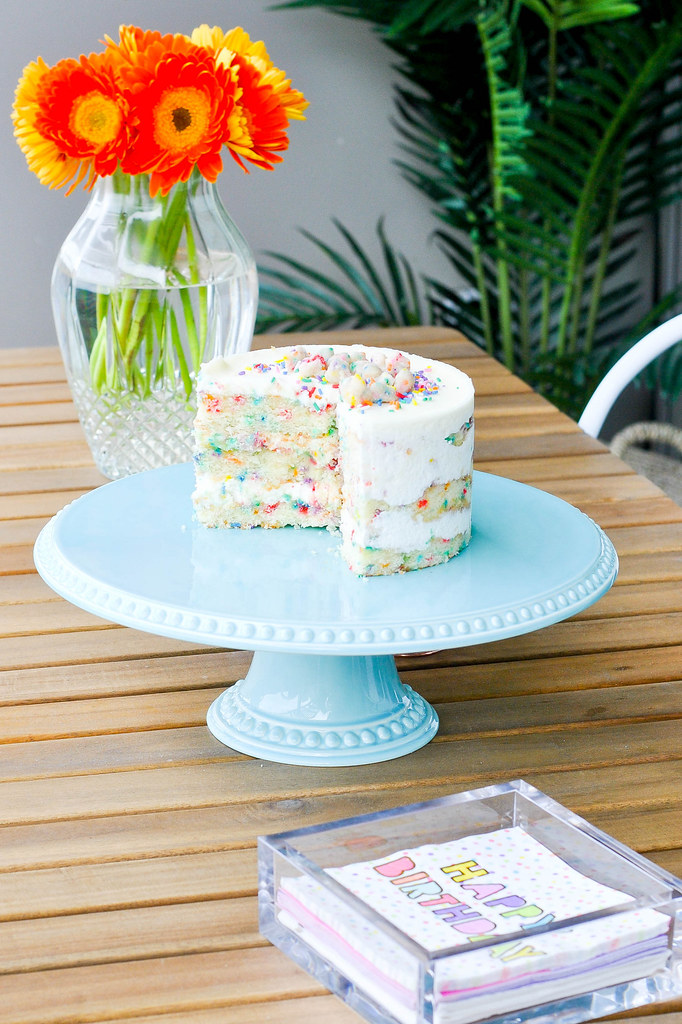
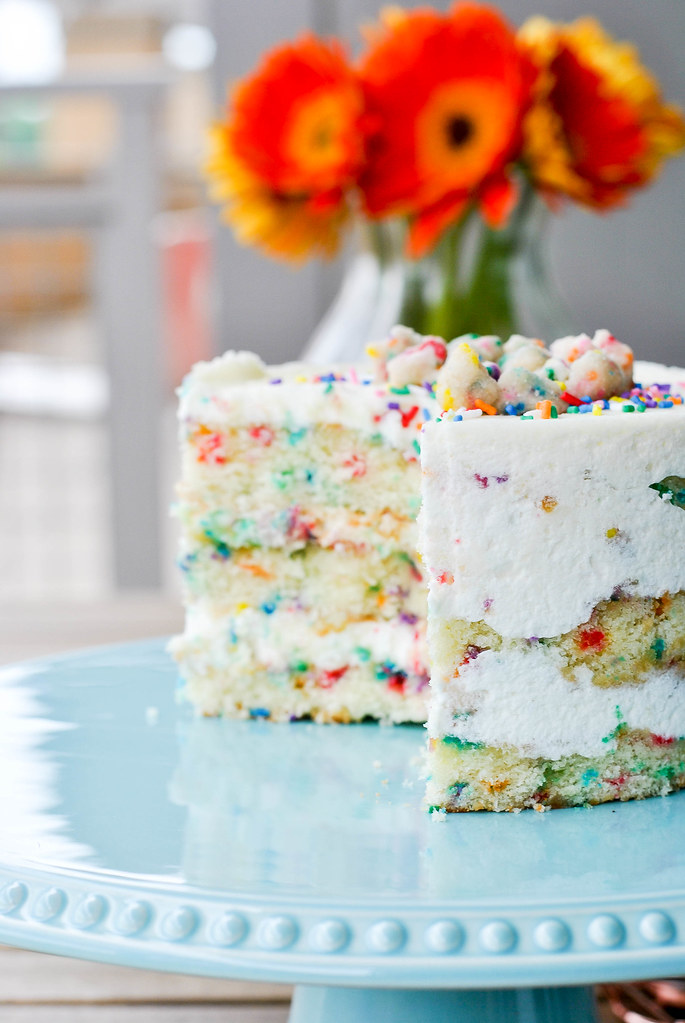
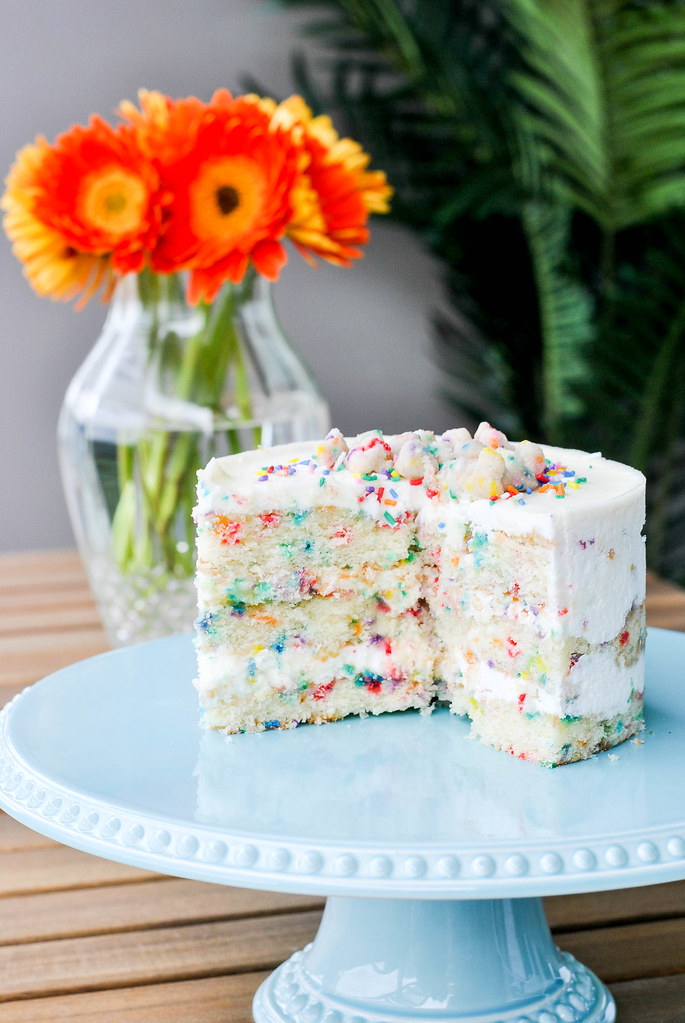
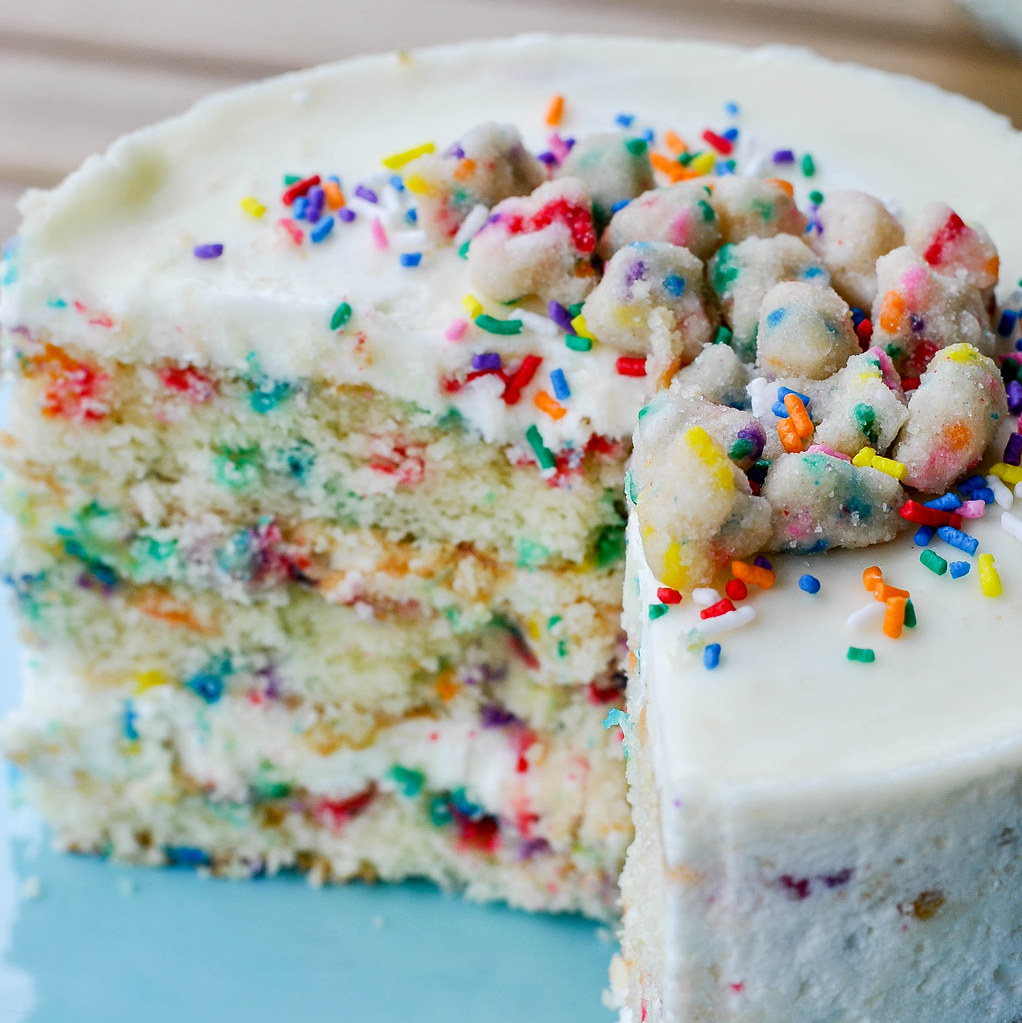
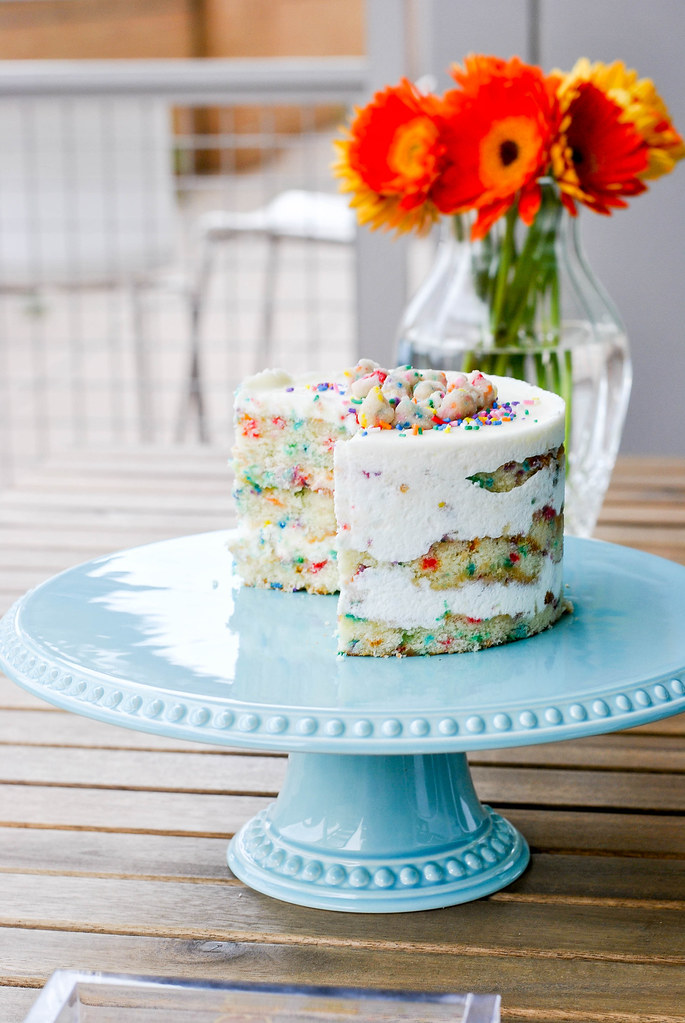
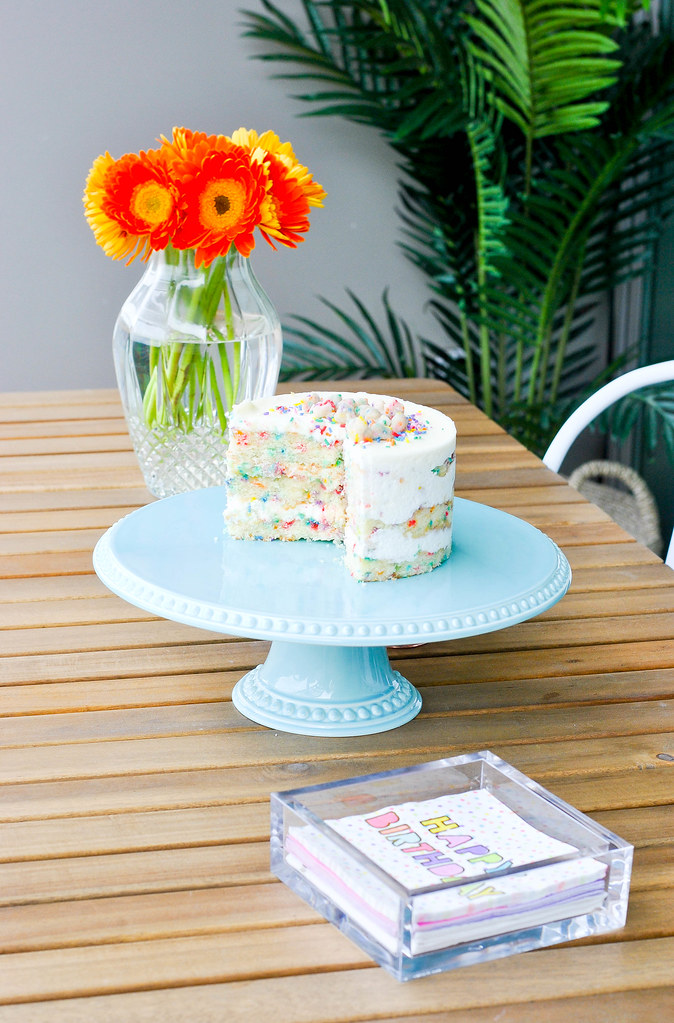
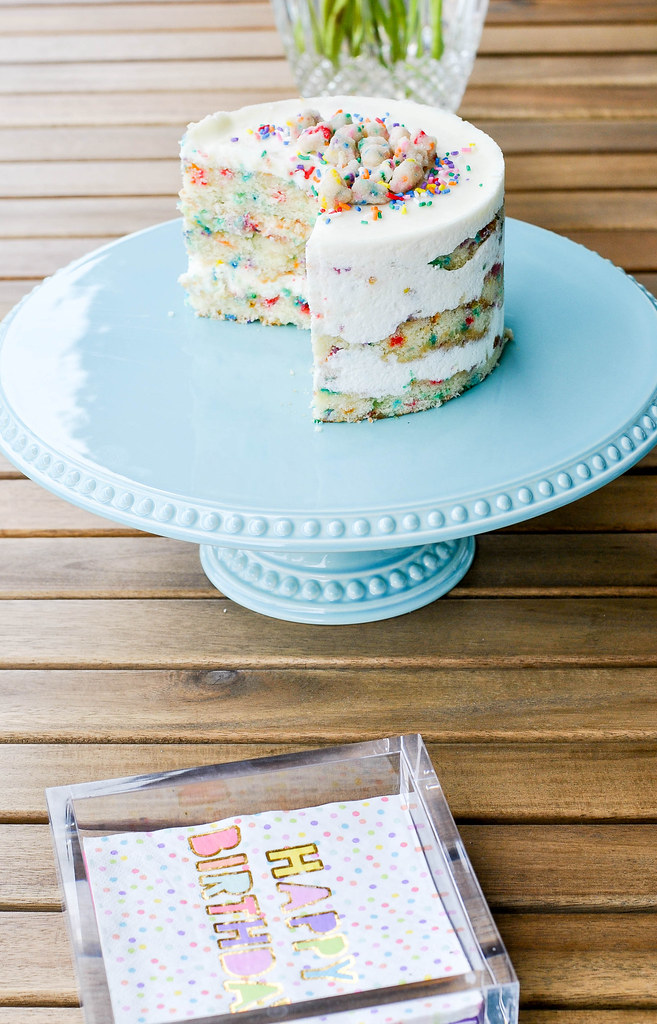
The ONLY thing I put on my birthday wishlist this year was this Milk Bar cake. It is appropriately named "Birthday Cake" and I have had my eye on it ever since I saw it in the City Center DC shop. (you can also order it online). It didn't disappoint. We ate the whole thing just the two of us over two days. Just LOOK at those sexy crumbs & sprinkles! Food porn at it's finest. My lovely other half also threw in some cute flowers, some rose, and a bottle of my favorite Joe Malone perfume which was a sweet treat on TOP of my sweet treat.


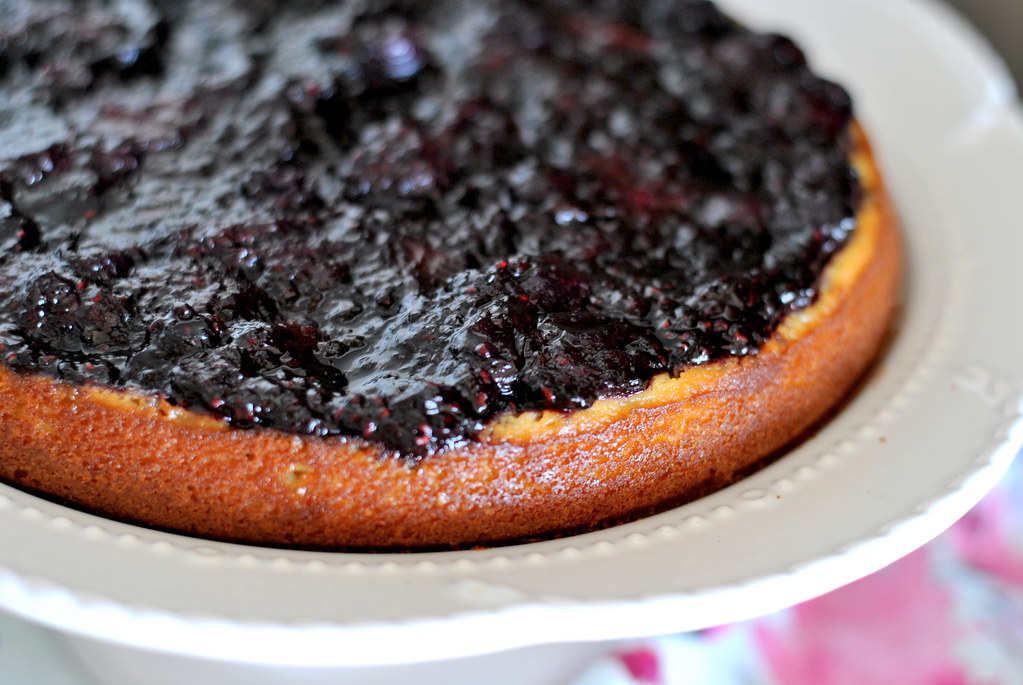
..Lemon Ricotta Cake With Mixed Berry Topping
April 14, 2017 • dessert lemon blueberry recipe recipe post
I made this last weekend when tasked with coming up with a dessert for a girls dinner. The meal was Italian so I figured I should stay in that lane. I got the lemon ricotta cake recipe from here, and followed it precisely except I only had a 9 inch spring form so my cake was a bit thin. I made it again during the week and did 1.5 times the recipe and added on two more minutes of bake time and it came out great. I will say my teeth did turn a bit blue on the topping which took some intense tooth brushing but I honestly still want to make EVERYTHING this flavor now, lemon-ricotta-berry pancakes, I'm coming for ya next! Also this would be the perfect thing to bring to Easter Sunday since it's so bright and seasonal!
Cake:
3/4 Cup Softened Butter
3/4 Cup Granulated Sugar
Zest From 3 Large Lemons
1 Teaspoon Lemon Extract
3 Large Eggs, Separated
1 Cup Full Fat Ricotta Cheese
1/2 Cup Plus 2 Tablespoons All-purpose Flour
2 Teaspoons Baking Powder
Dash of Salt
Directions:
Preheat oven to 325 degrees F and Lightly grease and flour a 7 or 8 inch spring-form pan.
Beat the butter and sugar until light and fluffy then add the lemon zest, extract, egg yolks, ricotta cheese, and beat until smooth. Mix together the flour, baking powder and salt, and beat into the butter mixture just until combined.
Beat the egg whites in a separate bowl until stiff. Gently fold the egg whites into the batter then spoon the batter into your prepared tin. Bake for about 45 minutes, or until a cake tester stuck into the center comes out clean. Allow to cool to room temperature before serving.
Topping:
1 bag frozen mixed berries (mine had strawberries, blueberries, raspberries, and blackberries)
1/3 cup sugar
Juice of 1 of the lemons you zested
Directions:
Dump your frozen berry bag into a skillet with the sugar and let it simmer for 15 minutes or so. Squeeze in your lemon juice and keep stirring until you get the thickness you want. Let it cool and top your cake.
P.S. if you haven't yet, please take this quick anonymous survey. Promise you will be in and out in under 2 minutes.
Always know when there is a new post up by following CC!

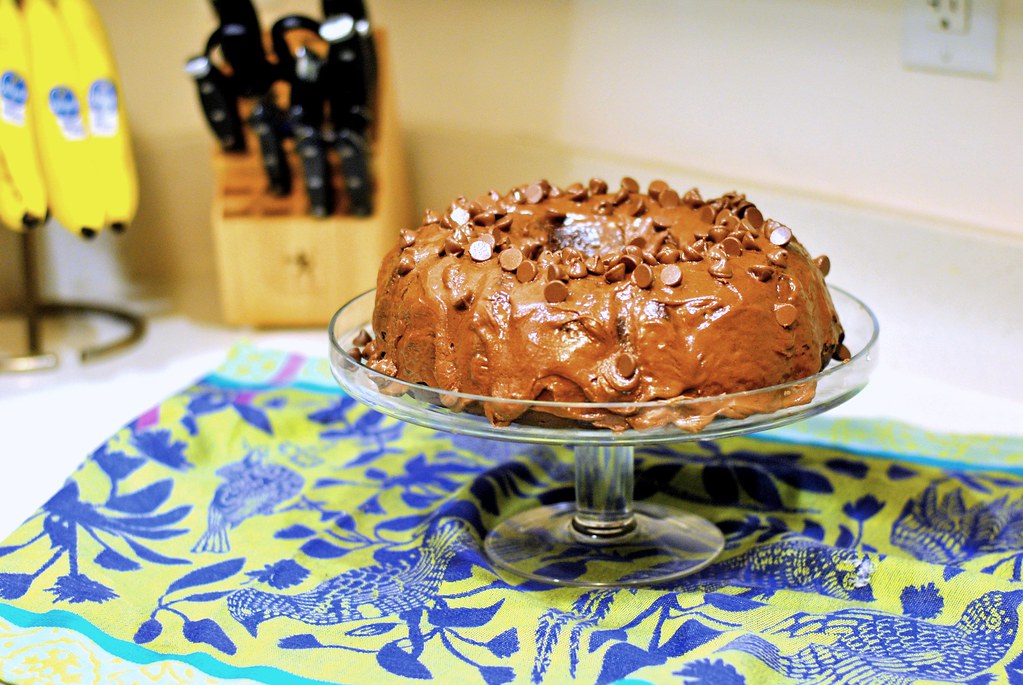
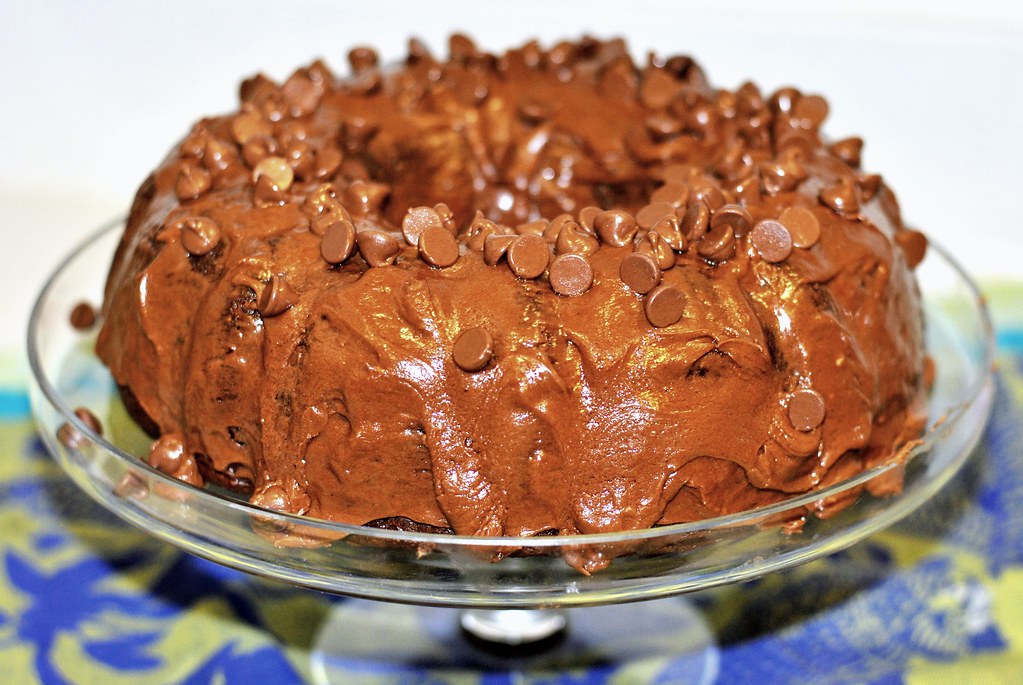
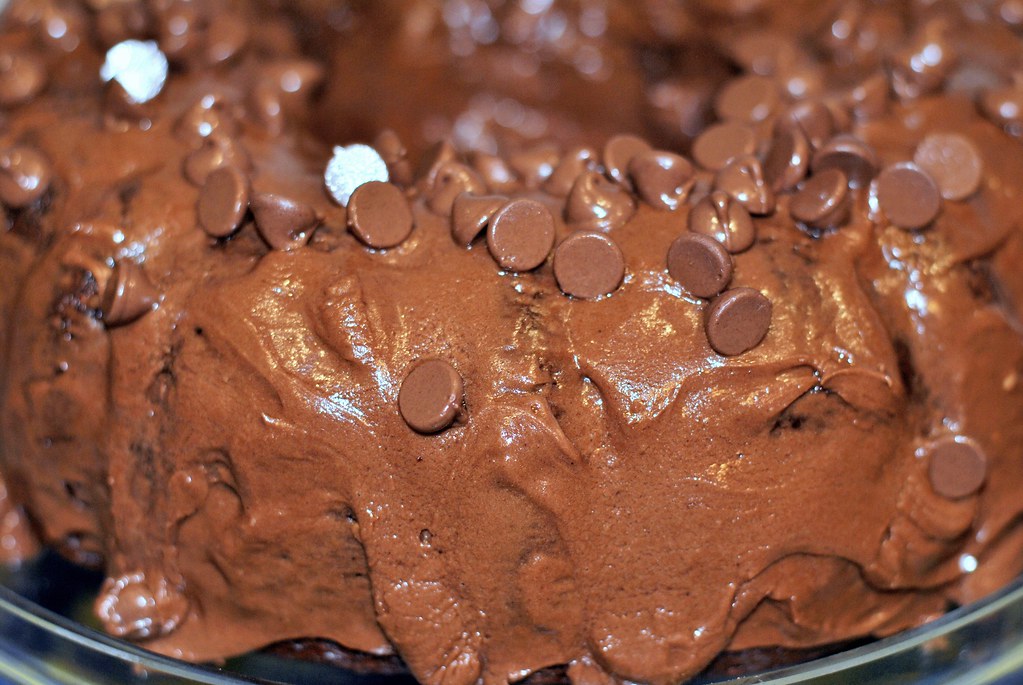
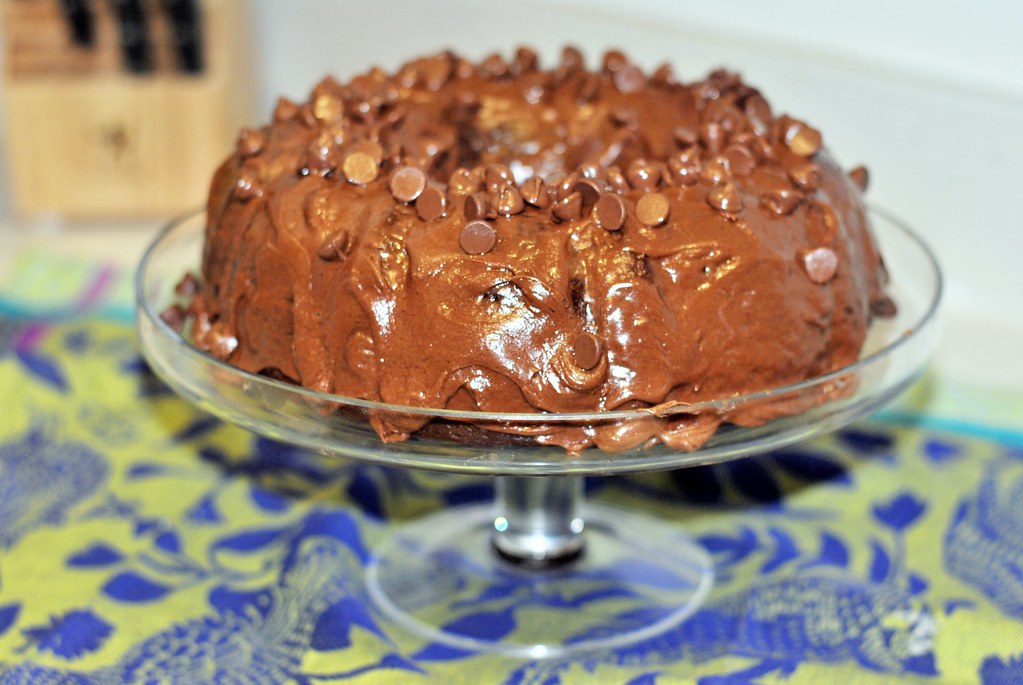
I can't take credit for this recipe, I found it here and once I took one look at it I HAD to try it myself. Of course I swapped out the semi-sweet chocolate chips for milk chocolate ones because I am a WILD WOMAN but everything else is the same. She calls this cake "ridiculous" and it truly is, and easy! I love love love any recipe that starts with boxed cake. Don't tell anyone but I think doctored boxed cake is better than from scratch in certain cases, especially this one or anything involving funfetti.
INGREDIENTS (recipe is from http://cookiesandcups.com/)
Cake
1 (15.25 ounce) box chocolate cake mix
1 (3.9 ounce) box instant chocolate pudding
1 (16 ounce) container sour cream
3 eggs
⅓ cup vegetable oil
½ cup water
2 cups semi-sweet chocolate chips (I used milk chocolate)
Frosting
¼ cup butter, room temperature
¼ cup unsweetened cocoa powder
2 cups powdered sugar
1 teaspoon vanilla
¼ cup heavy cream
INSTRUCTIONS
Cake
Preheat oven to 350°F. Liberally grease a 10- inch bundt pan with butter or shortening and lightly dust with flour. Set aside.
In the bowl of your stand mixer fitted with the paddle attachment combine all the cake ingredients. Mix on low for 30 seconds until combined and then on medium speed until smooth, about 1 minute. Stir in the chocolate chips and pour the batter into the prepared pan.
Bake for 55-60 minutes, until the cake is set. Allow the cake to cool in the pan for 10 minutes and then invert the pan onto a cake plate. Cool completely before frosting.
Frosting
In the bowl of your stand mixer fitted with the paddle attachment on low speed beat the butter, cocoa powder and powdered sugar until combined. Add in the vanilla and cream and beat on medium speed for 1-2 minutes until creamy, scraping the sides of the bowl as necessary.
Frost the top of the cake and garnish with more chocolate chips if desired.
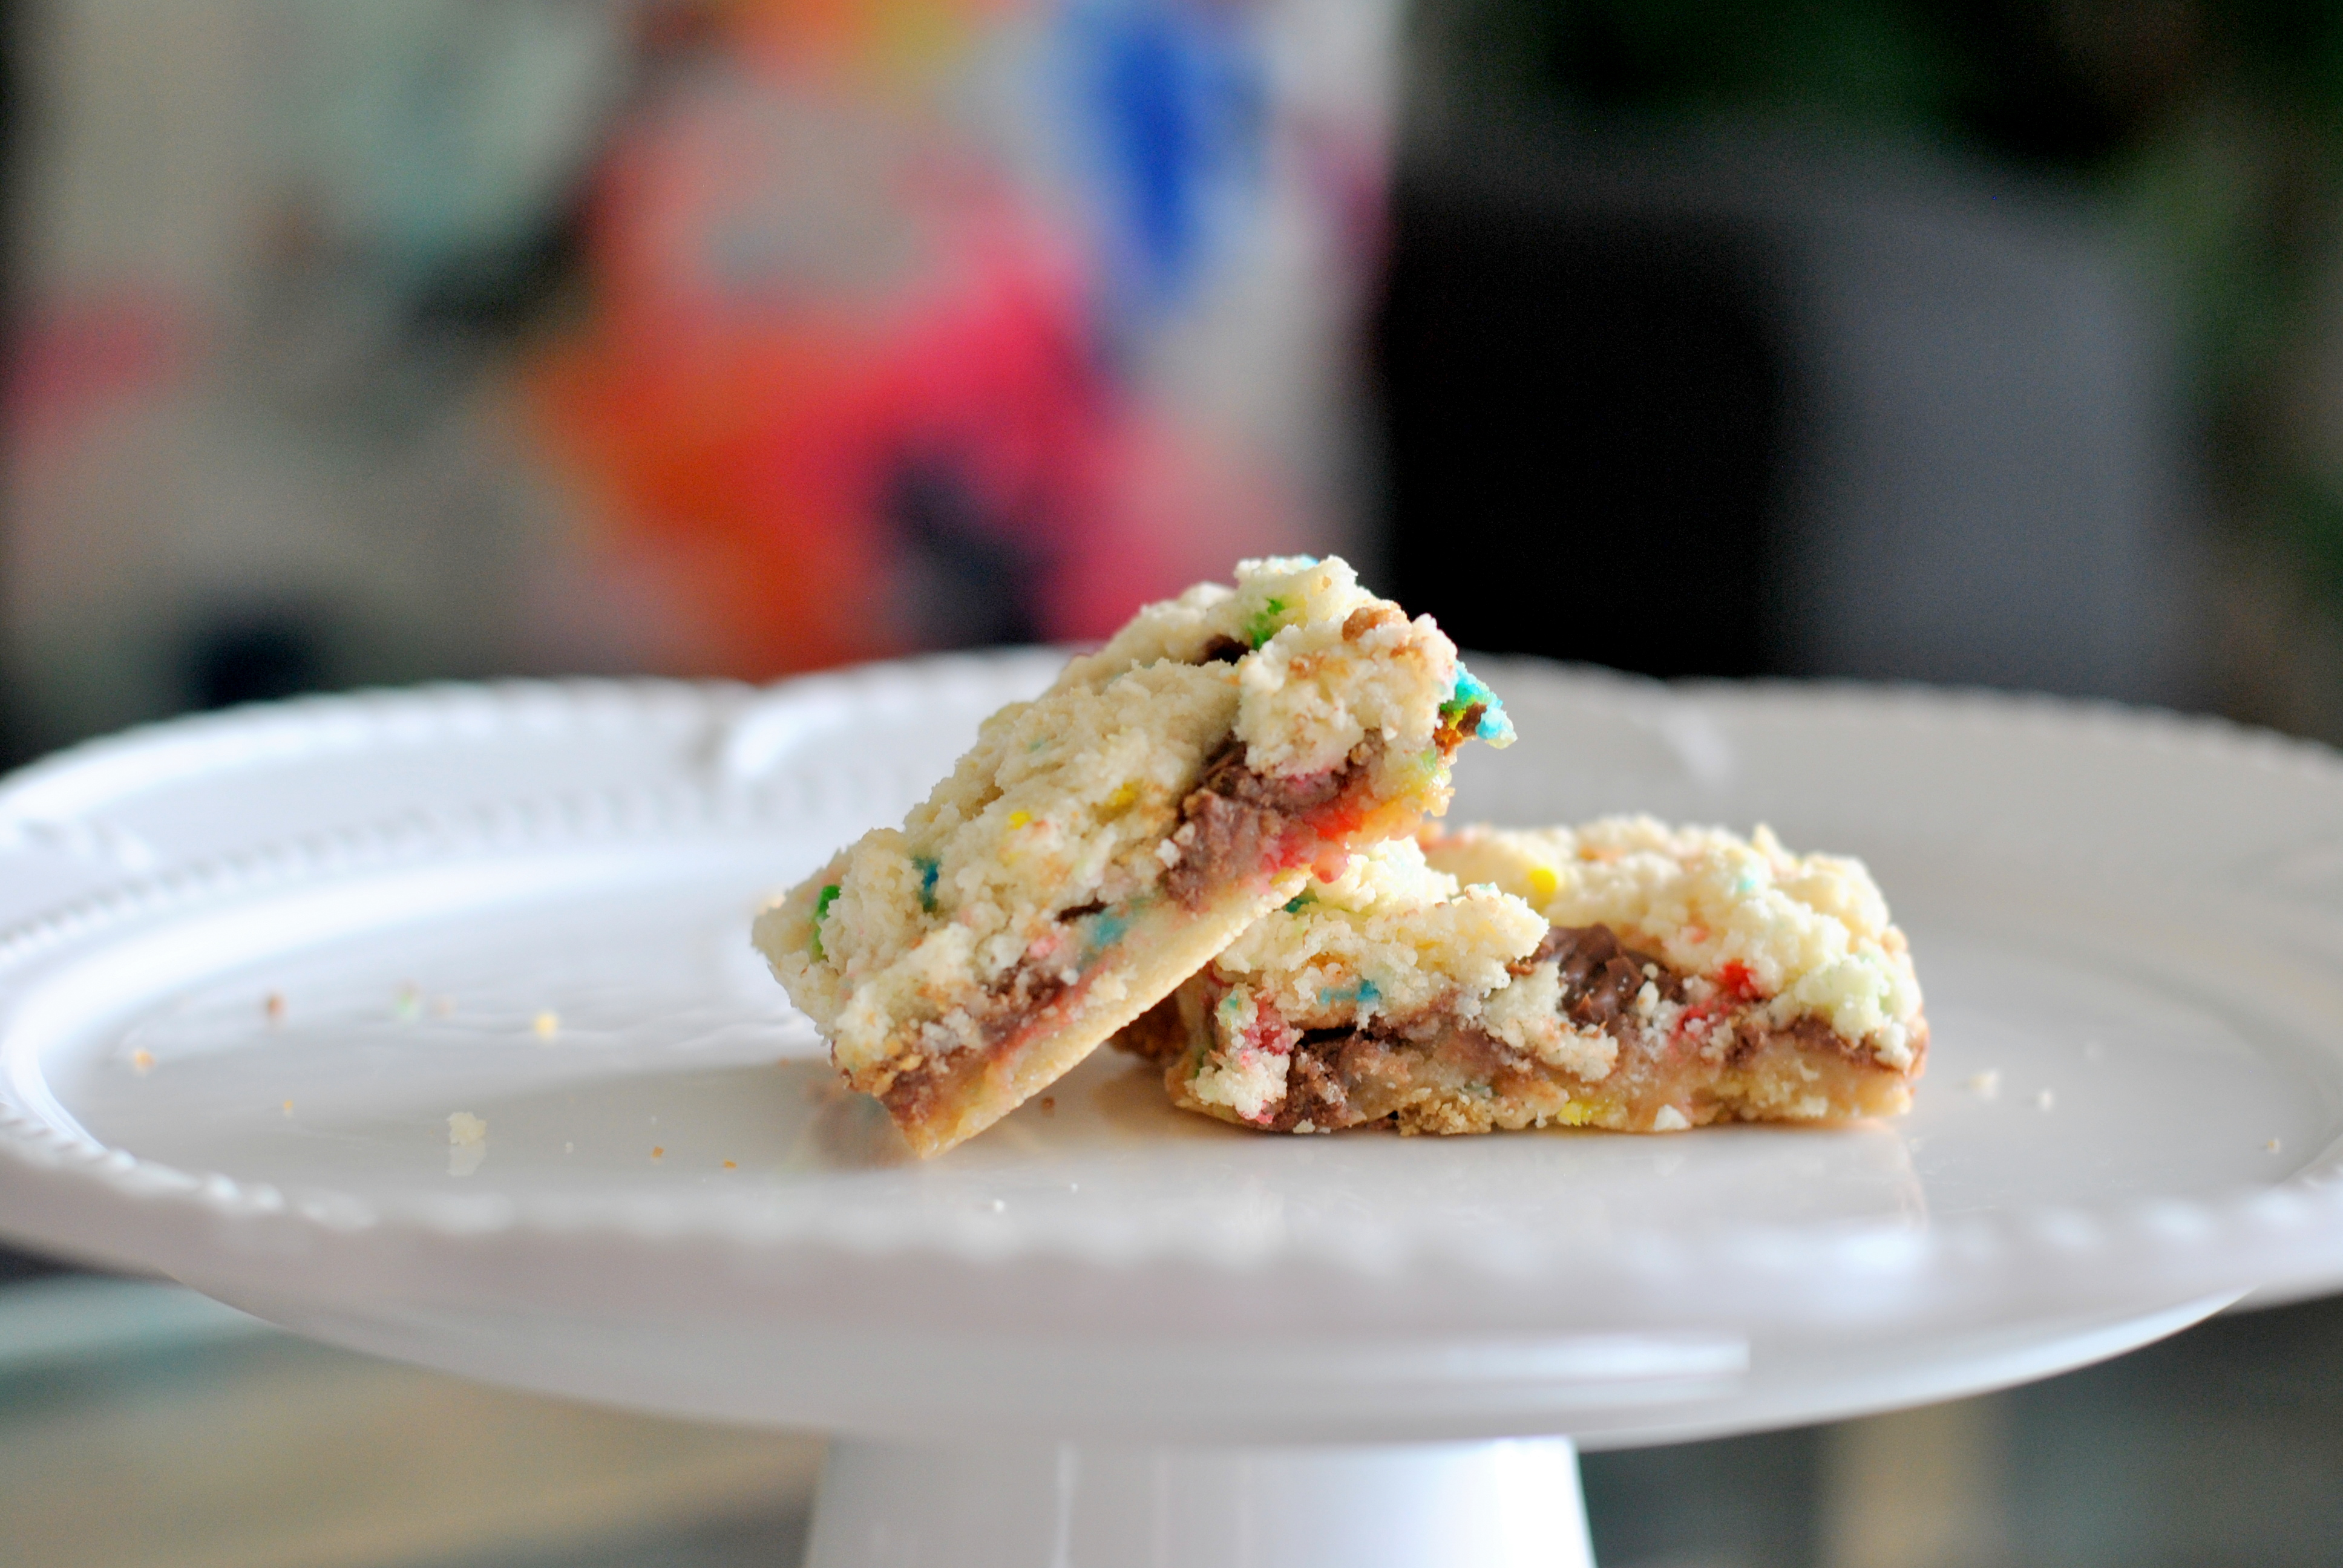
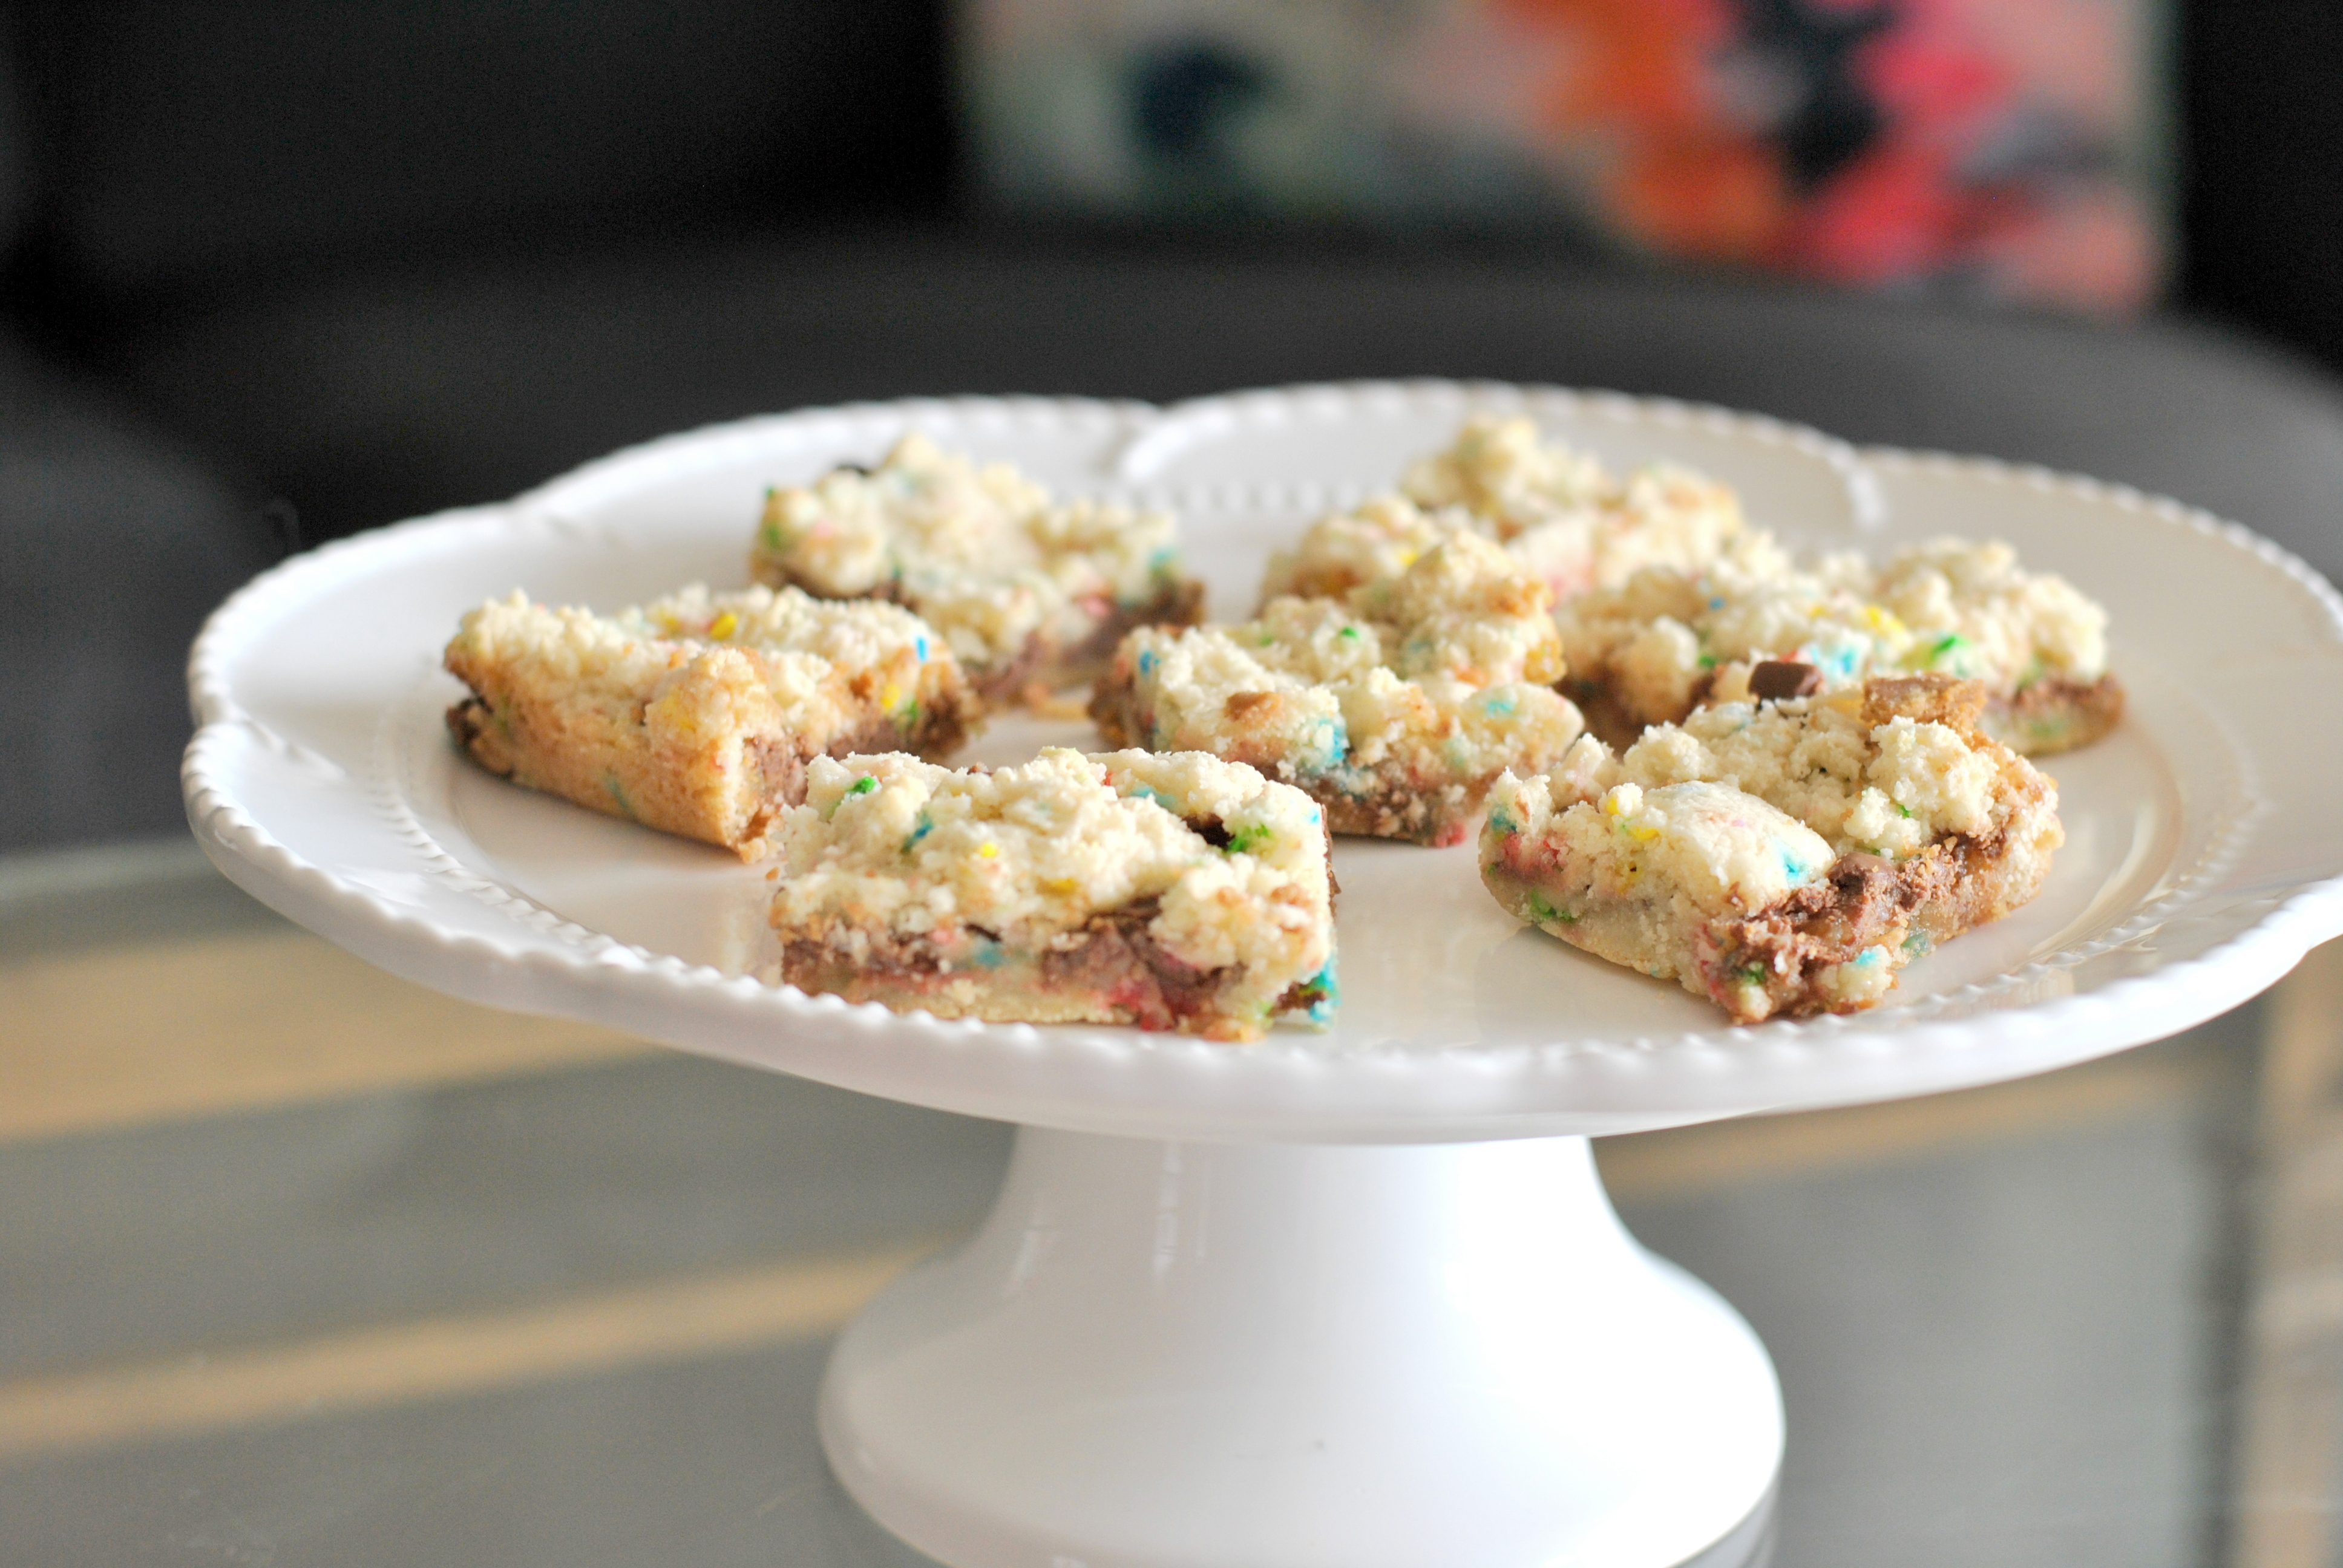
..Chocolate Caramel Funfetti Bars
March 23, 2016 • dessert Eats and Sweets food funfetti recipe recipe post
So if you follow me on snapchat (@erinhabes) you know I'm currently doing a Whole30 (day 17). I know, it's seriously masochistic to bake delicious treats like this when you can't even lick the spoon after you're done but one of my best friends just had the cutest baby girl and I wanted to take them some really fun treats - key word is fun - as in FUNFETTI (the best cake flavor of all time - you can find my other funfetti recipes here and here - WHERE is my sponsorship already, Pillsbury?). The recipe I used is here, I followed it exactly except I just swapped out white cake mix for funfetti mix because popping out a baby deserves a little celebration!
INGREDIENTS
1 box (18.25 oz) funfetti mix
5 oz evaporated milk
¼ cup butter, melted
40 Rolo Candies, unwrapped and cut in half
INSTRUCTIONS
Preheat oven to 350°
Spray a 9x13 pan with cooking spray.
With your mixer, beat cake mix, evaporated milk and butter until combined. Mixture will be thick and sticky.
Divide batter in half and press 1 half into the bottom of the pan.
Bake until just set, approximately 8-9 minutes.
Remove base from oven and place Rolo candies, caramel-side down on top.
Drop remaining batter on top of Rolos in teaspoon sized amounts.
Bake for 20-24 minutes longer until top begins to golden.
Cool completely before cutting into squares.

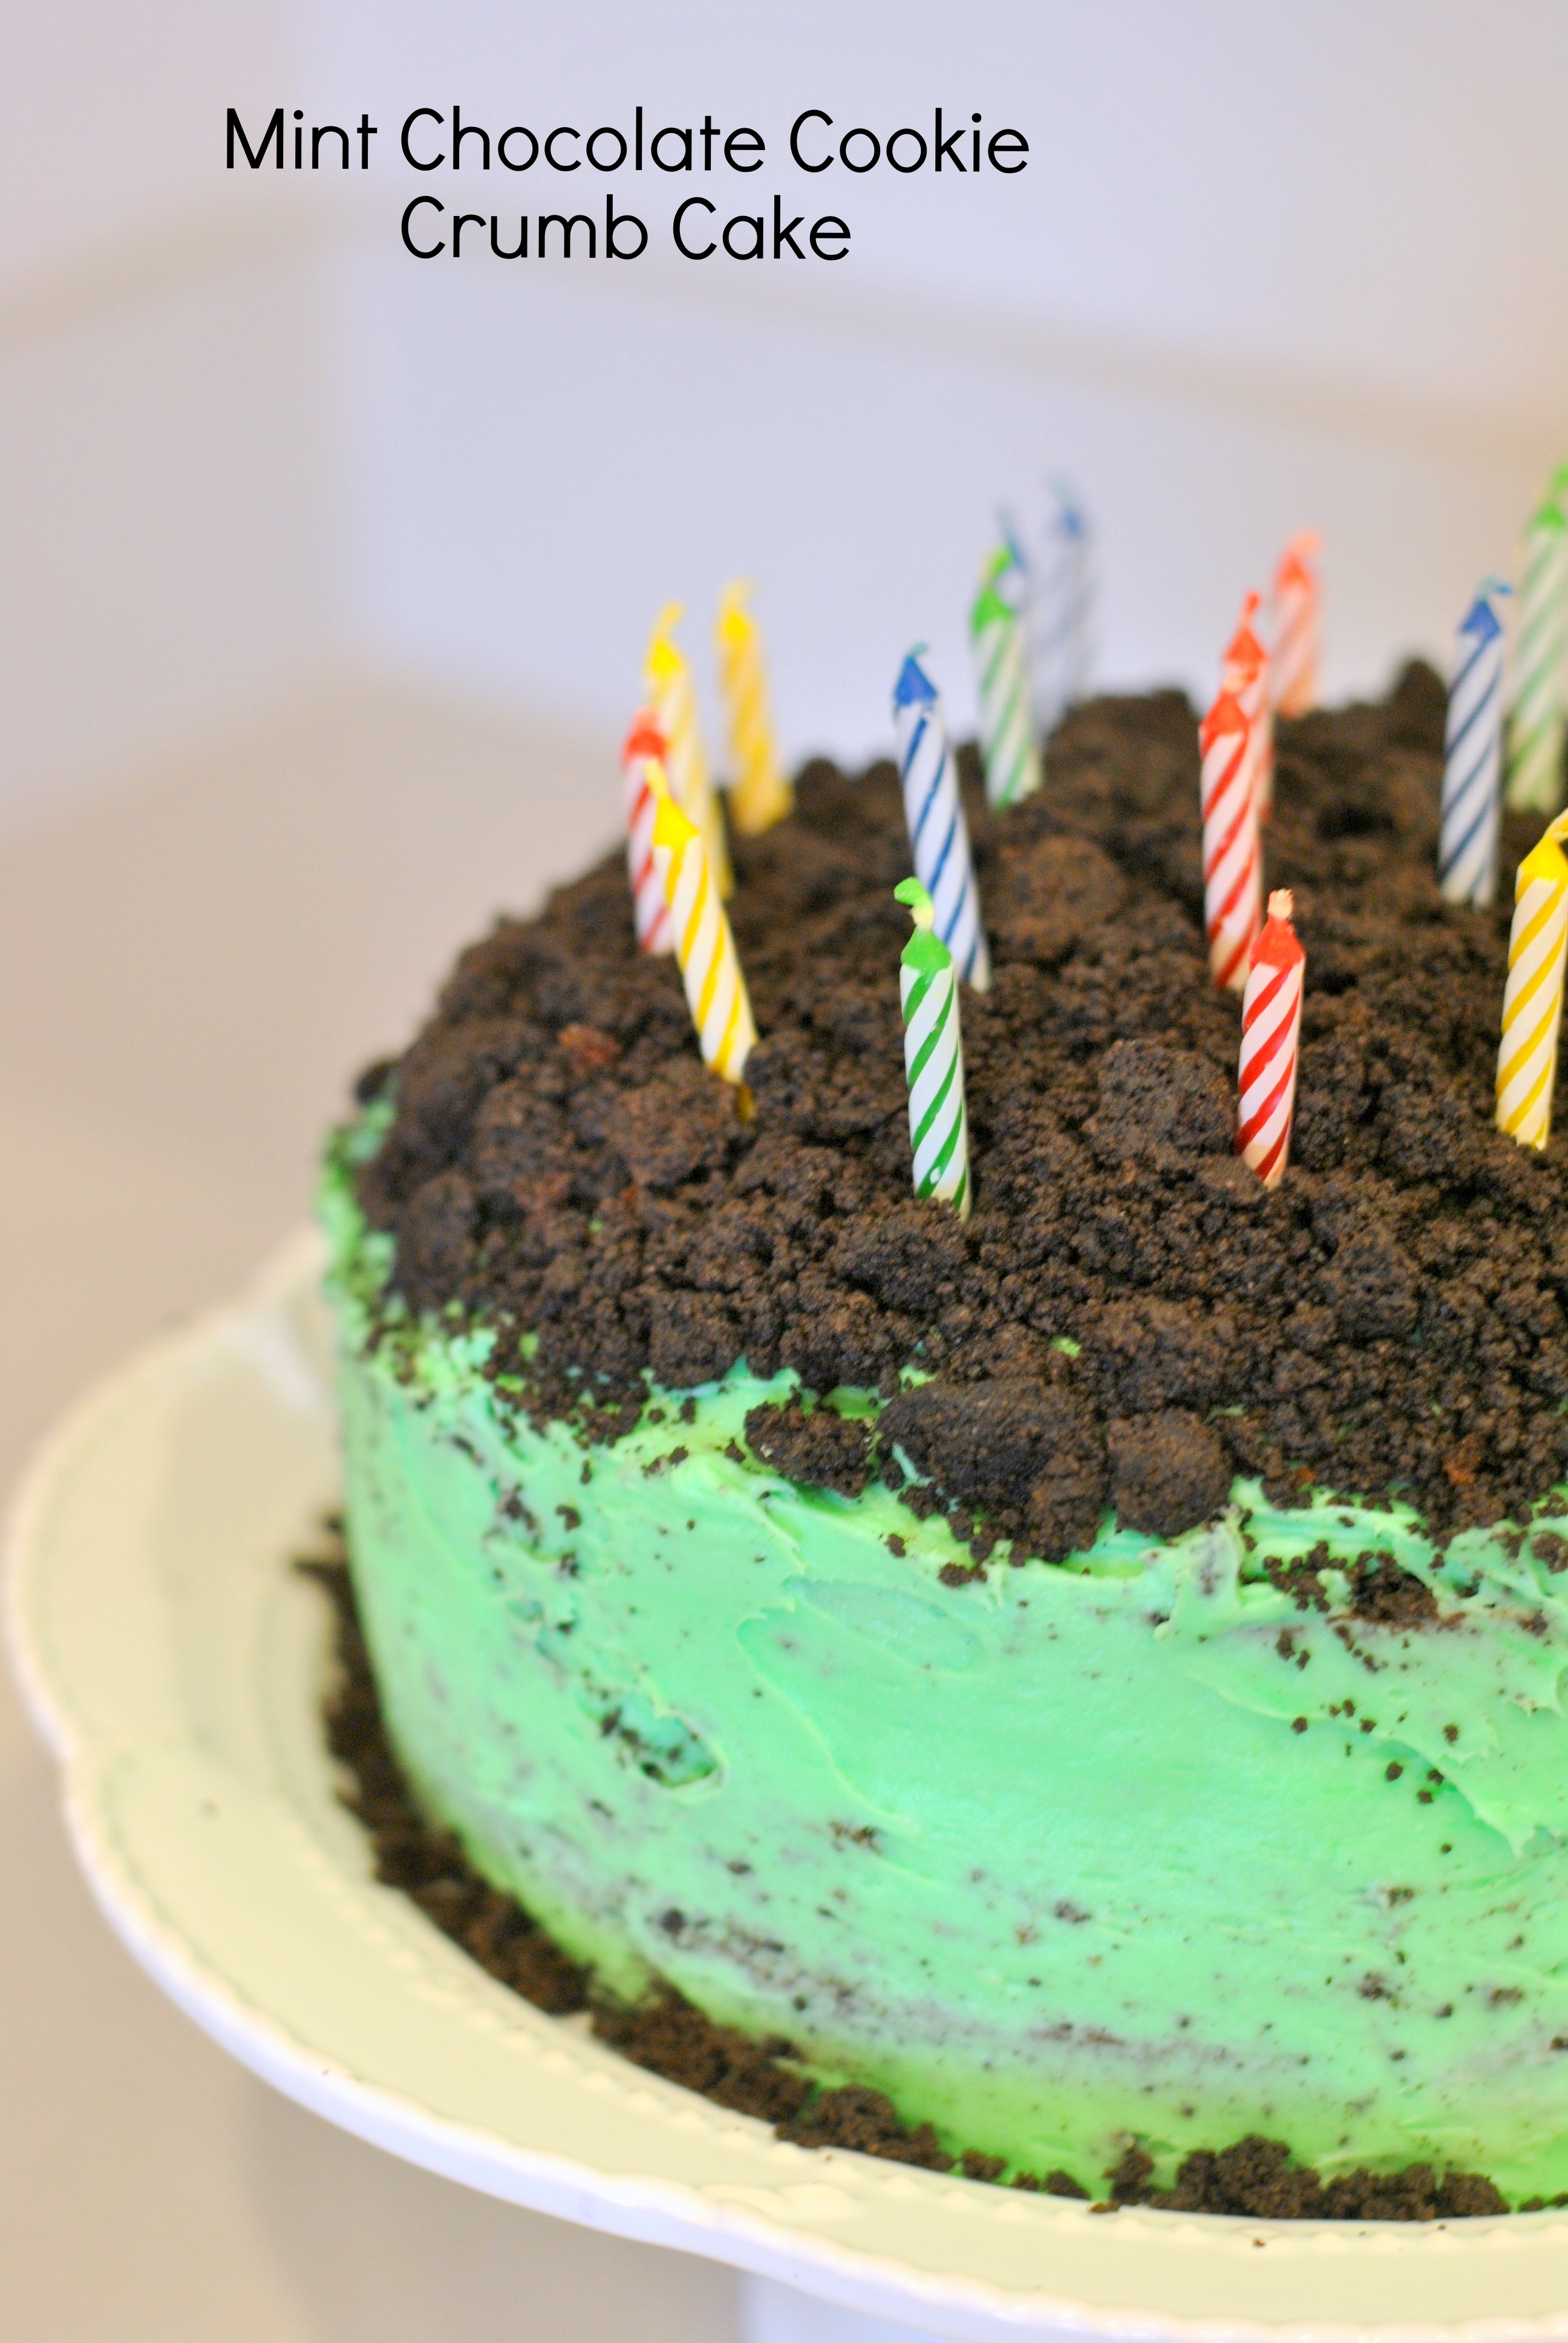
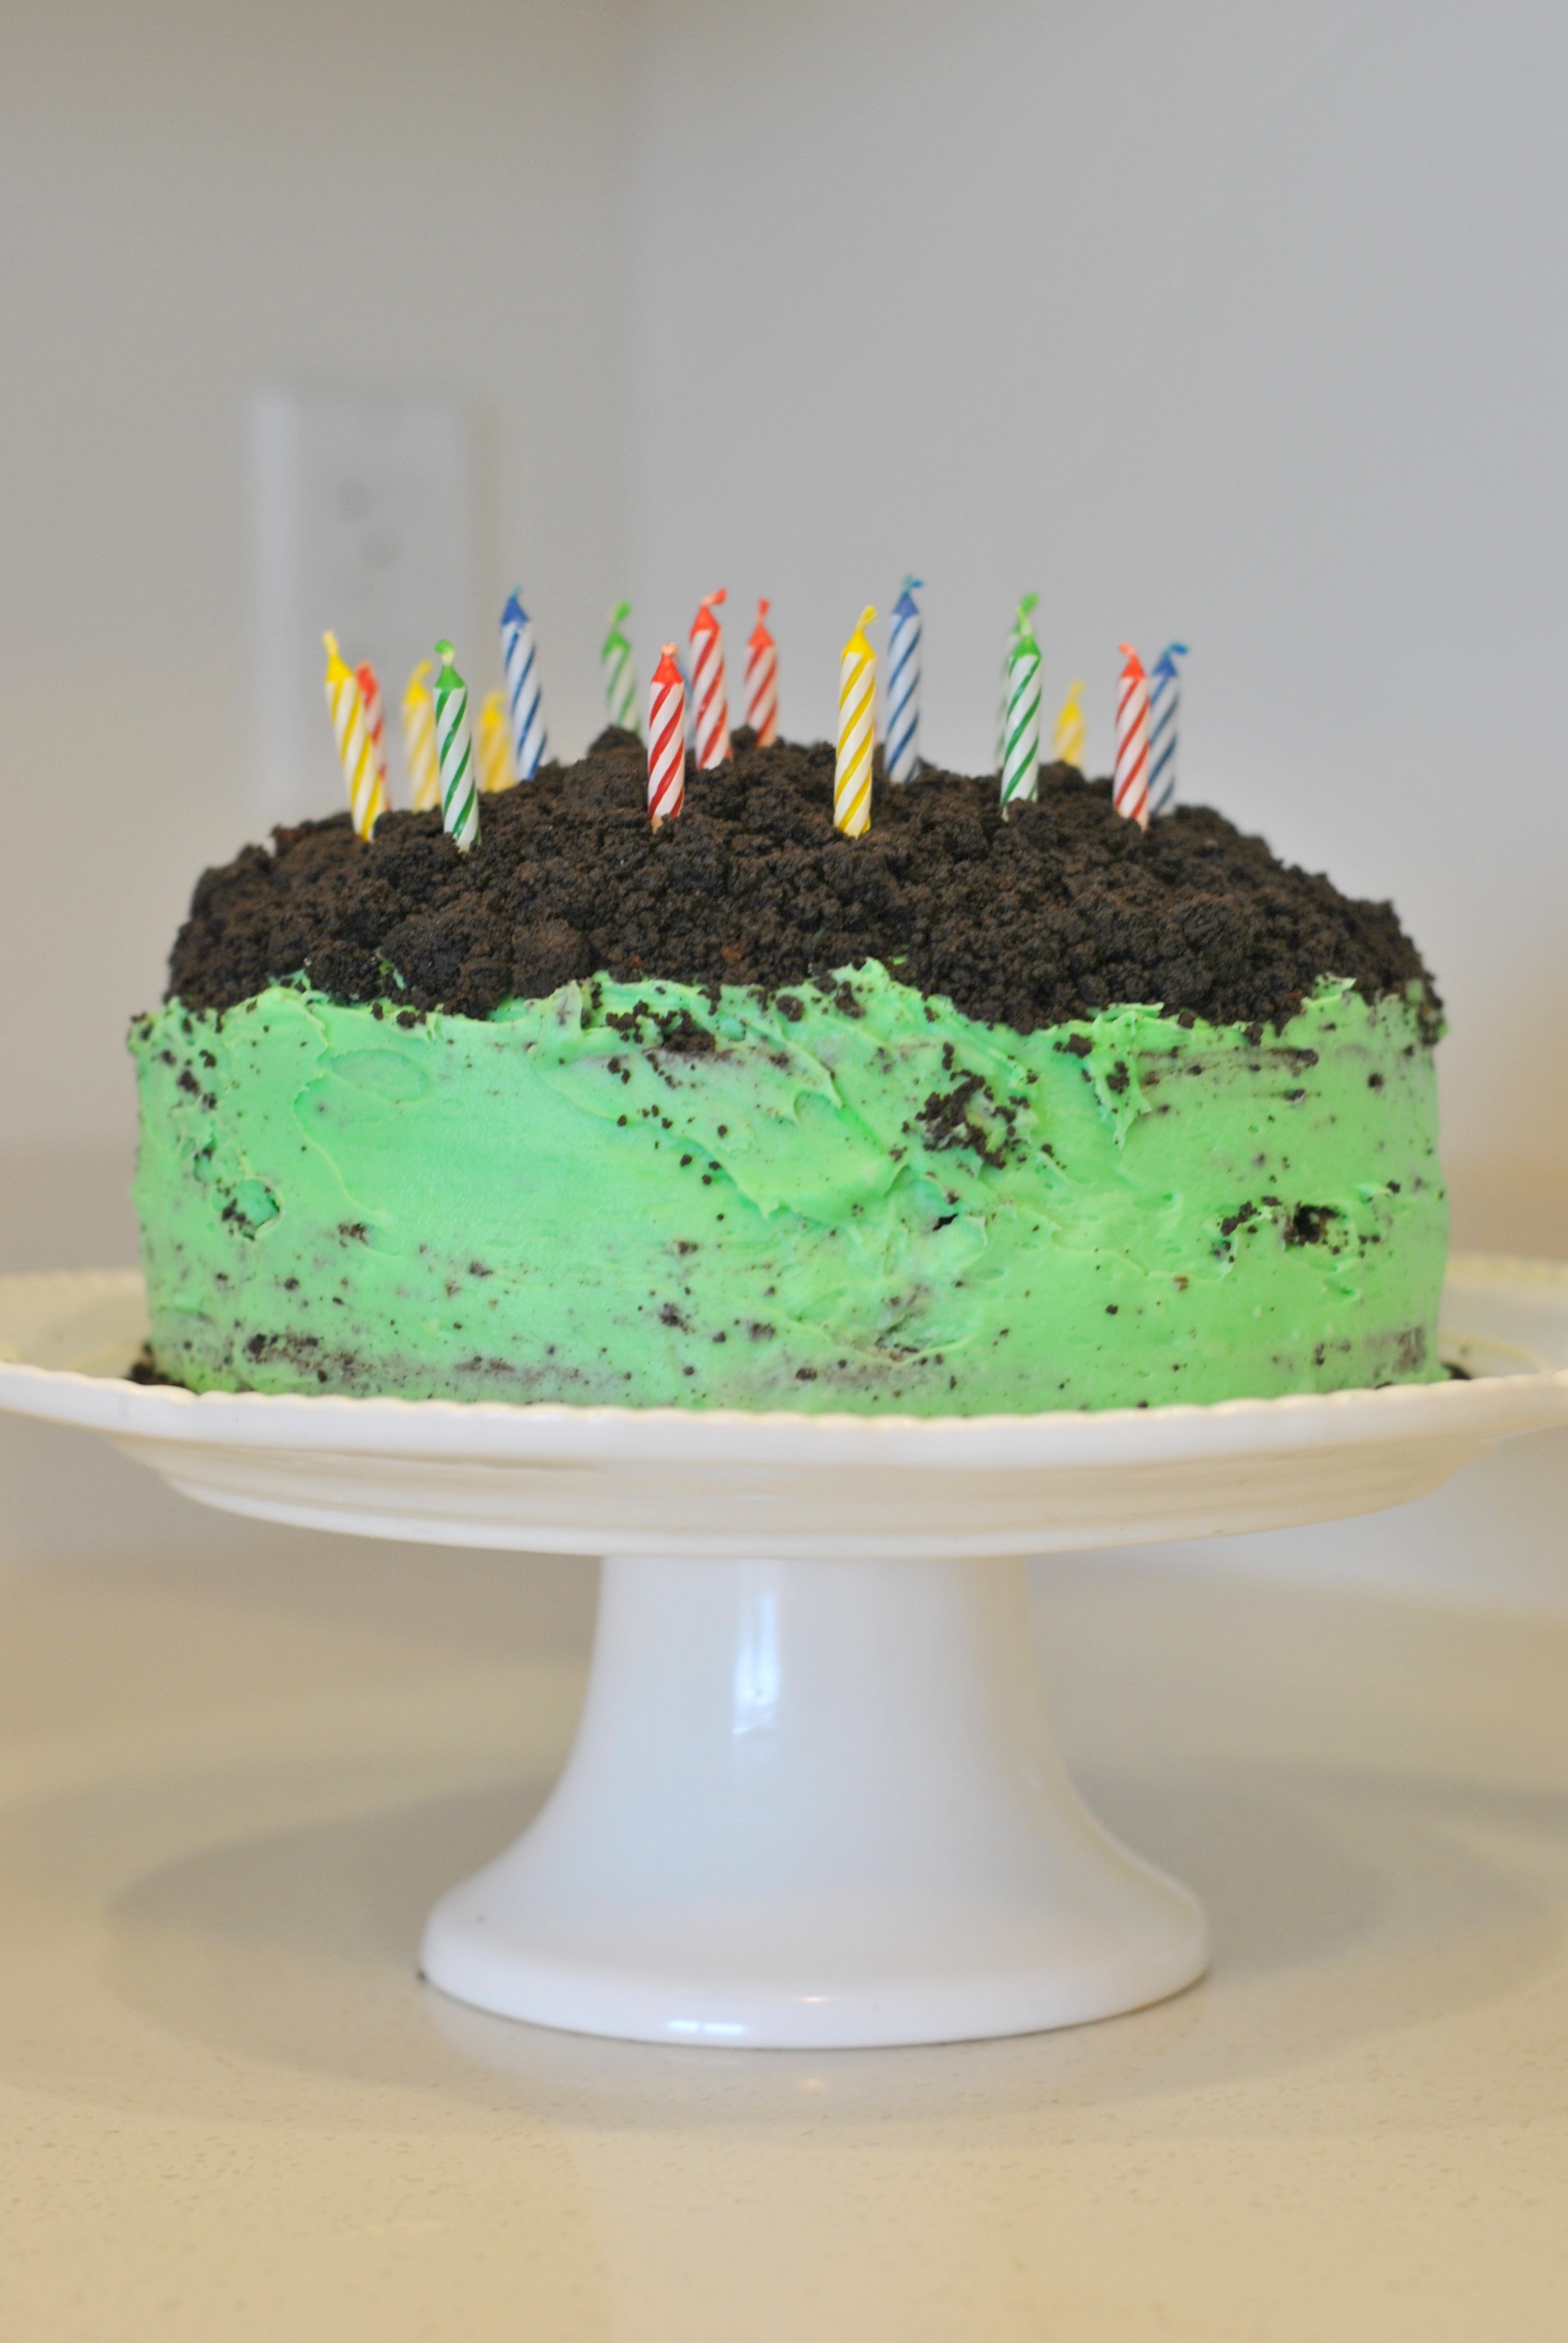
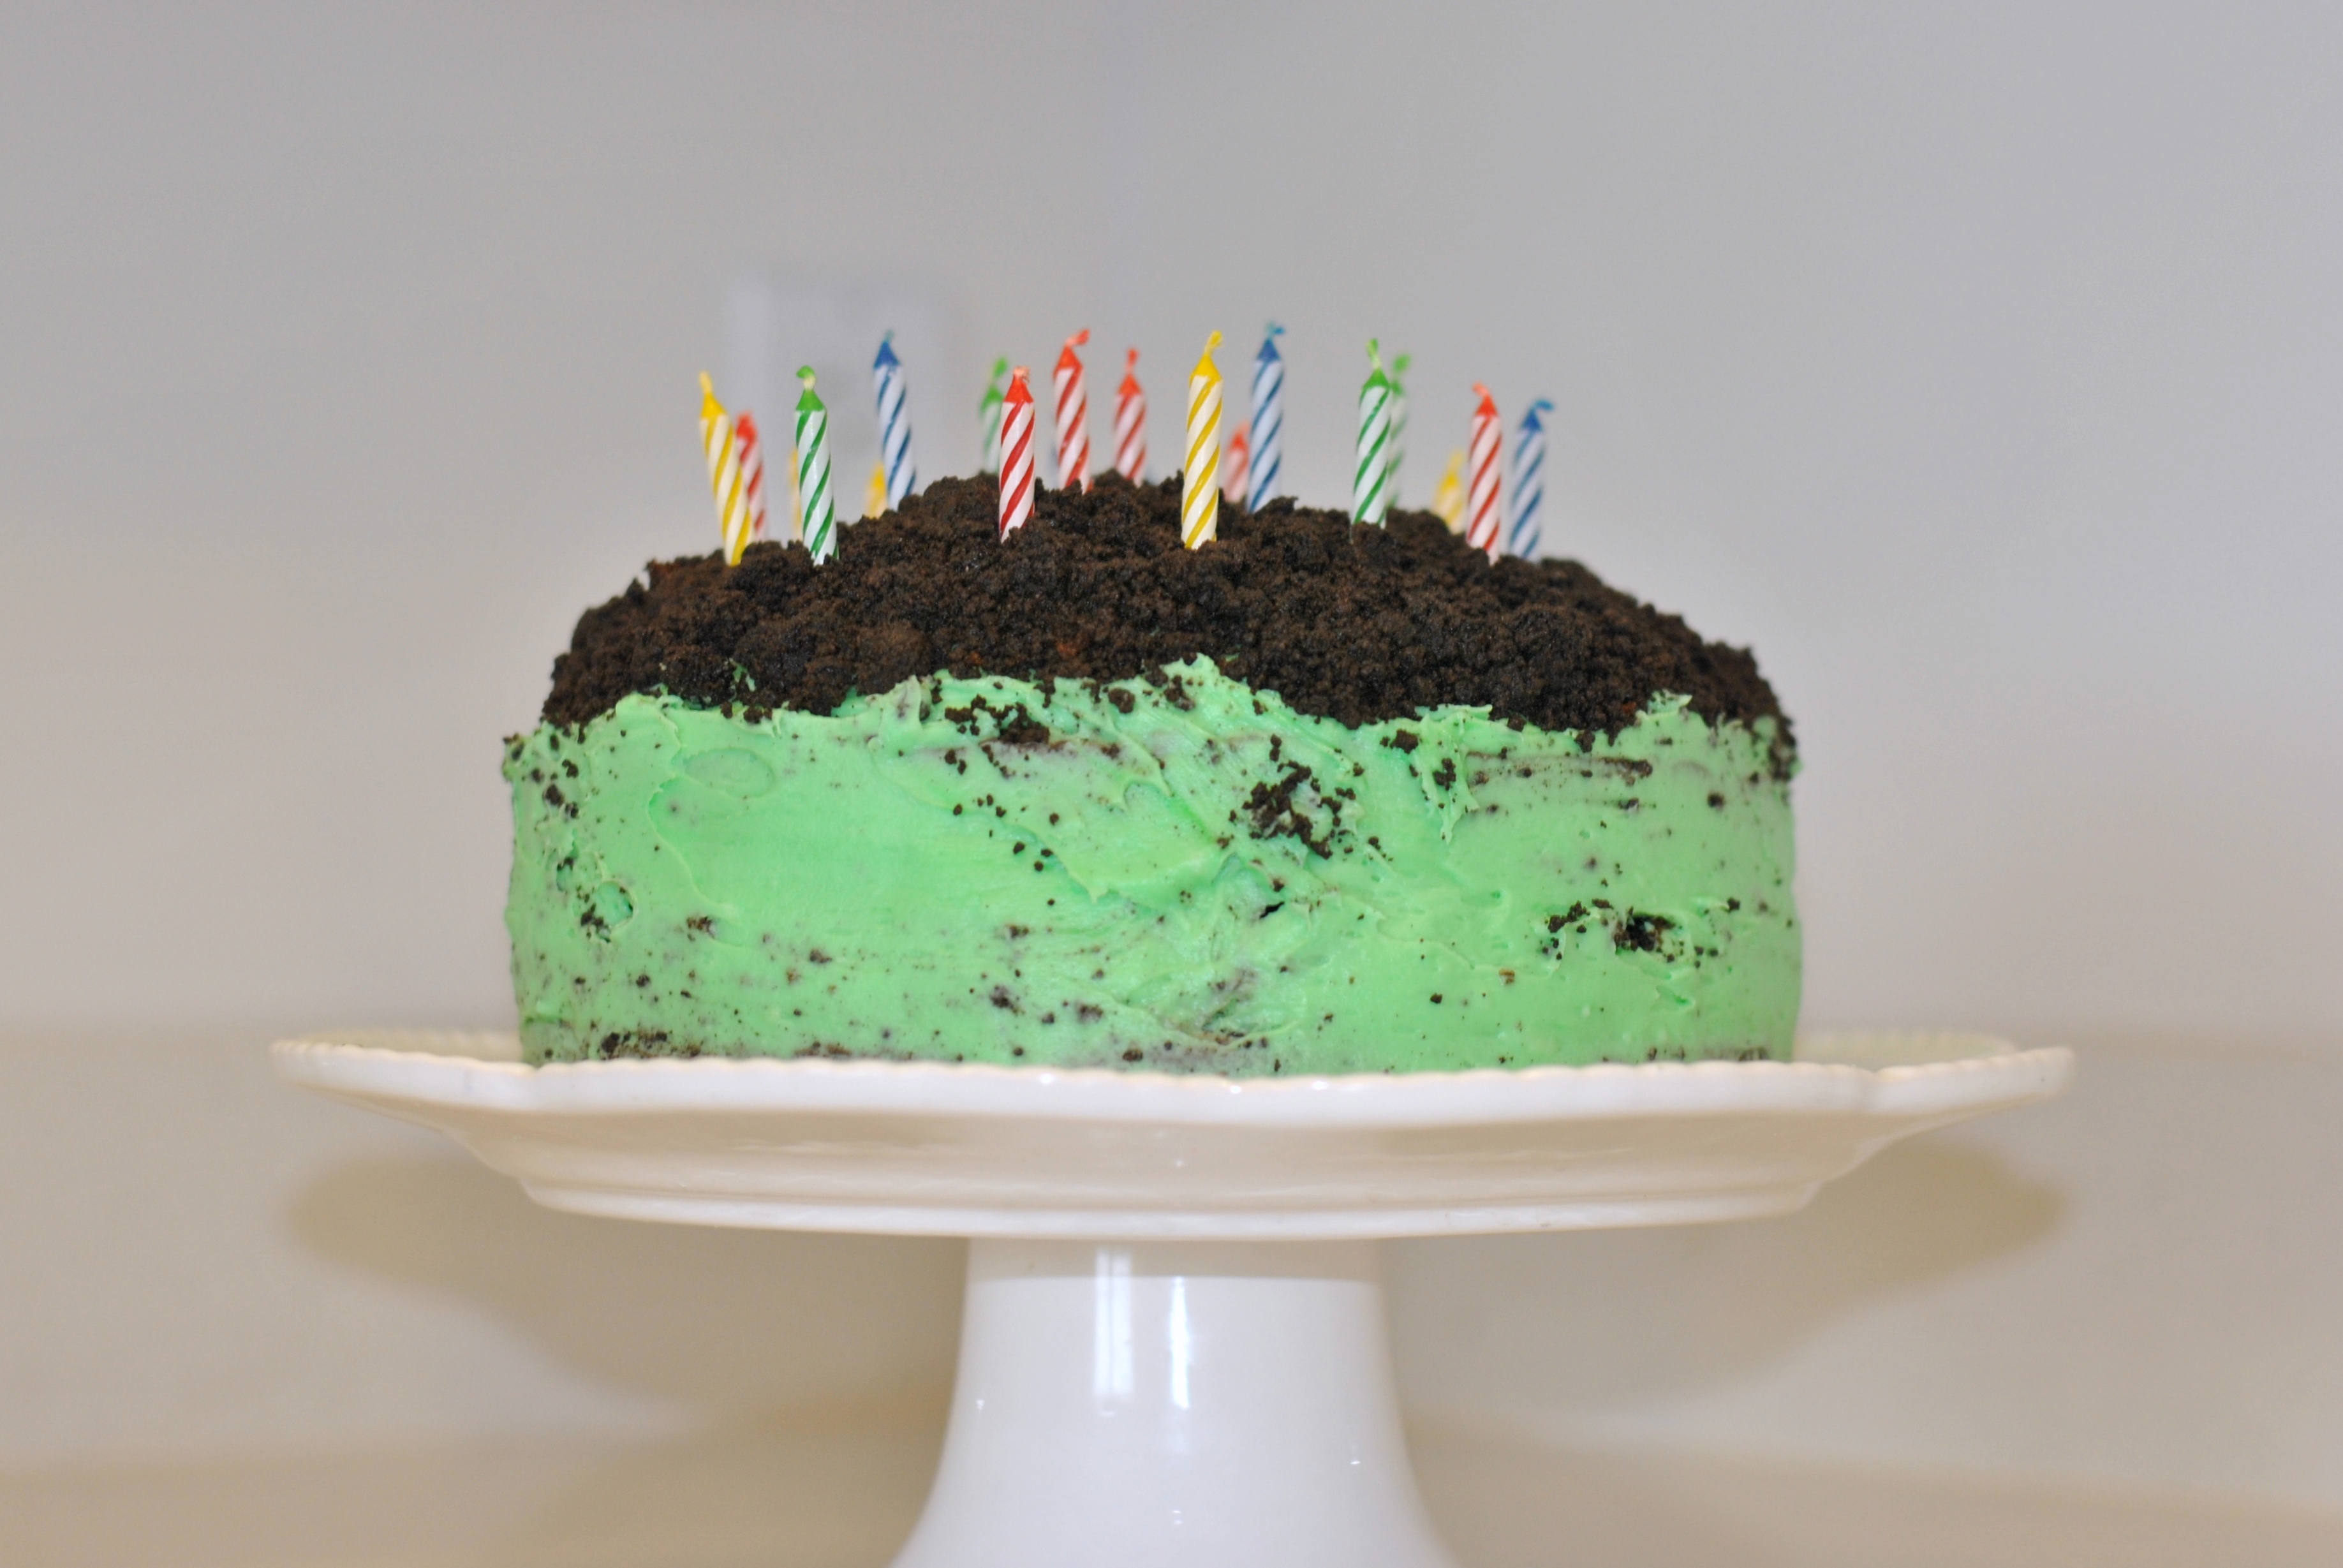
For my fiances 30th birthday he requested a cake that had mint and chocolate which didn't come as a surprise to me since he has made this request before (see the mint Oreo cake from birthday's past here). I basically made the same thing with the ingredients all switched around (only mint in the icing not the cake) but he seemed equally pleased with the end result.
Ingredients
1 box chocolate cake (plus eggs/water/oil it calls for)
1 package of Oreo cookies
1.5 sticks of butter (12 oz)
1 package of cream cheese
3.5 cups confectioners sugar
1 cup milk chocolate chips
2 tablespoons peppermint extract
1 teaspoon vanilla
pinch of salt
green food coloring (optional)
Directions
1. Prepare boxed cake batter according to instructions. Stir chocolate chips into batter and bake according to instructions on box. I used two 9 inch cake pans.
2. While cake is baking, take one sleeve of Oreos and break up into a food processor. Blend them into fine crumbs while adding in 1/2 stick (4 oz) melted butter to make them sticky. Set mixture aside for assembly later.
3. Also while cake is baking whip together 1 stick of butter with cream cheese until fluffy. Add in vanilla, peppermint extract, and salt then gradually start adding in sugar 1/2 cup at a time until all 3.5 cups is incorporated (I also used a few drops of green dye here but it is not necessary).
4 Assembly: Place one cake on cake stand and ice with mint frosting, then add crumbles very generously to the top, then add the other cake on top of the crumbles and ice all around and use up the rest of the crumbles for the topping.

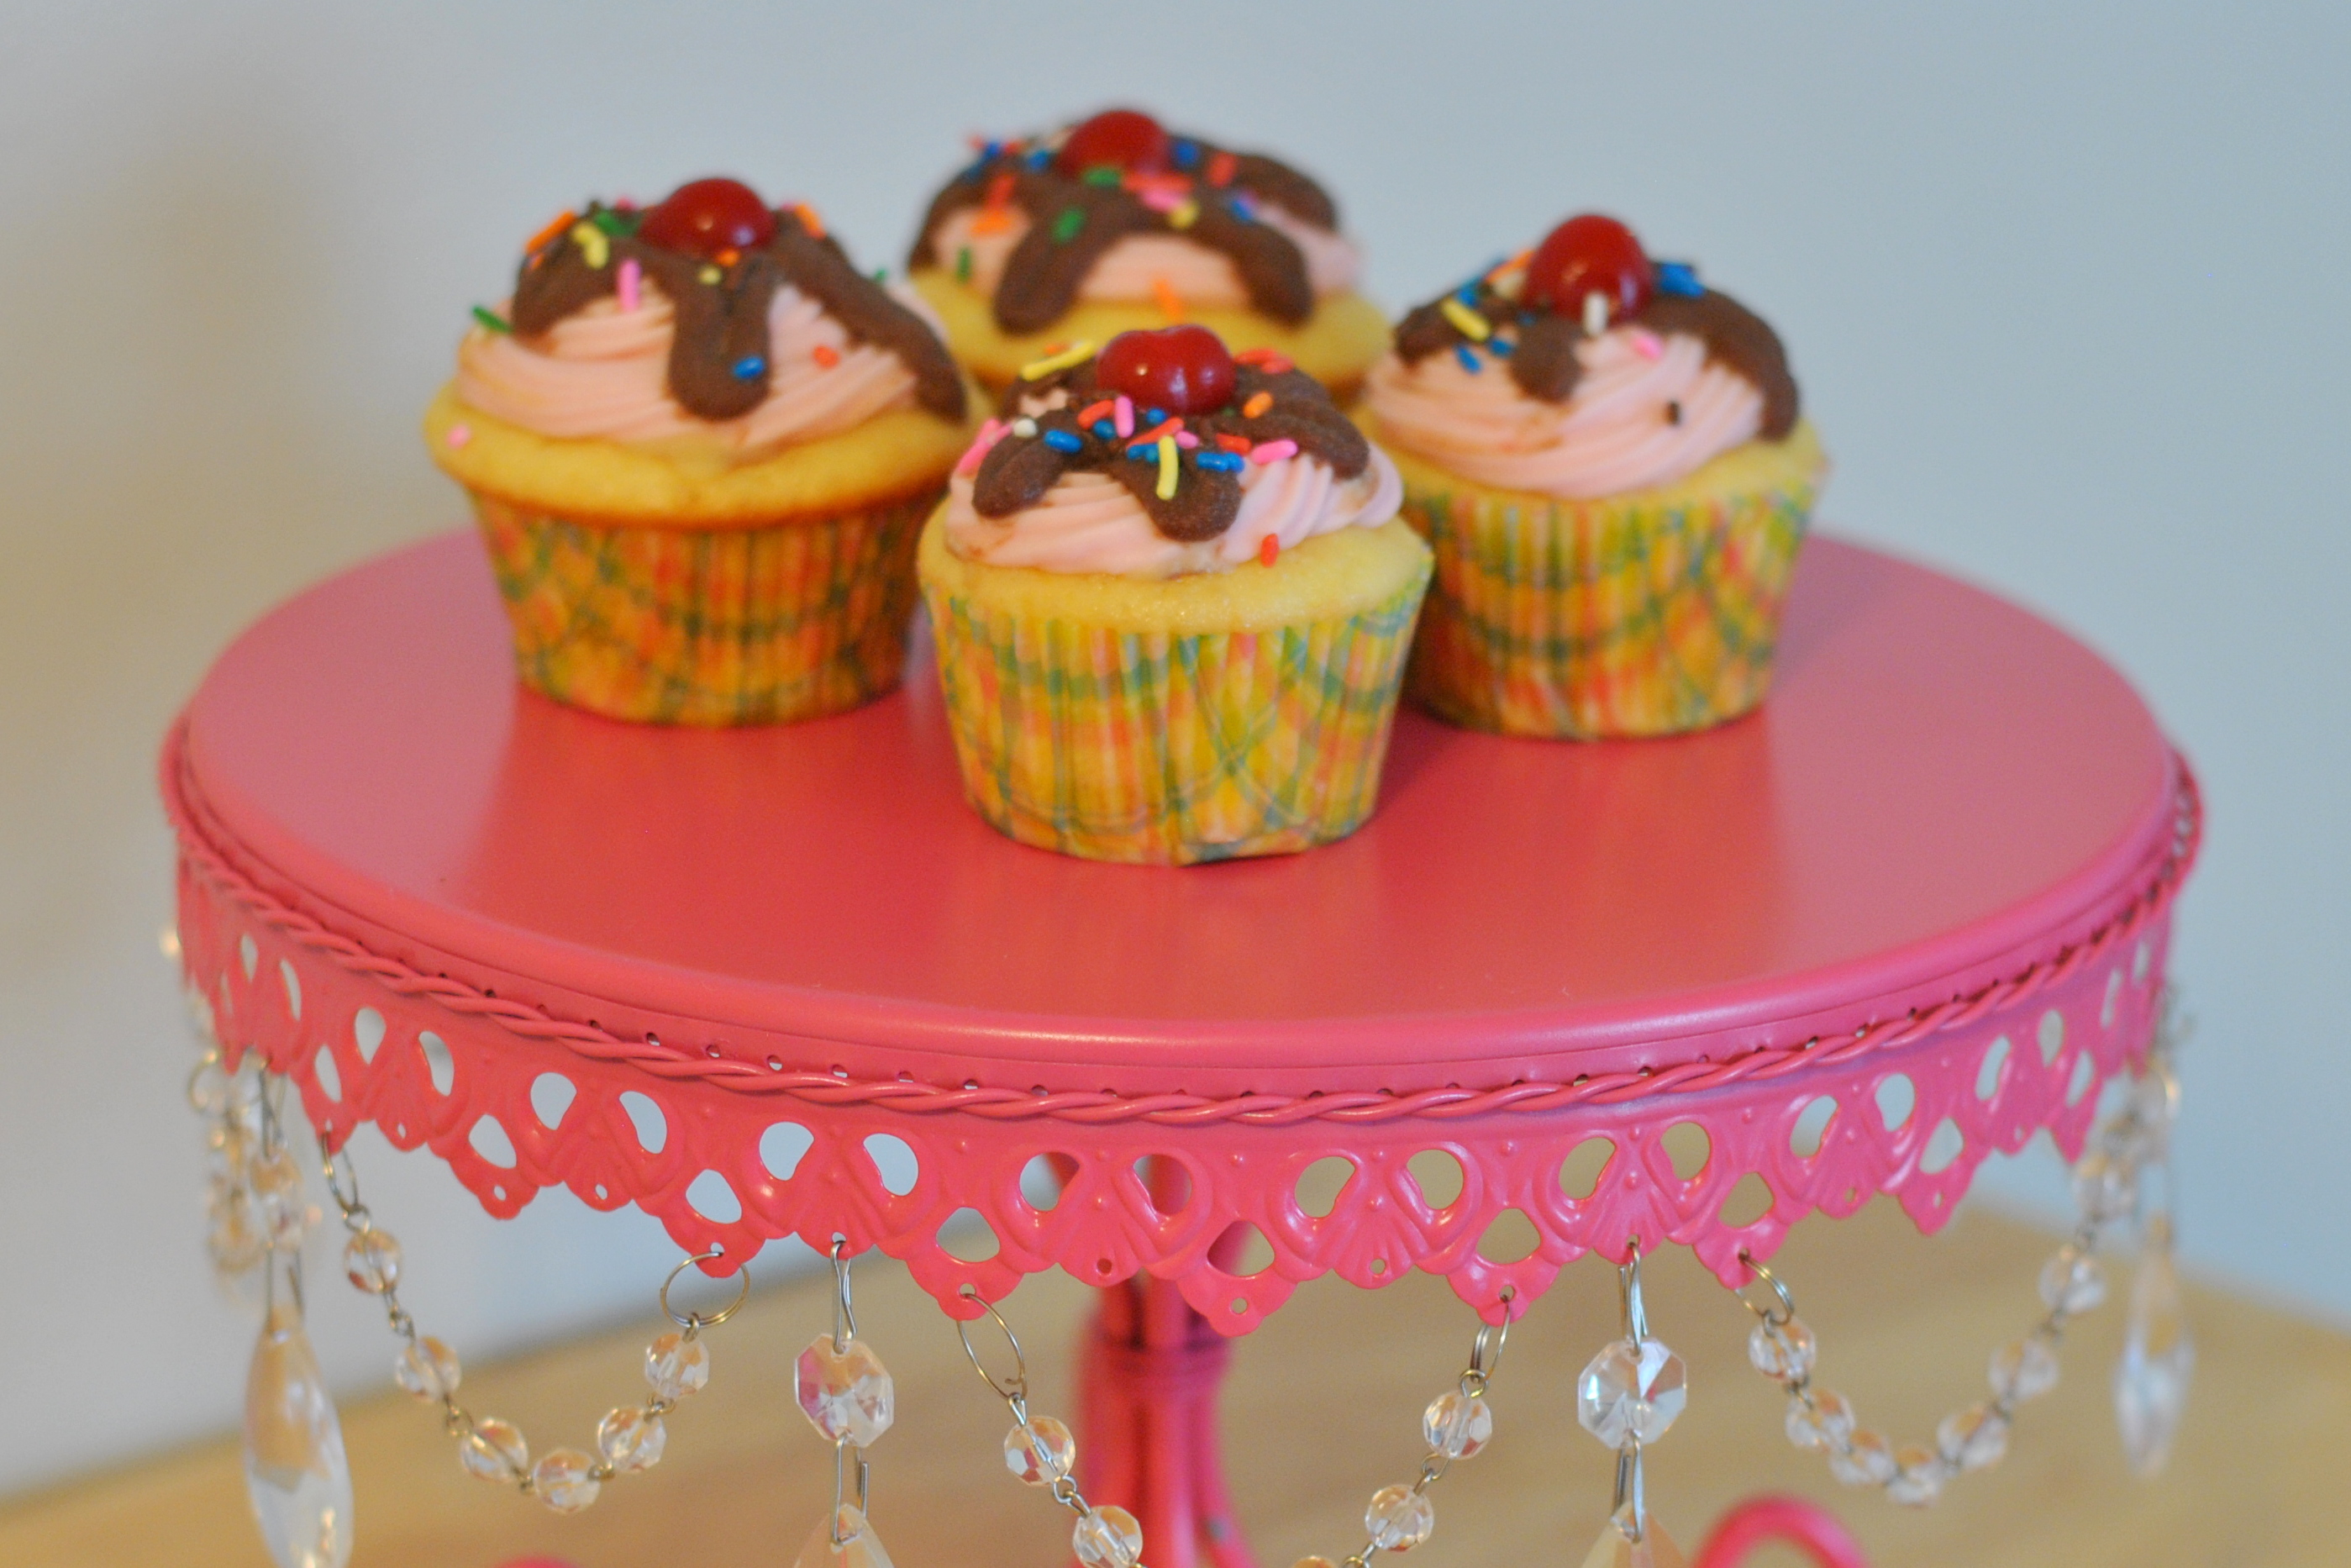
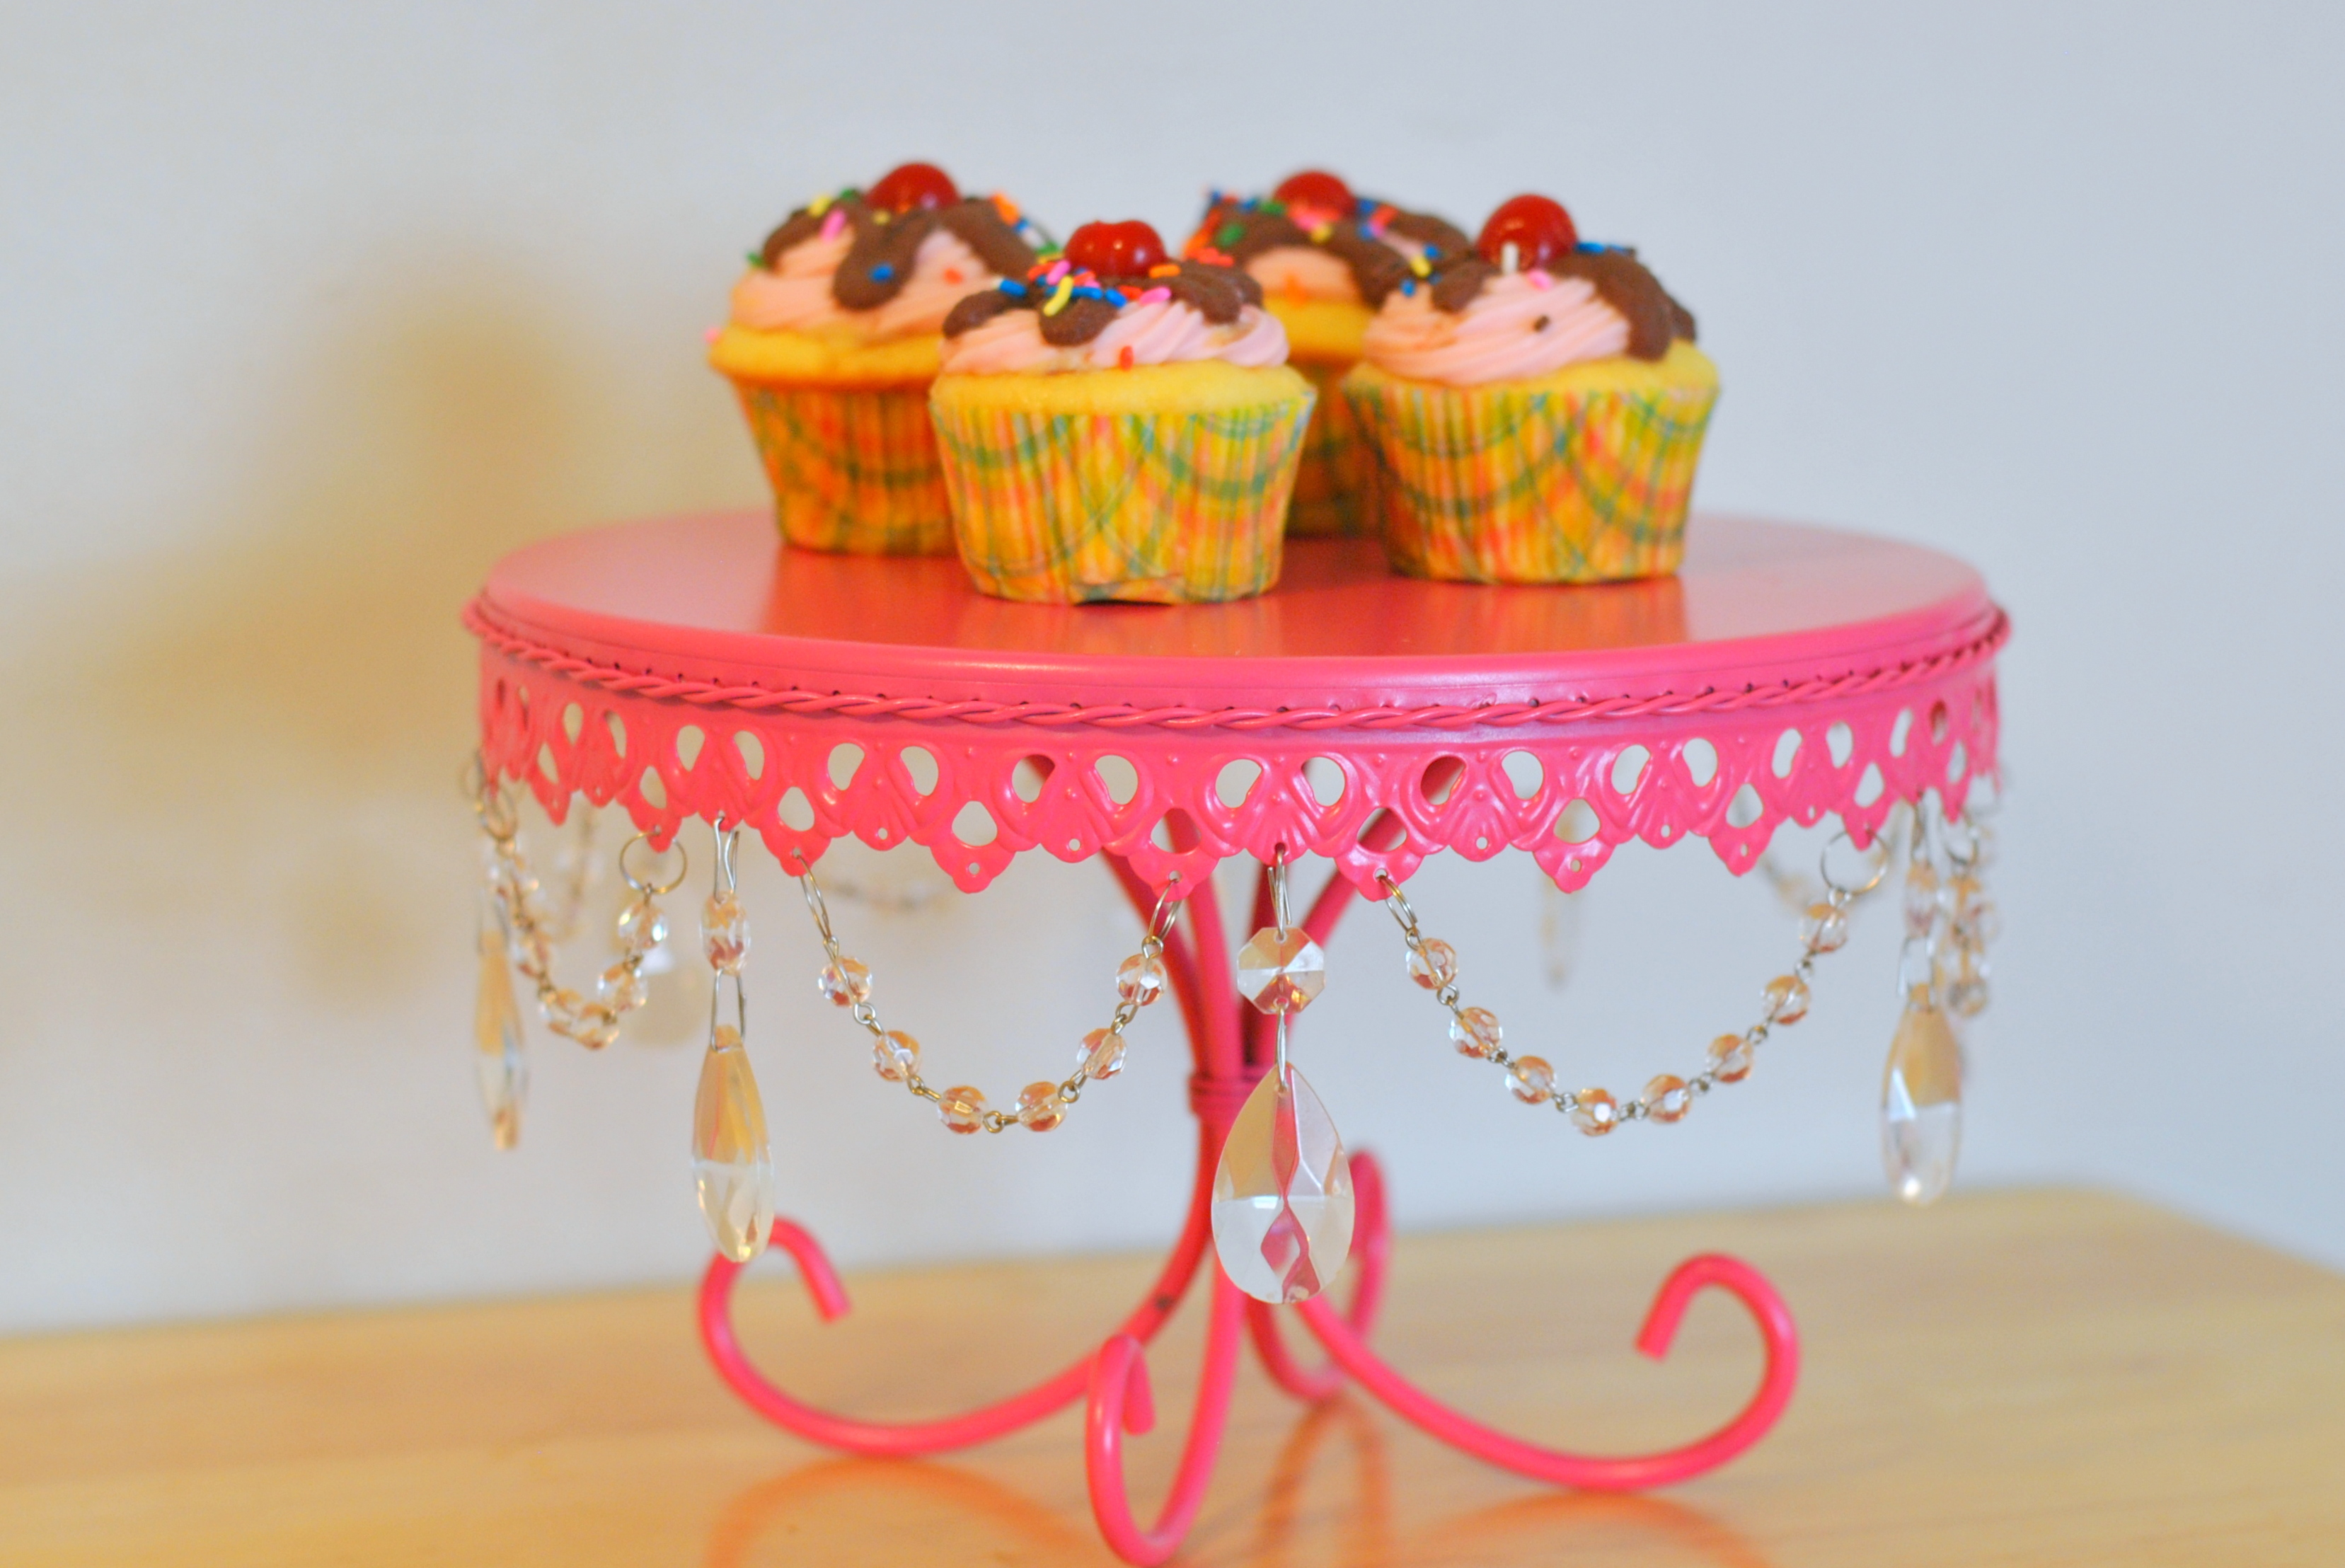
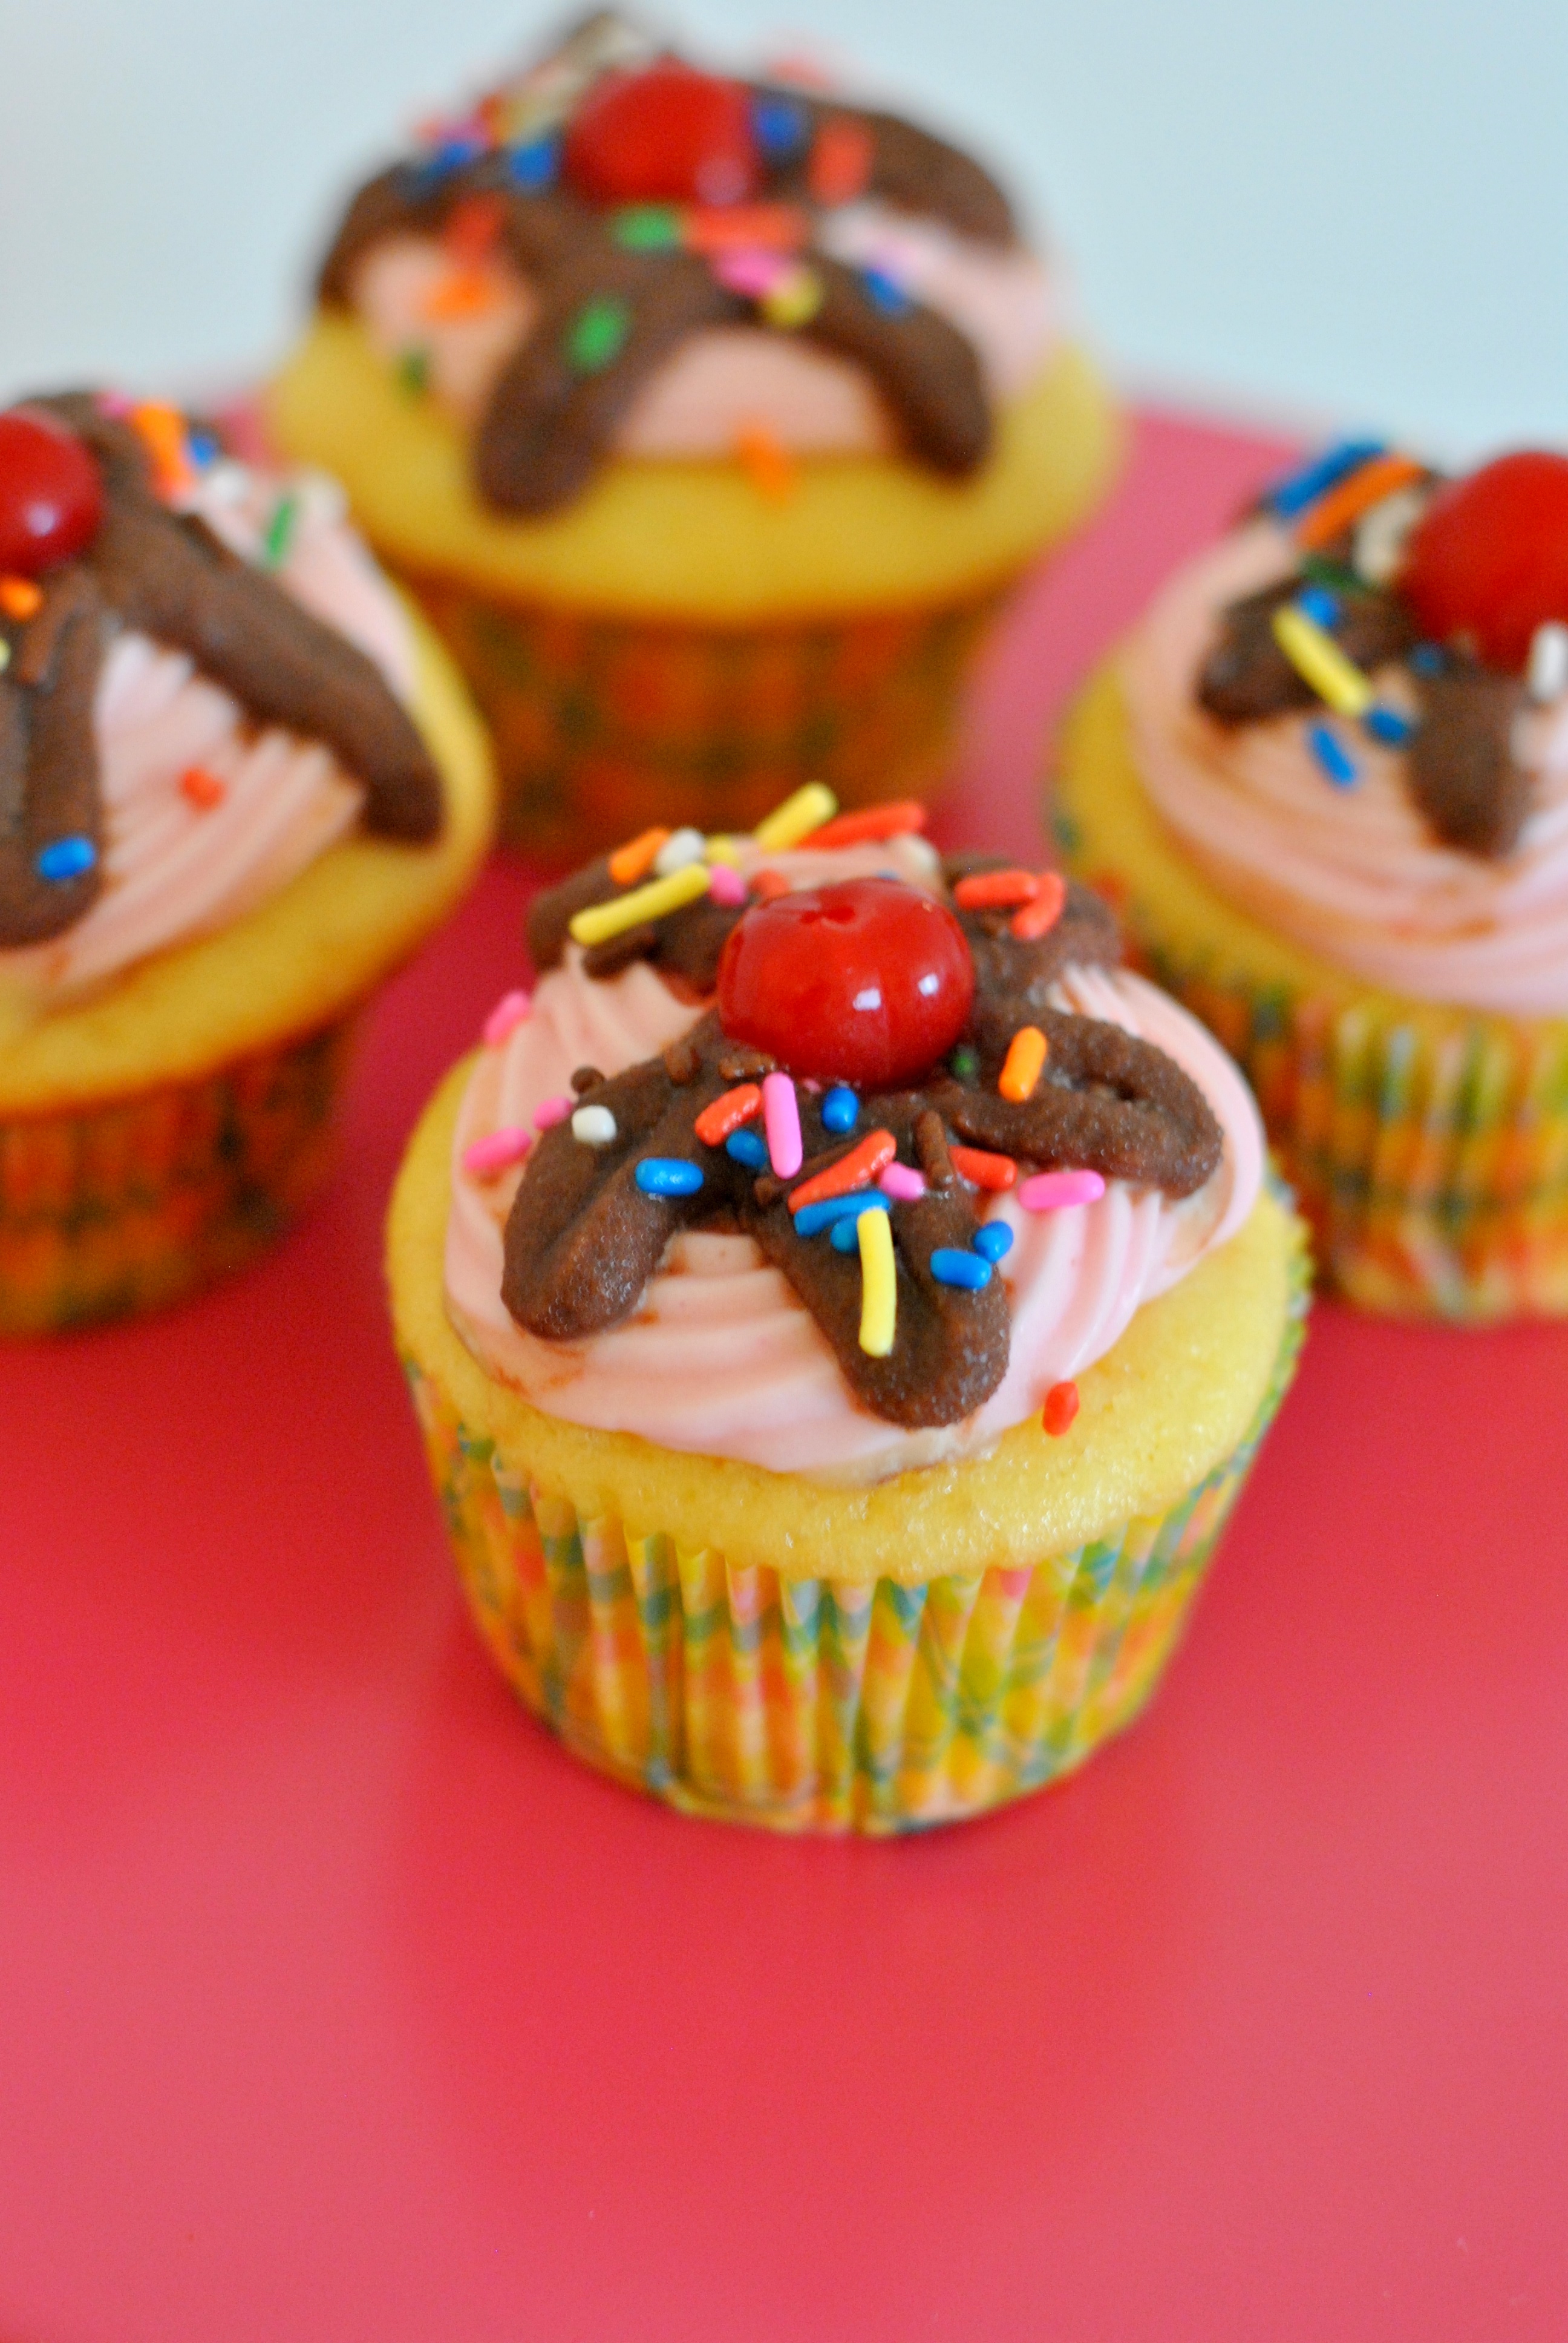
I made these cute little sundae themed cuppy cakes for a besties birthday this weekend. There was really no other reason I chose these except that they are the cutest. I made my usual vanilla cupcakes with my go-to cream cheese frosting (recipe here) but switched out 1/4 cup of the sugar in the frosting for 1/4 cup strawberry Nesquik mix to make a "strawberry ice cream" flavored icing. I then topped with a little ganache (recipe here), sprinkles, and a cherry. If you really want to load them up you could also add some chopped nuts!

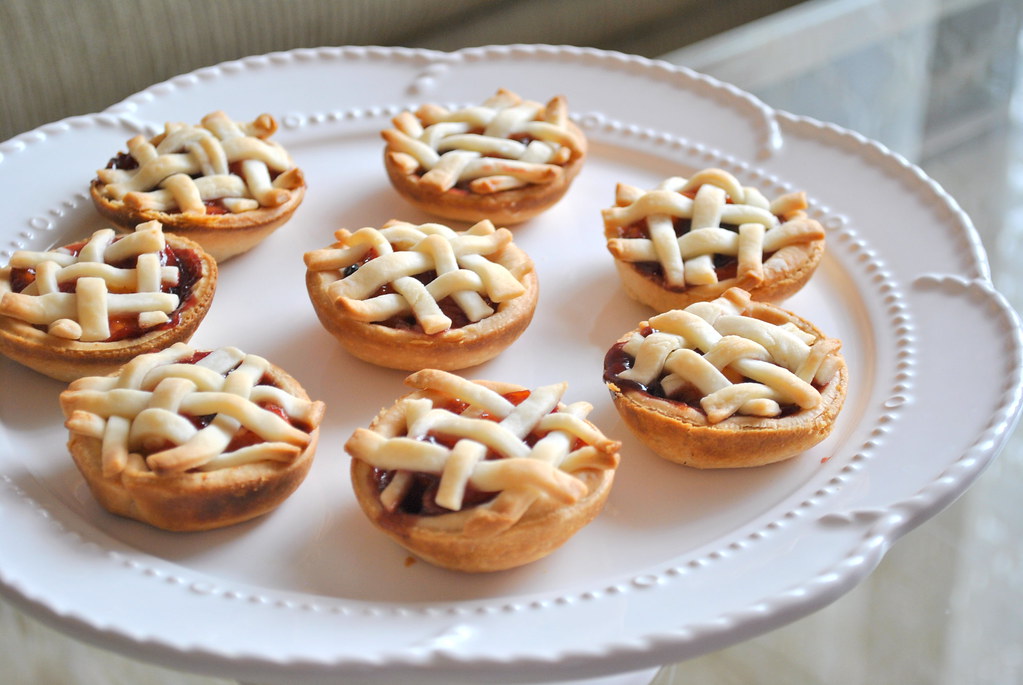
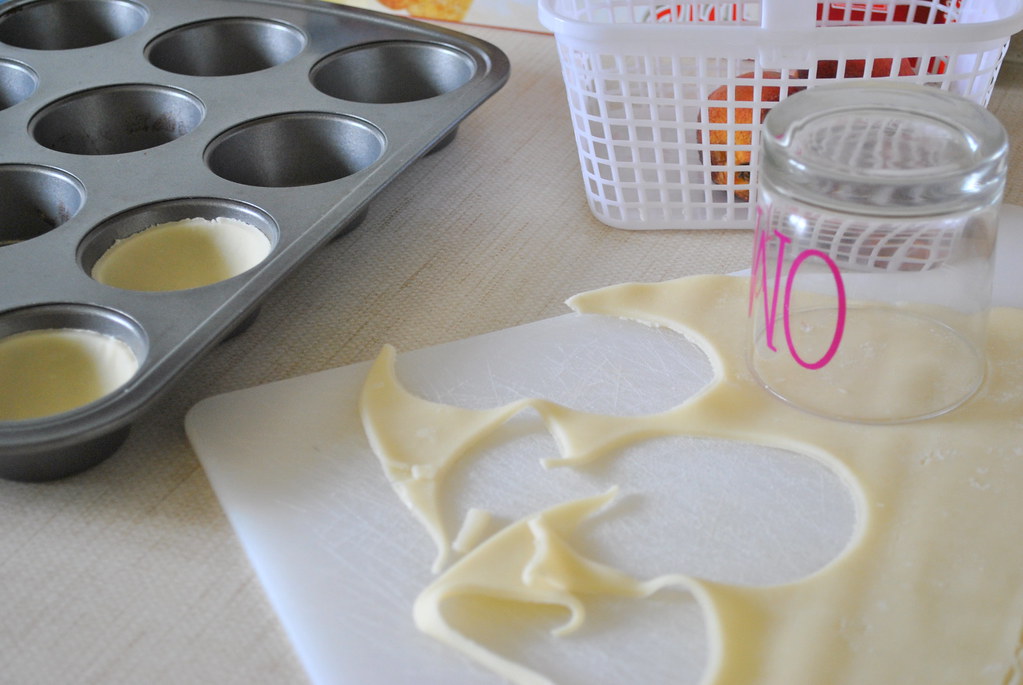
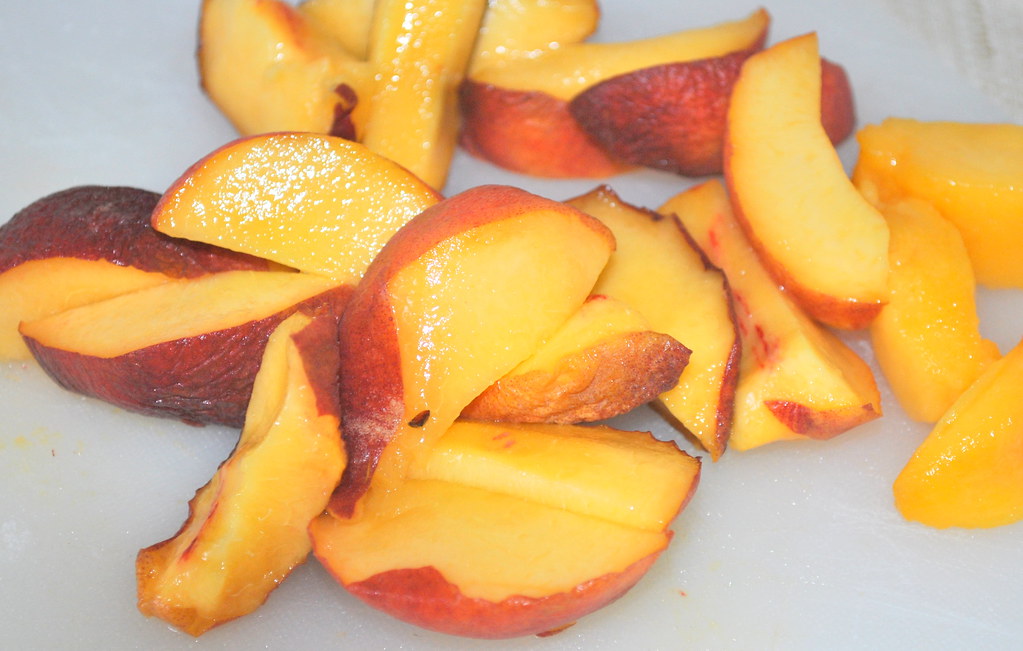
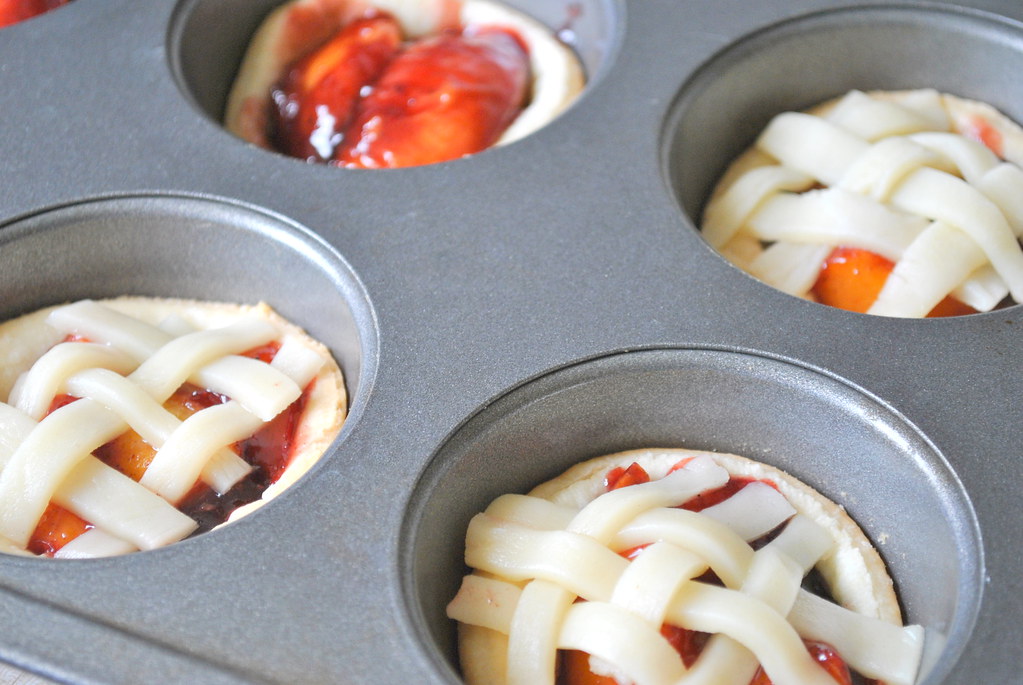
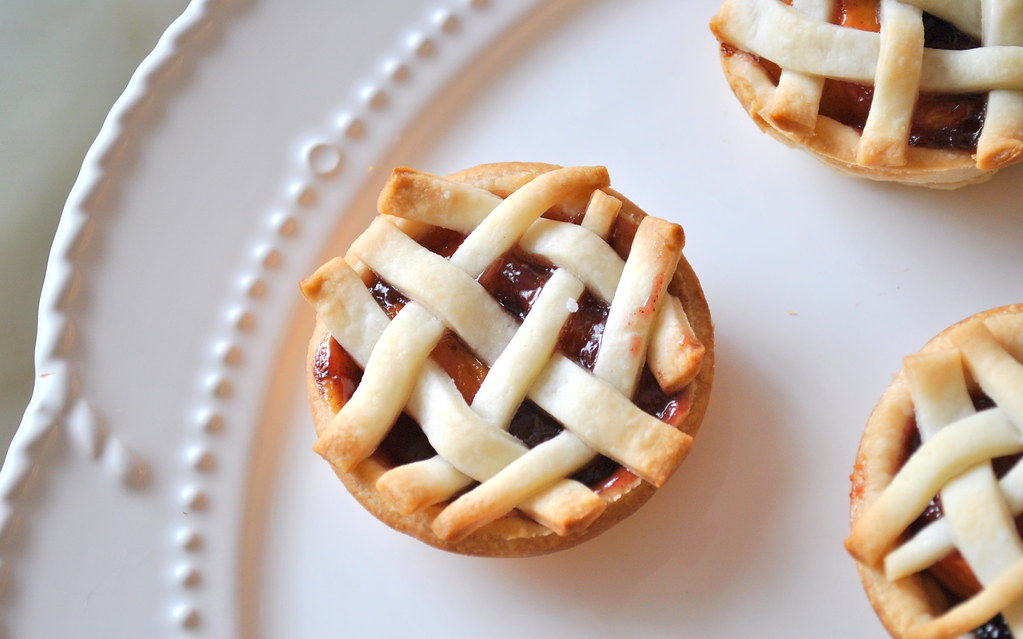
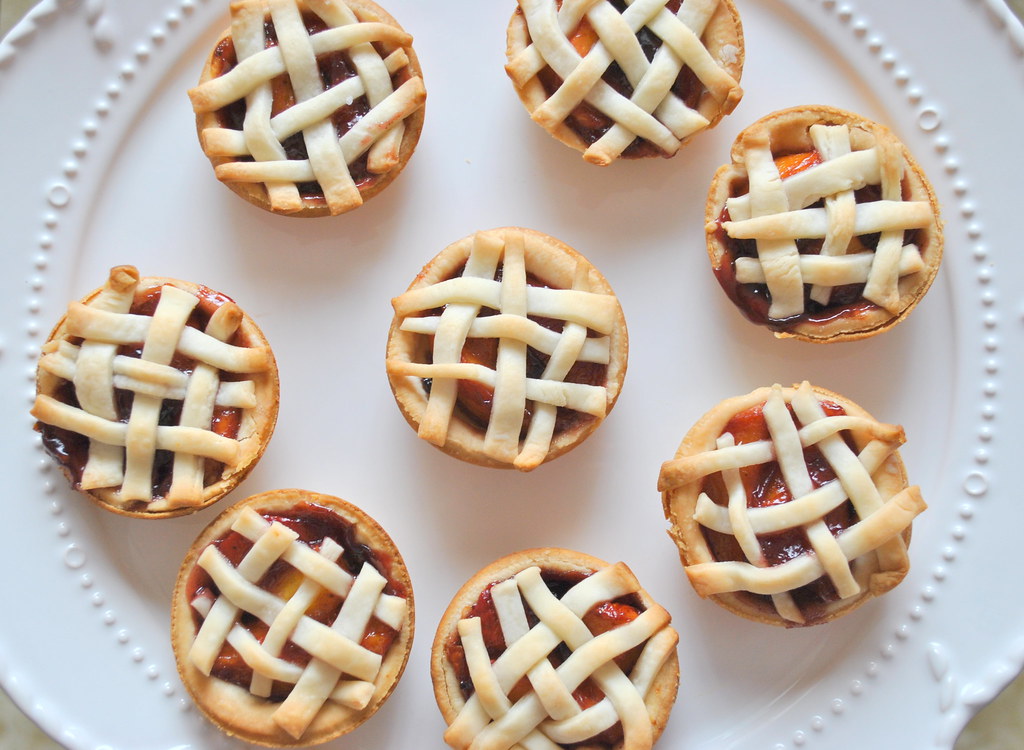
I recently bought a basket of locally grown peaches and had a few left that were starting to look less than fresh but I still didn't want them to go to waste. I decided making tiny pies out of them would be a fun solution! So easy, I promise. Directions below.
Ingredients
1 Package ready made pie crust dough
3 Peaches
1 tablespoon butter
1/4 cup sugar
1 teaspoon cinnamon
2 tablespoons blueberry preserves (good quality)
1 teaspoon lemon juice
Directions
1. Preheat oven to 400 degrees. Cut eight circles from your ready made pie crust with a tumbler glass (find mine here), place in cupcake pan, and bake for 9 minutes. Take out and let cool while you do the rest but don't shut off the oven.
2. Slice up your peaches and cook them in a saucepan on medium heat in the butter, sugar, cinnamon, lemon juice, and blueberry preserves until everything is good and tender/reduced (about ten minutes).
3. Put your pie filling in each little pie cup and cover with lattice dough top (I used a pizza cutter to make the tiny strips).
4. Bake for 9 more minutes or until top is slightly browned.
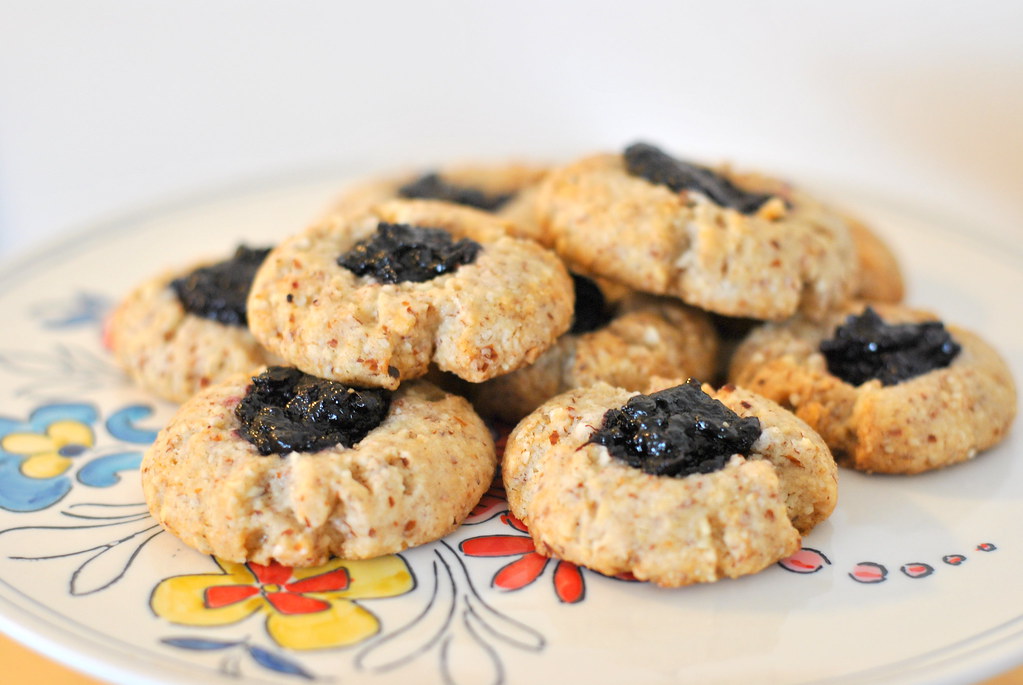
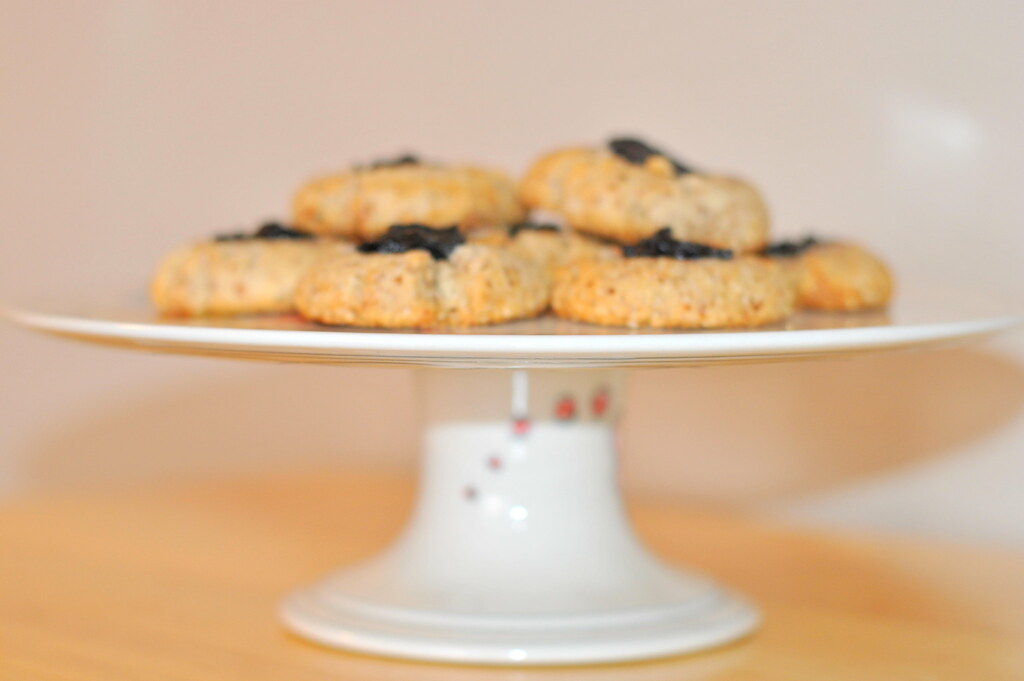
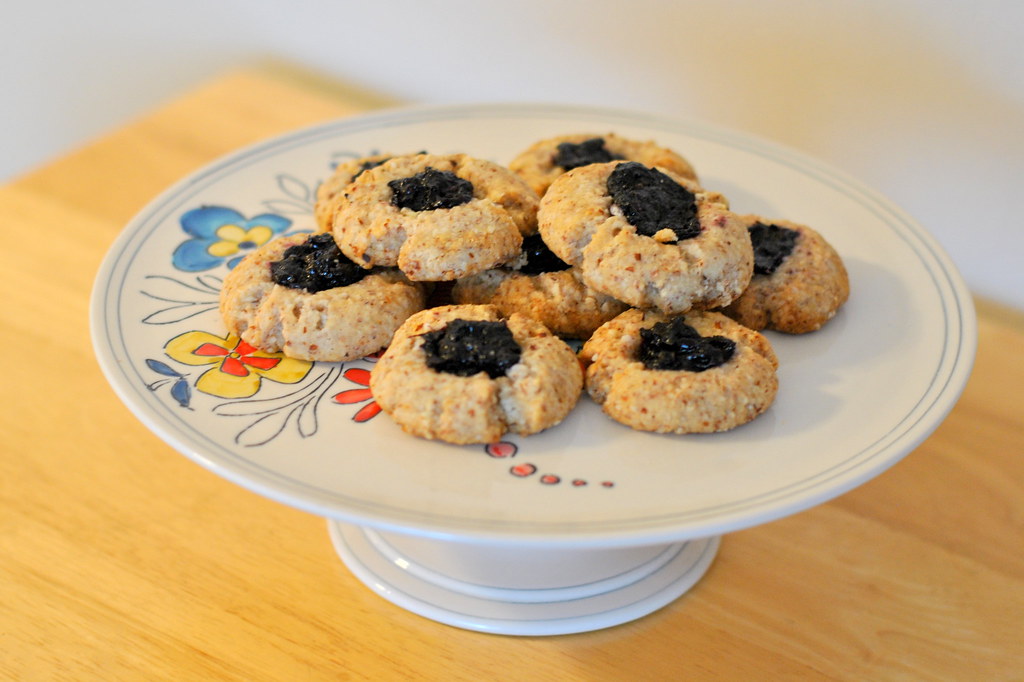
..Sugar, Flour, & Dairy Free Blueberry Thumbprint Cookies
March 4, 2015 • cookies health kick recipe post
While I can't take credit for these babies (recipe can be found here, thanks pinterest), I did fully enjoy these guilt free cookies so I felt I should share. I am constantly looking for ways I can satisfy my craving to bake while also staying on track with my health. As someone with a huge sweet tooth and penchant for creating sweet things it is something I really struggle with when trying to change my diet. While they were obviously not the same as a sugary chocolate chunk cookie, they did satiate my need to have something sweet, and since they are made with almond flour, they were quite filling and packed with protein. They also paired nicely with my nighttime tea.
Subscribe to:
Comments (Atom)

Social Icons